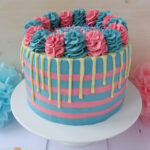
Baby Gender Reveal Cake
Pink and blue striped buttercream with a white chocolate drip - colour the sponge inside pink or blue to surprise your friends and family!
Servings 16
Calories 1190kcal
Ingredients
For the sponge
- 500 g Butter or baking spread
- 500 g Caster sugar
- 9 Eggs Large
- 500 g Self raising flour
- 2 tsp Vanilla extract
- Blue or pink food colouring I use Pro Gel
For the filling
- 340 g Blackcurrant jam (for a boy) OR strawberry/raspberry jam (for a girl)
For the crumb coat buttercream
- 150 g Butter or baking spread
- 300 g Icing sugar
- 1 tsp Vanilla extract
For the blue buttercream
- 250 g Butter or baking spread
- 500 g Icing sugar
- 1 ½ tsp Vanilla extract
- Blue food colouring
For the pink buttercream
- 250 g Butter or baking spread
- 500 g Icing sugar
- 1 ½ tsp Vanilla extract
- Pink food colouring
For the white chocolate drip
- 75 g White chocolate
- ½ tsp Vegetable oil
For decoration
- Blue/pink/white sprinkles optional
Instructions
- Pre-heat your oven to 160C Fan/180C/350F/Gas Mark 4, and grease and line three 8" cake tins that are at least 2" deep
- Make the sponge by mixing the butter and caster sugar in a large bowl until fluffy, ideally using an electric mixer
- Add the eggs and vanilla extract, and whisk until fully incorporated
- Add the self raising flour and whisk in until you can't see any flour anymore
- Add your chosen food colouring and whisk until you get the desired shade
- Divide the mixture between the tins, use scales for accuracy (mine worked out at about 675g of batter per tin)
- Bake them for 35 minutes or until a skewer inserted in the middle comes out clean. Leave them to fully cool either in the tins or remove from the tin and place on cooling racks
- To make the crumb coat buttercream mix the butter and icing sugar together. Once it starts to come together add the vanilla extract and mix until smooth. I use my electric hand whisk to do this but you can also do it by hand with a spoon. If the buttercream is too stiff, you can add some milk to it
- Put about a third of the crumb coat buttercream into a piping bag fitted with a circular nozzle
- If the cakes have domed on top, level them off with a cake leveller or a serrated knife
- Put one of the sponges on a decorating turntable and use the crumb coat buttercream in the piping bag to pie a border of buttercream around the edge of the sponge - this is to stop the jam seeping into the buttercream that you will spread around the sides of the cake
- Fill in the centre of the sponge with half of the jam, then add the next sponge
- Do the same again - pipe a buttercream border and fill the centre with the remaining jam, then add the final sponge
- Use the rest of the crumb coat buttercream to fully crumb coat the cake, then put it in the fridge for 30 minutes to firm up
- Make the pink and blue buttercreams in different bowls. Mix the butter and icing sugar together. Once it starts to come together add the vanilla extract and mix until smooth. I use my electric hand whisk to do this but you can also do it by hand with a spoon. Then add the pink food colouring to one, and blue to the other and mix in well. If the buttercream is too stiff, you can add some milk to it
- Put about two thirds of the pink buttercream into a piping bag fitted with a circular nozzle. Do the same with the blue buttercream
- To create the striped effect, pipe lines of alternating pink and blue buttercream all around the sides of the cake. Use a cake scraper to smooth the sides and create the stripey effect, making sure to wipe off excess buttercream from the scraper as you go
- Once the sides are smoothed to your liking, add more lines of alternating pink and blue buttercream to the top of the cake and smooth it out using a palette knife
- Put the cake in the fridge for 30 minutes to firm up
- Melt the white chocolate in the microwave, start with a 30 second blast, then stir it, then do 10 second blasts, stirring in between until it's melted
- Mix the oil into the melted chocolate
- Put the chocolate into a piping bag and snip a small section off the end
- Pipe blobs around the edge of the cake, allowing the chocolate to drip down the sides in varying amounts
- Use a palette knife to smooth the chocolate around the edge on the top of the cake
- Then put the remaining pink and blue buttercream into piping bags fitted with a Wilton 2D nozzle, or other nozzle of your choice, and pipe alternating rosettes of blue and pink buttercream on top of the cake round the edge
- Fill the centre with pink and blue sprinkles if desired
- Move the cake onto a serving plate or cake stand, and slice for the big reveal! Leftovers will keep in an airtight container in a cool place for 2-3 days
Notes
- Make sure all your ingredients (particularly the butter and eggs) are at room temperature before you start baking.
- I used a baking spread for the cake and unsalted butter for the buttercream.
- For the best results, use good quality professional food colourings. My favourite brands are Pro Gel and Sugarflair. You can buy these easily online. Other well known brands are Colour Mill and Americolor.
- For all the tips and tricks on how to make a drip cake, including a how to video, check out my Ultimate Drip Cake How To Guide!
- Although I provide cup measurements, I highly recommend weighing your ingredients out using digital kitchen scales*. It is the most accurate way to measure ingredients and will ensure the best results. Digital scales are very low cost and can be purchased for around £12 ($16.50) .
- For teaspoon (tsp) and tablespoon (tbsp) measurements, please use measuring spoons* and not the type of spoons you eat with. Again this will ensure accuracy and provide the best results.
Nutrition
Calories: 1190kcal | Carbohydrates: 153g | Protein: 8g | Fat: 63g | Saturated Fat: 39g | Polyunsaturated Fat: 3g | Monounsaturated Fat: 17g | Trans Fat: 2g | Cholesterol: 248mg | Sodium: 562mg | Potassium: 117mg | Fiber: 1g | Sugar: 124g | Vitamin A: 1932IU | Vitamin C: 2mg | Calcium: 51mg | Iron: 1mg