
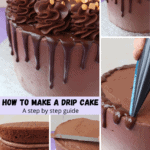
Welcome to The Ultimate Drip Cake How To Guide! Drip cakes are one of the cakes I get asked the most questions about. Because of this, I've created what I believe to be the most thorough guide on how to make and decorate a drip cake. I've covered pretty much everything in this guide. So whether you're making your first drip cake, or you've made a few but you want to try a different technique, the answer to your question should be here! And if it isn't, please let me know in the comments and I will endeavour to find out. You can use the handy menu below to skip to the section you need, or start at the top for the full guide. I've also filmed a tutorial video to go alongside this guide, which you can watch on my YouTube channel.
This post may contain affiliate links. I earn from qualifying purchases.
Menu
What is a drip cake?
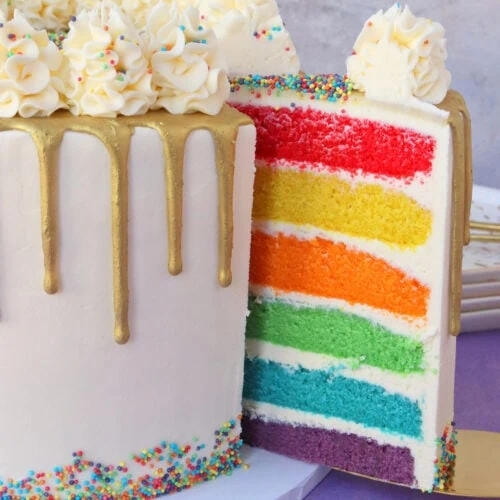
A drip cake is quite simply, any cake that has drips of chocolate (or caramel) dripping down the sides. There's no definitive information on who created the drip decoration, or when it first started, but it began to gain popularity in 2015. Do a quick search on Pinterest or Instagram and you'll soon see the wide variety of drip cakes that are being created by bakers all over the world. One thing's for certain - the drip cake craze is not showing signs of dying down any time soon!
Essential equipment
When you're making a showstopping cake like a drip cake, there are some pieces of essential equipment that you will need in order to get that professional finish. As well as basic items like cake tins and piping bags, you'll also find that a decorating turntable and buttercream scraper make a huge difference to the final look of your drip cake. I've listed and linked below my preferred and recommended items to get you all kitted up and ready to bake!
- 8" cake tins
- Mixing bowls
- Kitchen scales
- Silicone spatulas
- Cooling rack
- Electric hand mixer
- Round cake tin liners
- Cake tester
- Angled palette knife
- Decorating turntable
- Buttercream scraper/smoother
- Cake leveller
- Piping bags
- Wilton 789 tip
- Ateco 829 piping nozzle
- Round piping nozzle
- Measuring spoons
- Cake lifter
- Gripper mat
- Large tupperware box
- Cake boards
- Large cardboard cake box
- Paint brushes
- Squeezy bottle
NB. The items above are all affiliate links. I will receive a small amount if you make a purchase, this does not increase the price for you at all. Thank you for supporting The Baking Explorer!
You can also buy cake decorating items from:
The foundation of a drip cake
There's quite a lot to do before you get to the drip part of a drip cake. It all starts with cake, and I like to make my drip cakes with at least three layers of cake. This is because a taller cake adds more drama to the drip effect, and makes it look extra impressive. A nice smooth coating of buttercream is also essential for the drip to have an even surface to fall down. If you'd like the cake or buttercream recipes I've used here, head to The Recipes section.
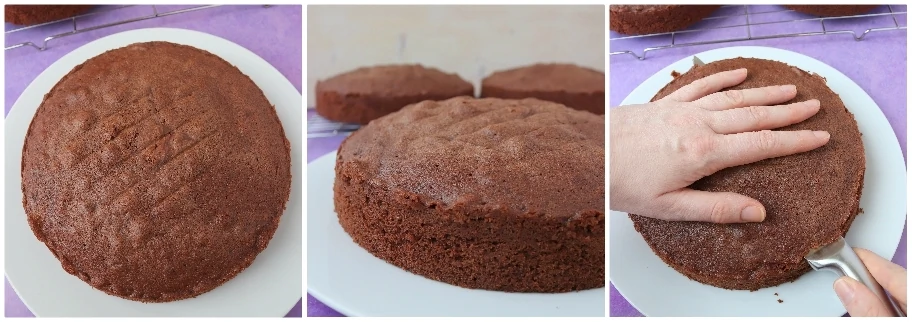
When your cake is ready, you may notice that the top of each sponge is 'domed'. The first thing you need to do is level the cake off so it has a nice flat top. You can use a cake leveller, or a knife to do this. I prefer to use a nice sharp knife, but please watch your fingers when doing this! Place your hand on top of the sponge and work the knife around the edge of the cake, turning the cake as you cut. When you've cut all around the edge, cut through the middle.
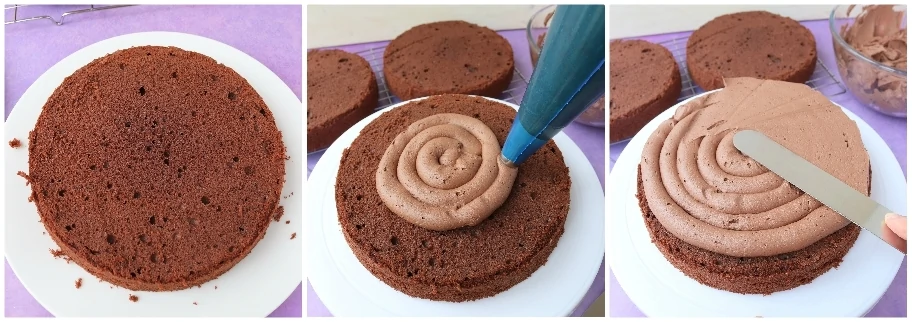
Once you've got nice flat cake, you can start filling and stacking them onto a cake board. Place the cake board onto a decorating turntable. Some decorating turntables have silicone grip on them, but if yours doesn't I recommend placing a silicone mat or a piece of non slip gripper mat between the turntable and the cake board. This will stop your cake from sliding around. Add a small blob of buttercream to your cake board to 'glue' the cake to it and avoid it slipping. I usually pipe the buttercream between the layers using a round nozzle in a piping bag so that it creates an even layer of buttercream. This looks nice when you cut a slice, and it also helps to keep the cake level.
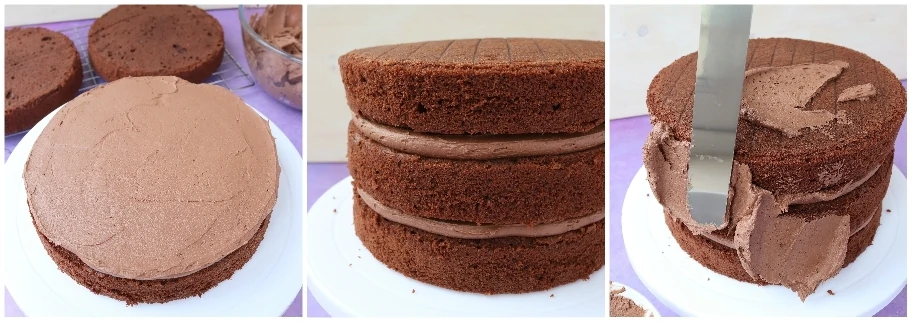
Using a palette knife, smooth the buttercream out, then do the same for the next layer. When adding the final sponge, flip it over so the bottom becomes the top. Even though you've cut the top to make it level, the bottom is even more flat so this ensures that the cake has a nice flat top. Then you can start crumb coating the cake with buttercream.

The crumb coat seals the sponge with a thin layer of buttercream so that crumbs from the cake sponge don't mix with the final buttercream layer and create a messy or uneven finish. Smooth a thin layer all over the cake using an angled palette knife, don't worry too much about neatness, just cover up the cake. Chill the cake for 30 minutes. For the second and final layer of buttercream use a piping bag fitted with a Wilton 798 nozzle to cover the cake in a rough layer of thick buttercream. Or you can spread it on with a palette knife.
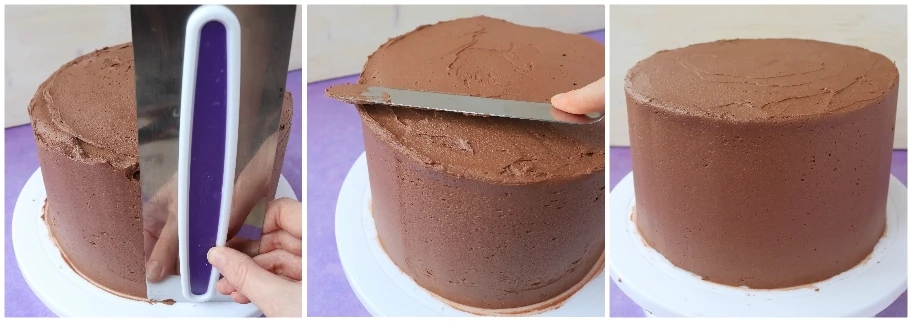
Using a scraper or icing smoother, smooth the buttercream around the sides of the cake, use the turntable to help you and stop often to wipe excess buttercream off the smoothing tool. For the top of the cake, an angled spatula, or a smoothing tool, can be used to smooth out the buttercream. If you get any holes or dents, fill with extra buttercream and smooth out again until you're happy. Then chill the cake in the fridge for 30 minutes before adding the drip.
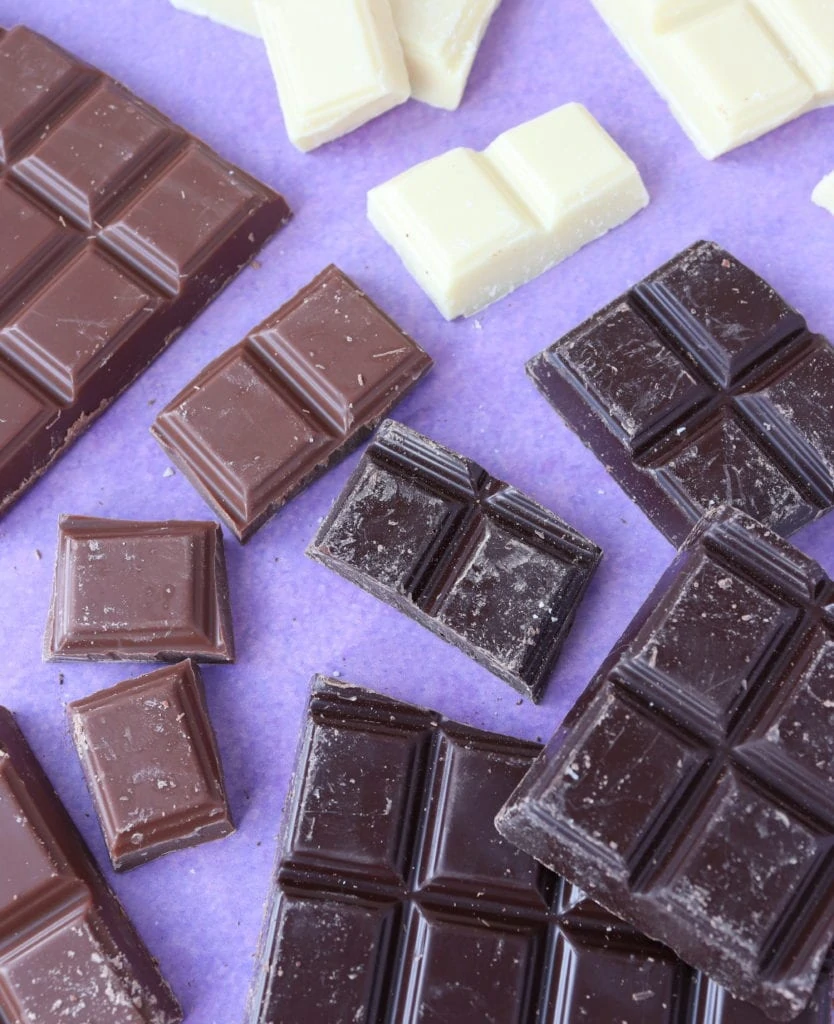
What chocolate to use
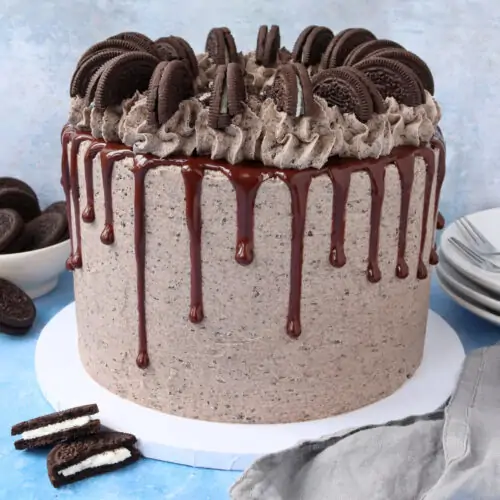
The most common type of drip is a dark chocolate drip, so I'd recommend using dark chocolate for your first few forays into the drip cake world. White chocolate is also popular, while milk chocolate trails behind and is rarely used from what I've seen. The extra milk in both white and milk chocolate make them harder to work with, but not impossible. If you want to get technical, the best type of chocolate to use has between 50-60% cocoa.
You can use candy melts for a coloured drip, but I would advise against it as they just don't taste as good as chocolate, plus they set hard which can make cutting the cake difficult. Head to the Coloured Drips section for more information.
How to make a chocolate drip
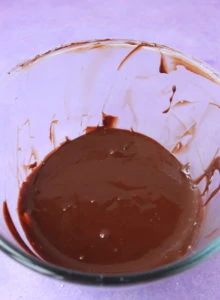
For a standard dark chocolate drip, you can use a ganache using equal amounts of double cream (a 48% fat cream) and dark chocolate. I use 65g of each for a 8" round cake, which is enough to do the drips and cover the top of the cake. It's easy to make in the microwave. Heat for 20 seconds, stir, then heat for 10 seconds and stir. Keep heating for 10 seconds and stopping to stir until it's melted. Let it sit for 5 minutes, to cool and thicken, before applying to the cake.
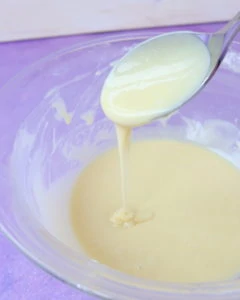
There is also a cheat's chocolate drip, which I use often and it's featured in a lot of my drip cake recipes. It's really handy if you can't get hold of double cream, or if you don't want to open a whole pot of cream. For this I melt the chocolate (either white or dark) in the microwave using the same timings as above, then I stir in vegetable oil. The only downside of this is that it doesn't stay as shiny as a cream based drip when it sets. See The Recipes section for measurements.
For a white chocolate drip, which can be coloured or painted gold, I use 140g white chocolate and 50g double cream, and heat in the microwave using the same timings as the dark chocolate ganache. The white chocolate ganache always takes longer to melt, but be patient as overheating it will ruin it. As white chocolate has a yellowish tinge to it, so there are a few products you can add to it to make it white. Add ⅛ tsp Superwhite powder before starting the melting process, or after its melted you can add Wilton White White. Again, let it sit for 5 minutes, to cool and thicken, before applying to the cake.
If you're concerned about the consistency of either ganache, you can test the drip out first, either drip it down the side of a bowl and see how far it runs. Or use an upside down chilled pint glass.
How to drip
There a few different ways to add the chocolate drip to your cake. You can use a piping bag, a squeezy bottle, or a spoon. My preferred method is a piping bag, however I do want to move to the squeezy bottle method soon as it's more environmentally friendly because the bottle can be washed and re-used.

Put the ganache into a piping bag and snip of the end using scissors. You only want to snip off a small amount, around 7mm. Position the piping bag on the top of the cake, close to the edge. Squeeze out some of the ganache so that it falls down the side of the cake. Do 3 or 4 drips, squeezing out varying amounts of ganache but don't squeeze too much. Stop dripping and let the drips you've done trickle down and see how far they go. Use this as a guide to decide how much ganache to squeeze out, then carry on around the whole cake, squeezing varying amounts as you go so the drips are different. Then use a palette knife to smooth the blobs of ganache on top of the cake down. If you want to cover the top of the cake with ganache, pipe a generous drizzle over the top.
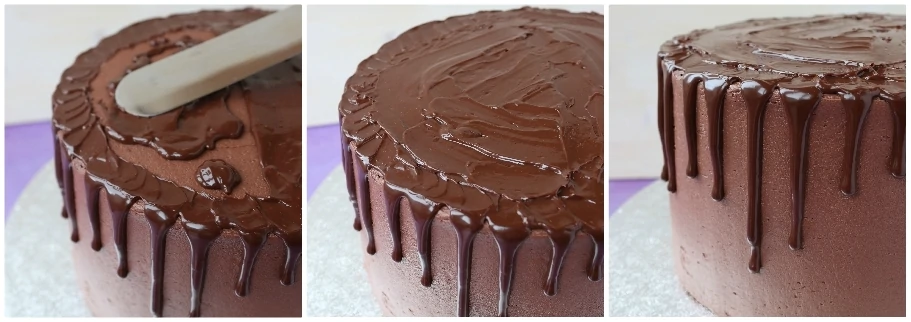
Again, use a palette knife to smooth the ganache all over the top of the cake. The quicker you do this, the smoother the finish will be. (I was a bit slow as I was taking photos so mine looks uneven, but you will get a smooth finish if you do it straight away!) Either way, you'll probably be covering the top with buttercream or other decorations, so don't worry if yours is uneven too. The drip is now complete! Pop the cake in the fridge for 30 minutes to firm up the chocolate ganache drip.
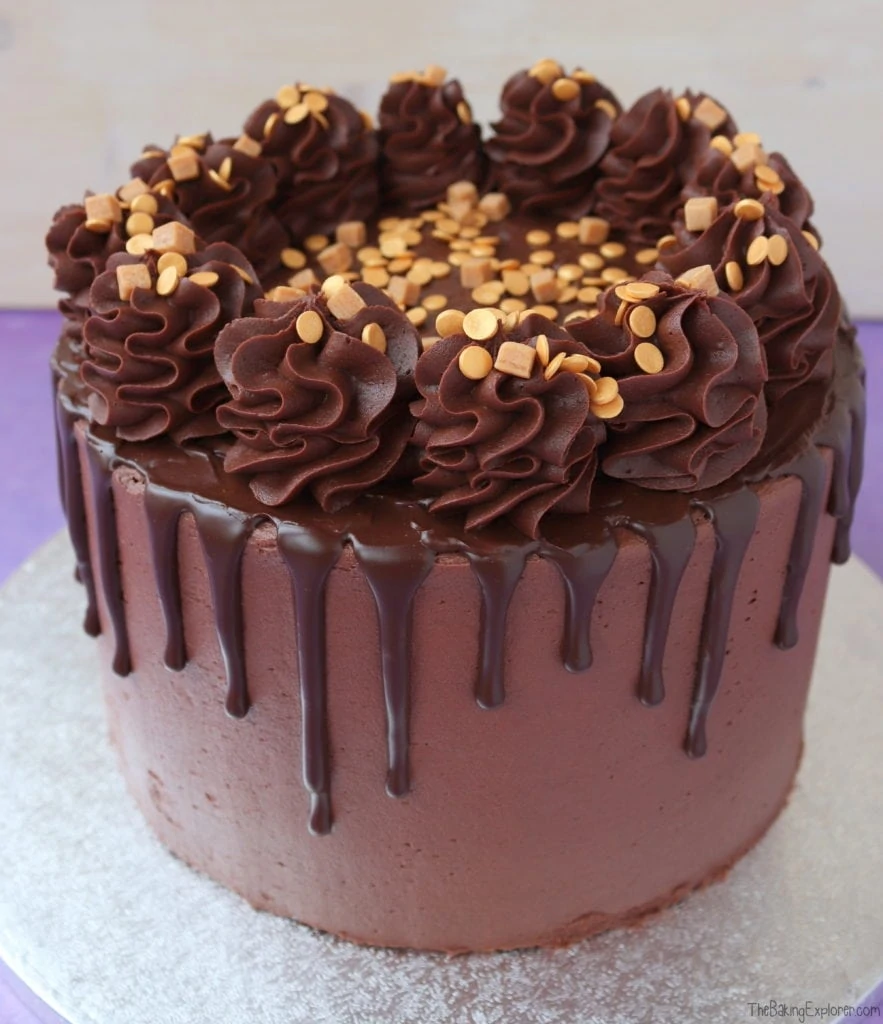
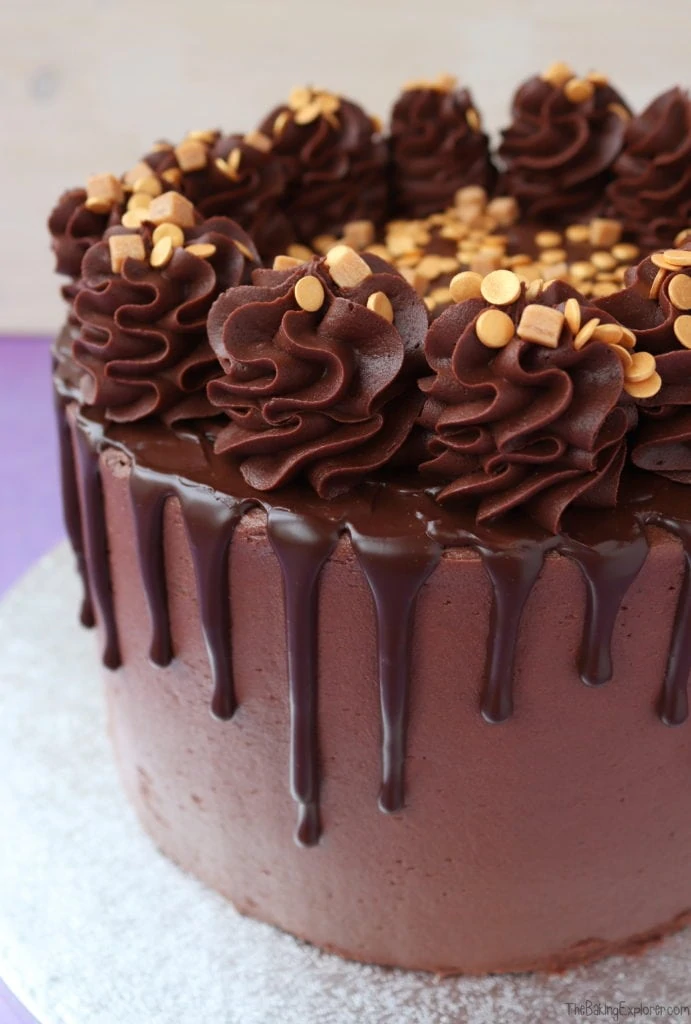
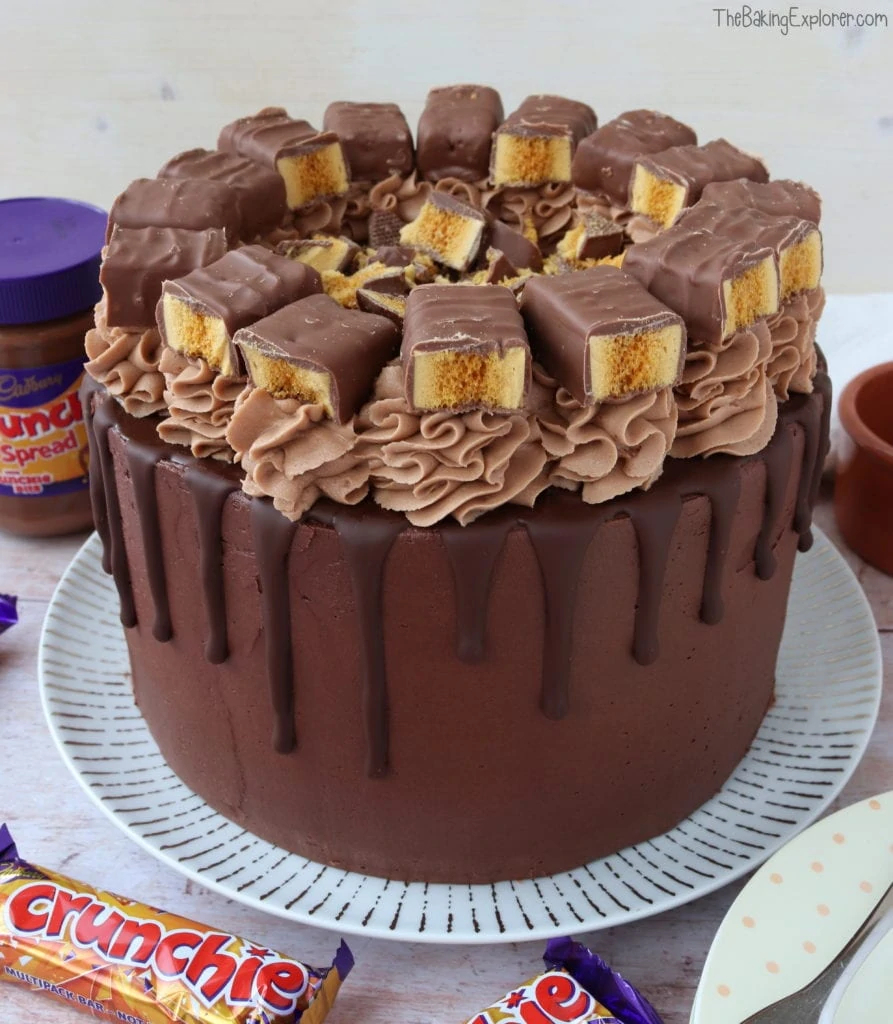
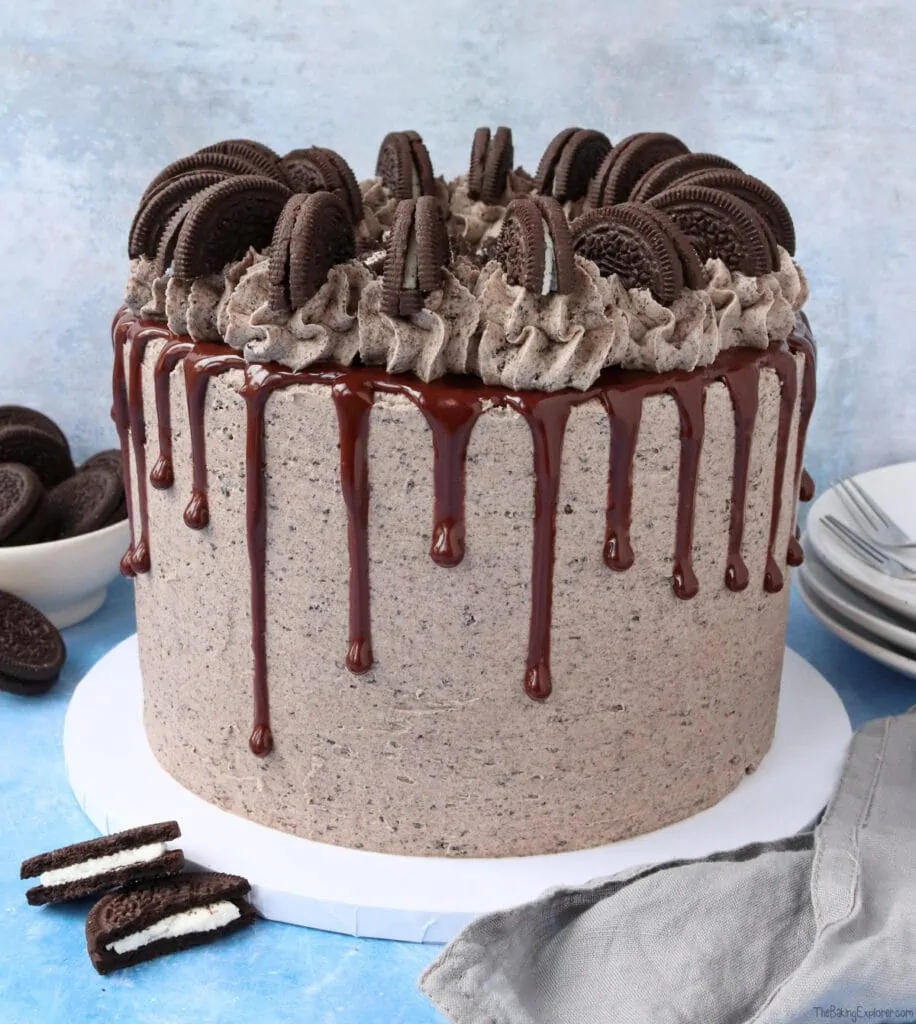
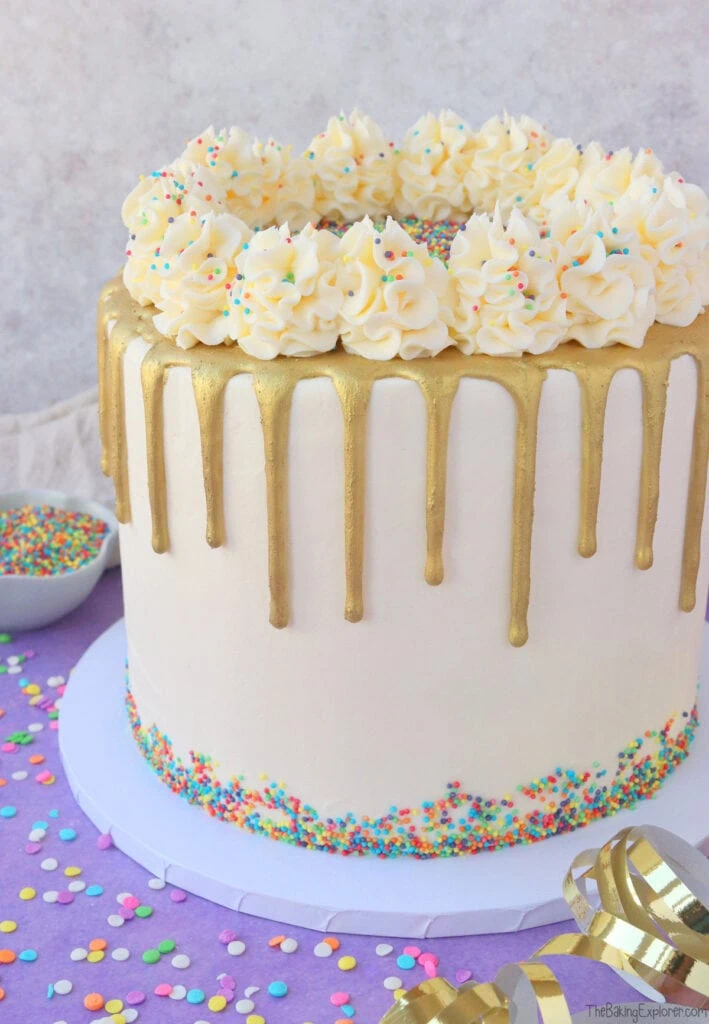
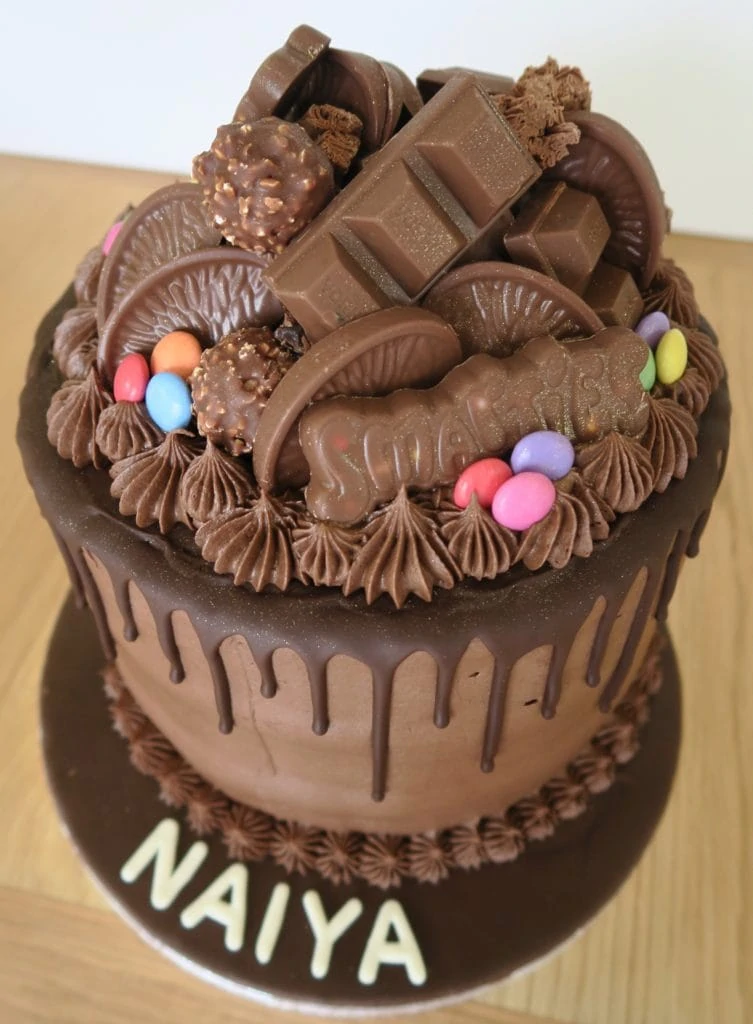
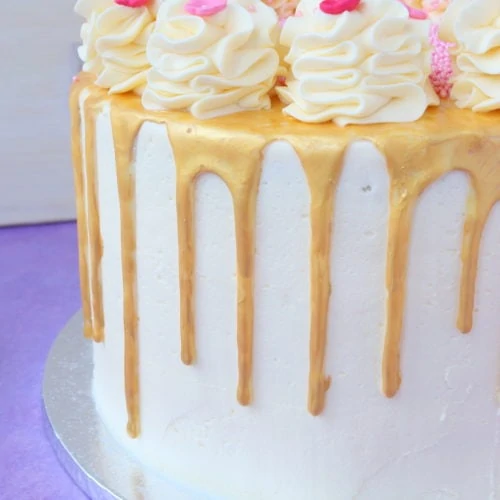
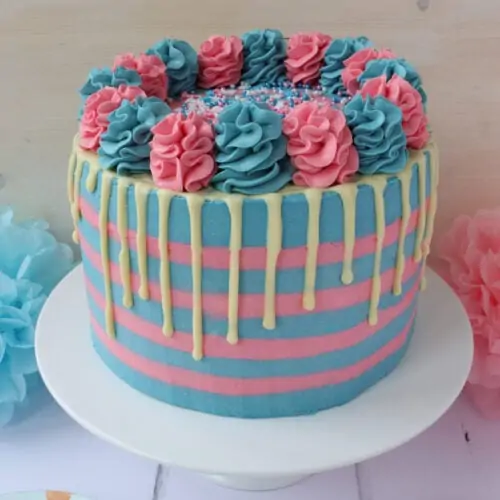
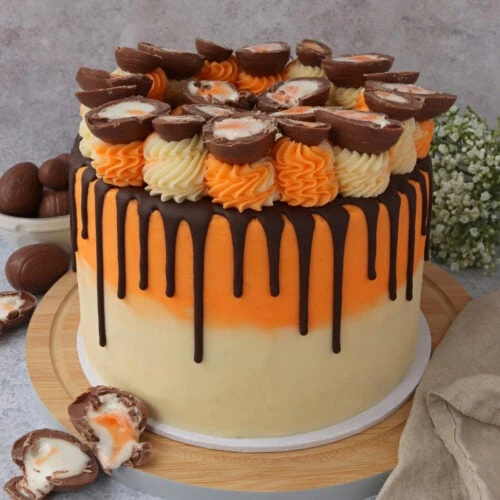
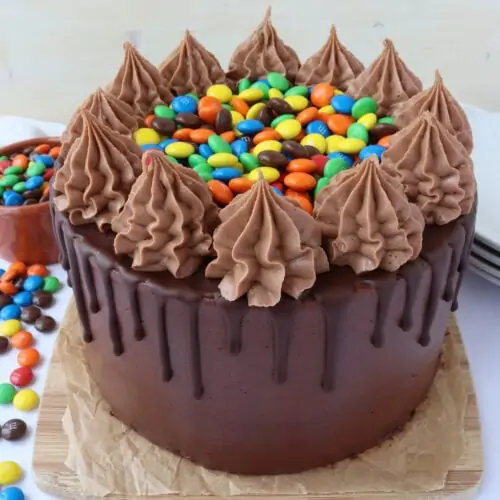
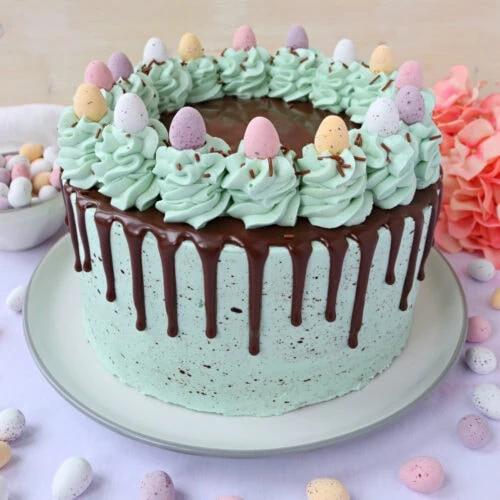
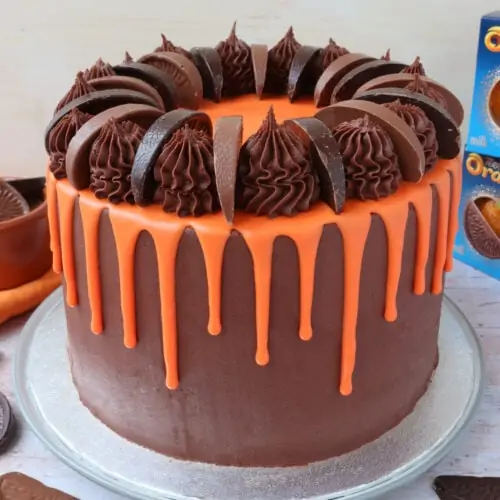
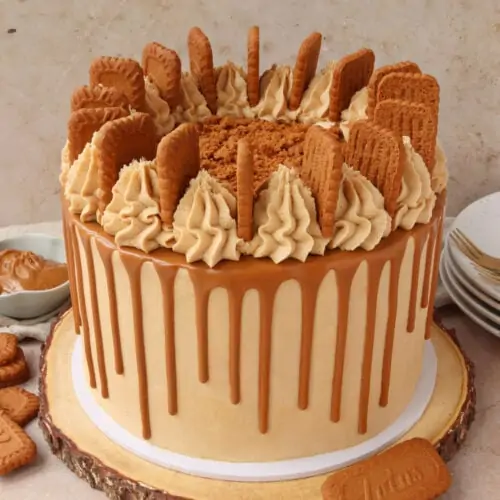
You can now decorate the cake however you like. I like to pipe buttercream rosettes around the top edge of the cake, then I add sprinkles all over. This is where you can get creative and personalise the drip cake! Add your favourite sweets, chocolate bars, birthday candles, macarons, meringue kisses... the possibilities are endless!
Coloured drips
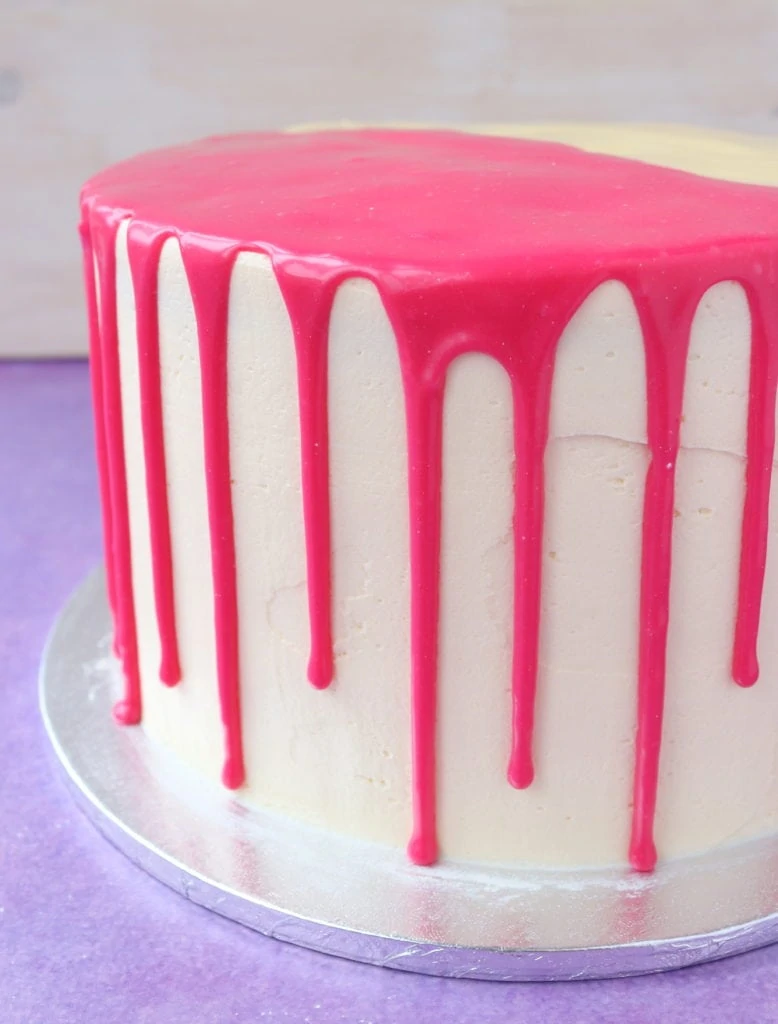
For a coloured drip, all you need to do is make a white chocolate ganache, then add your chosen food colouring. The best food colouring to use is gel colour, brands such as Pro Gel and Americolor work well. You can also use powder colouring, although I have found this is harder to get hold of and more expensive.
Gold drips
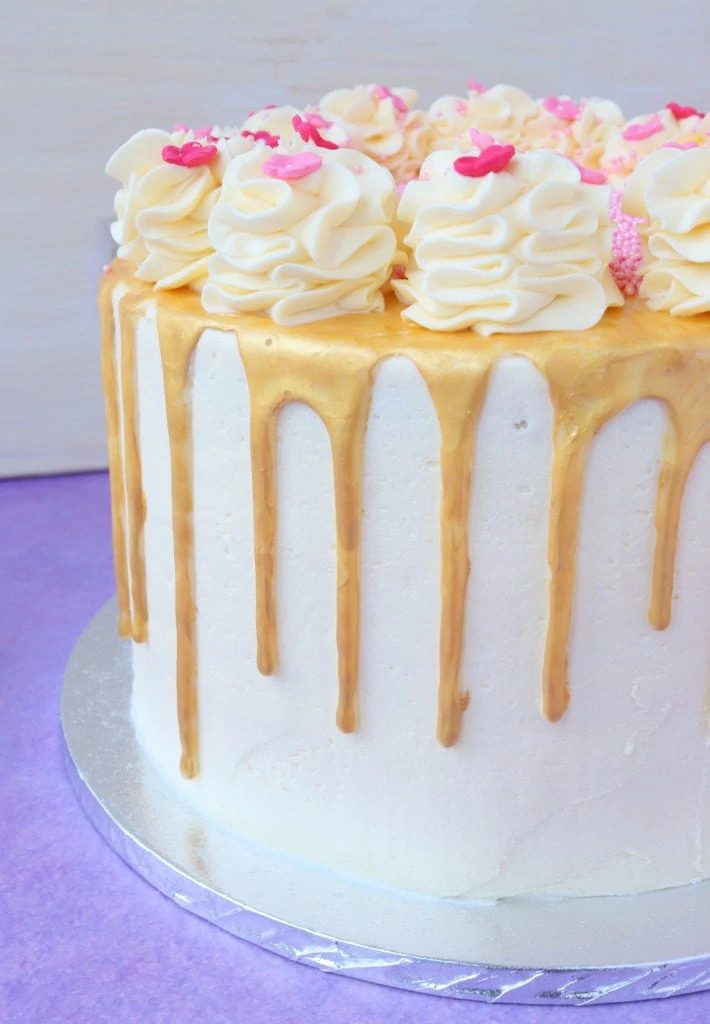
One of the most impressive drip cake trends is a gold drip, rose gold drip, or a silver drip. To do this you need to make a white chocolate ganache, and apply it to the cake in the same way as the dark chocolate ganache. Then chill the cake until the drip is set and feels firm to the touch. You then need the following equipment and ingredients:
- Small clean paint brush (a larger one is also useful to make painting the top of the cake a faster process)
- Edible paint, or luster dust in your chosen colour
- Vodka or alcohol based flavour extract (only needed if using luster dust)

If you have edible paint, you can paint this straight onto the white chocolate drip to make it gold. If you're using luster dust, tip some of it out into a small bowl and add a very small amount of the vodka to create a paint. Paint it onto the white chocolate drip, and the vodka will evaporate as the paint dries. Be aware that painting a gold drip is quite time consuming, especially if you want a very neat finish.
Other drips
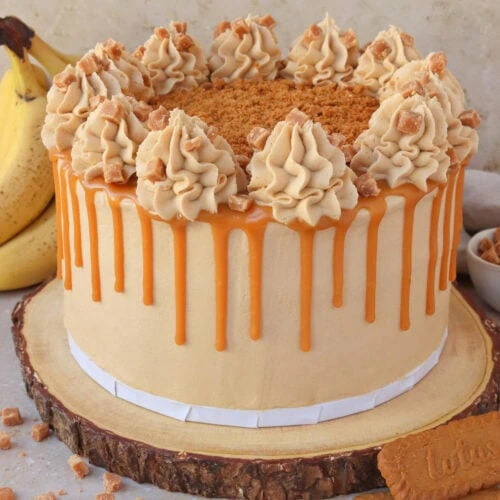
The most popular type of drip after chocolate has got to be caramel. To do this you can either use a homemade or a shop bought caramel sauce. I prefer to use Carnation caramel as it's convenient, purse friendly and delicious. You can easily add salt to make it salted caramel too. I warm the caramel for 20 seconds in the microwave, then apply it to the cake the same way as the chocolate ganaches. Caramel can be more runny, so I recommend testing out the drips first on the side of a bowl or an upside down glass. Then you can work out how much to squeeze out for each drip.
Is there anything else you can drip down the sides of a cake? Well, I've done it with jam, icing (the classic water and icing sugar mixture), and warmed up Biscoff spread. Any kind of chocolate spread should work, like Nutella for example. If you're willing to experiment then I'm sure there are more options too!
Tiered and square cakes
The principle in exactly the same for a square cake, so you don't need to do anything differently. For a tiered cake, apply the drip to the bottom cake first and fill in the top of the bottom cake too as this will help to stick the top cake to it. Then add the top tier, then do the drip on the top cake. The amounts of ganache you need will vary depending on the size of the cakes, but I would always recommend doing more than you think you need as it's better to have too much than too little. Don't forget to properly stack the cake using dowels and cake boards so it doesn't collapse.
Storage and transportation
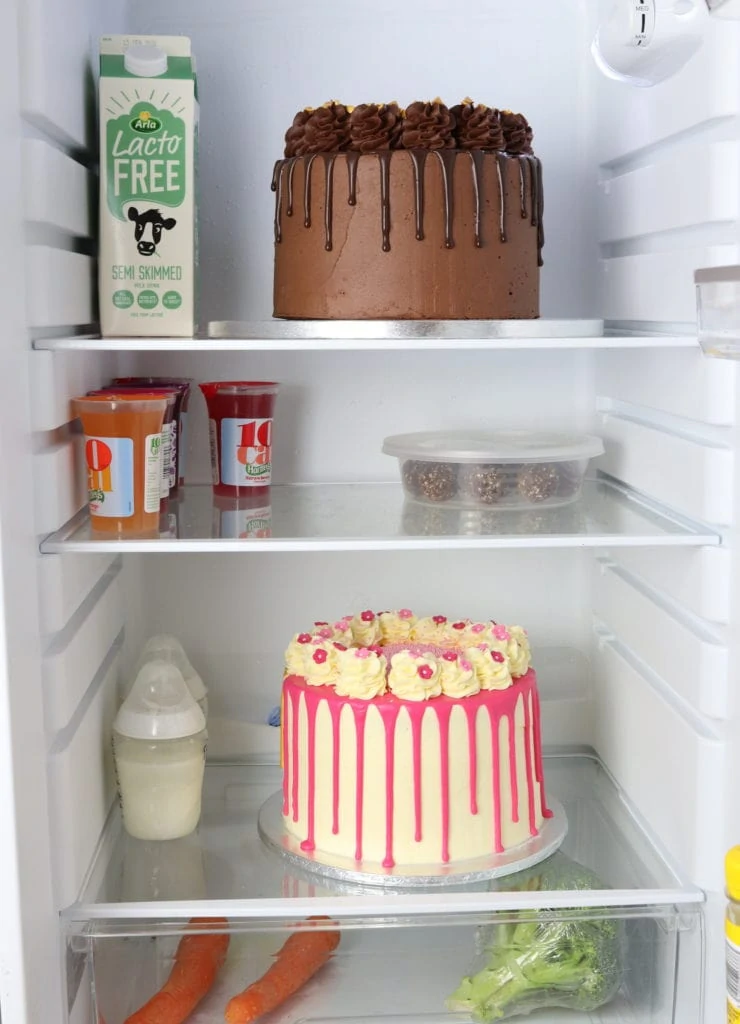
Before you start making a drip cake, you need to clear out some room in your fridge. Based on my recipe, my drip cakes are around 6.5" tall. Then you have to also take into account the height of your turntable and your plate or cake board. So you may need to move some shelves around! Fridge space is critical for chilling the cake between buttercream layers and also for storing the cake if it's summer time or you live in a warm place. Don't worry - the cake won't dry out. The layers of buttercream seal and protect the sponge, I've never had a problem with my drip cakes being dry even after a couple of days in the fridge. If this is something you're really worried about, you can add a sugar syrup to the sponge before assembling the cake. In cooler weather, you can safely store the drip cake in an airtight container or a cake box in a cool place.
You can freeze the drip cake fully assembled (althought I wouldn't recommend freezing sprinkles or any chocolate decorations). To do this and avoid damage to the decoration, freeze it either in an airtight container. Or let it freeze solid on a cake board or plate, then wrap in cling film. Remove the cling film when you take it out to defrost it, if you don't it could damage the decoration as it defrosts and softens.
You can also freeze the cake and buttercream separately. Once the cake sponges are fully cool, wrap them well with cling film or put them in an airtight container with some baking paper between them, then freeze. You can freeze the buttercream on it's own in a tub, or refridgerate it and it will last as long as the best before date on the butter you used. You can also freeze slices of the cake, again well wrapped in cling film or in airtight containers.
I purchased a large tupperware container in order to transport my drip cakes - I only share them with family and friends so I know I'll get the tub back. However, if you're making the drip cake for a customer, or another reason where you don't want to use your own container, you can buy cardboard boxes to transport them instead. Head to the Essential equipment section for links to my recommended products.
Hopefully it goes without saying, but when transporting a drip cake it needs to stay level. This is so it doesn't slip which can cause the sides to hit the box or container and get squished - buttercream is very delicate stuff. For example, the back seat of a car is not a good idea as they are angled. I'd recommend the foot well in a car - drive carefully round corners and over speed bumps, and make sure you don't turn the heat on!
Tutorial Video
I filmed a tutorial while I was making and decorating the chocolate and vanilla cakes featured in this post. So you can see exactly what I did, I hope you find it helpful! Please give it a like and comment on YouTube if you found it useful.
Subscribe to my YouTube channel for more tutorial videos like this!
The Recipes
Here are the recipes for the chocolate drip cake and vanilla drip cake I made for this guide and the tutorial video.

Chocolate Drip Cake
Ingredients
For the sponge
- 500 g Butter or baking spread unsalted, softened
- 500 g Caster sugar
- 9 Eggs large
- 425 g Self raising flour
- 75 g Cocoa powder
- ⅛ tsp Baking powder
- 2 tbsp Milk
For the chocolate ganache
- 65 g Dark chocolate
- 65 g Double cream
OR for cheat's chocolate drip
- 75 g Dark chocolate
- 1 tsp Vegetable oil
For the buttercream
- 600 g Butter unsalted, softened
- 1.05 kg Icing sugar (1050 grams)
- 150 g Cocoa powder
- 3-4 tbsp Milk
For decoration
- Sprinkles, sweets and chocolates of you choice
Instructions
- Pre-heat your oven to 160C Fan/180C/350F/Gas Mark 4, and grease and line three 8" cake tins (that are at least 2" deep)
- Make the sponge by mixing the butter and caster sugar in a large bowl with an electric mixer until fluffy (about 2 minutes)
- Add the eggs and milk, and whisk until fully incorporated
- Add the self raising flour, cocoa powder and baking powder and whisk in just until you can't see any flour anymore
- Divide the mixture between the tins, use scales for accuracy
- Bake them for 35-40 minutes or until a skewer inserted in the middle comes out clean. Leave them to fully cool either in the tins or remove from the tin and place on cooling racks
- To make the chocolate buttercream mix the butter, cocoa powder and icing sugar together. Once it starts to come together add the milk and mix until smooth. Use an electric mixer for the best results. You can add more milk if the buttercream is too stiff
- To make the dark chocolate ganache, put the ingredients into a bowl and microwave for 20 seconds, then stir. Continue microwaving in 10 second blasts, stirring between each blast, until melted and smooth
- OR To make the cheat's dark chocolate drip, melt the dark chocolate in the microwave for 30 seconds, then stir. Continue microwaving in 10 second blasts, stirring between each blast, until melted and smooth. Stir in the vegetable oil
- See the rest of the post for decorating instructions. Store in the fridge and in an airtight container once cut
Video
Nutrition
Vanilla Drip Cake
Ingredients
For the sponge
- 500 g Butter or baking spread unsalted, softened
- 500 g Caster sugar
- 9 Eggs large
- 500 g Self raising flour
- 2 tsp Vanilla extract
For the buttercream
- 600 g Butter unsalted, softened
- 1.2 kg Icing sugar (1200 grams)
- 3 tsp Vanilla extract
- 3-4 tbsp Milk
For the white chocolate ganache
- 140 g White chocolate
- 55 g Double cream
- ⅛ tsp Superwhite powder optional
OR for cheat's white chocolate drip
- 75 g White chocolate
- ½ tsp Vegetable oil
For decoration
- Food colouring if you want a coloured drip
- Luster dust and vodka or edible paint If you want a metallic (e.g. gold) drip
- Sprinkles, sweets and chocolates of you choice
Instructions
- Pre-heat your oven to 160C Fan/180C/350F/Gas Mark 4, and grease and line three 8" cake tins (that are at least 2" deep)
- Make the sponge by mixing the butter and caster sugar in a large bowl with an electric mixer until fluffy
- Add the eggs and vanilla extract, and whisk until fully incorporated
- Add the self raising flour and whisk in until you can't see any flour anymore
- Divide the mixture between the tins, use scales for accuracy
- Bake them for 35-40 minutes or until a skewer inserted in the middle comes out clean. Leave them to fully cool either in the tins or remove from the tin and place on cooling racks
- To make the vanilla buttercream mix the butter and icing sugar together. Once it starts to come together add the vanilla extract and mix until smooth. I use my electric hand whisk to do this but you can also do it by hand with a spoon
- To make the white chocolate ganache, put the ingredients into a bowl and microwave for 20 seconds, then stir. Continue microwaving in 10 second blasts, stirring between each blast, until melted and smooth
- OR To make the cheat's white chocolate drip, melt the white chocolate in the microwave for 30 seconds, then stir. Continue microwaving in 10 second blasts, stirring between each blast, until melted and smooth. Stir in the vegetable oil
- See the rest of the post for decorating instructions. Store in the fridge and in an airtight container once cut, eat within 5 days
Notes
Nutrition
Drip cake recipes on The Baking Explorer
Here are all the drip cake recipes I have created so far on The Baking Explorer! There are more to come, follow me on Instagram or subscribe to my email list to be the first to see when I release a new drip cake recipe.

Questions?
Is there anything I've not covered in The Ultimate Drip Cake How To Guide that you'd like to know? Let me know in the comments! I'd also love to know if this guide has helped you make a drip cake - please share your stories in the comments!
Kate - Gluten Free Alchemist
Love this Kat. Drip cakes are such fun and your advice is fantastic. I am certain I will come back and watch/read again next time I make a drip cake. xx
Jessica
First time making a drip cake, I loved it and it turned out great. However, I do have question. When piping my buttercream rosettes on top, my buttercream had gone slightly soft even after putting it in the fridge, which meant they didn't stand tall like yours and ended up 'spilling out', if that makes sense. I added more icing sugar but it didn't really make any difference. Do you have any tips for next time?
Alex
Whenever I make dark chocolate ganache it ends up being really globby and not a neat drip look. I used the ganache immediately so it didn’t set too much but it wasn’t the ideal consistency. Any advice? Does the cheats version make a thinner drip?
thebakingexplorer
Hi Alex, this could be because the cream and chocolate got a bit too hot, you can try melting them together in a glass bowl over simmering water instead for a gentler heat. The cheat's version is great though because you can't really go wrong with it!
Nicole picillo
Hi can I put purple food colouring in the chocolate buttercream to have it as a purple colour? Would I need to add less cocco powder to get the purple?
Thanks
thebakingexplorer
Hi Nicole, for a bright purple buttercream it would be best to make the vanilla buttercream and then add purple food colouring. Adding purple food colouring to a chocolate buttercream would either not show the purple well enough, or be a very dark purple. So it depends what shade of purple you are looking for. I also advise using a good quality professional grade gel food colour for the best results (I like Sugarflair and Pro Gel). I hope that helps!
mohan kumar
This sounds gorgeous.I’m actually considering making this.
Thank you for sharing.
Abi
So I’ve never made a drip cake before, or any big cake at all actually. This recipe is so detailed and my cake came out perfect! Thank you
thebakingexplorer
That's fantastic Abi, I'm so glad this helped you!!
Laura Harris
How long would you leave a cake in the fridge? My niece birthday is Tuesday but I was going to buttercream the cane and add the ganache and decorations on Sunday then keep refrigerated would this dry out?
thebakingexplorer
Hi Laura, the cake should be fine for this long. The layer of buttercream protects the cake from drying out.
Mona
Hi Kat, do you have the measurements as a two tier cake?
thebakingexplorer
Hi Mona, you can use my conversion guide to adjust the ingredients for other sized tiers: https://thebakingexplorer.com/ingredients-conversions/
Rukshana
When storing the cake in the fridge does it need to be covered with anything or can I just leave it bare?
thebakingexplorer
Hi Rukshana, you can store it in an airtight container or a cake box if you like, but it can be left bare too. The buttercream covering will protect the cake from drying out. Of course make sure there isn't anything strong smelling in your fridge that could impart it's smell/flavour onto the cake (raw onions for example).
Jenny
Can I make the cake cover with butter icing and ganache and freeze it until I need it ?
thebakingexplorer
Hi Jenny, I've never frozen the cake fully assembled. I have made the cake layers and wrapped them seperately, then you can decorate them straight from frozen. You can also freeze a batch of buttercream, then defrost and whisk it a bit when defrosted to fluff it up again. I wouldn't recommend freezing the ganache because cream and chocolate can go a bit funny when you freeze them. I hope that helps!
Bex
This is THE best guide ever! As a complete novice who has made this twice now, it has been a huge hit with friends and family and took the stress of guess work away. Very detailed and helpful, and super yummy of course!
Carolyn Turner
If I am making a two tier cake, and therefore using three 6" tins for the top cake, how do you suggest I reduce the recipe (for the vanilla cake) so that I don't make too much mixture?
thebakingexplorer
Hi Carolyn, I have a conversion guide here: https://thebakingexplorer.com/ingredients-conversions/ Which has the info about how to convert the ingredients for different cake tin sizes. Have a look and let me know if you have any further questions 🙂
Barbara
Hi. Love this post, thank you for sharing. I’m thinking of practising making the ganache and technique maybe down the inside of a bowl. How long can the ganache once made be kept? And how should it be stored? Or can something else be done with the ganache to use it up so it doesn’t go to waste? Thank you 😊
thebakingexplorer
Hi Barbara, thank you, I'm so glad it's been helpful to you. Yes you can store it in the fridge in an airtight container for a couple of weeks, it will harden so you'll need to gentle reheat it to use it again. Or you could make chocolate truffles with it 🙂
Sarah
Love this drip cake! It was so much fun to make, the recipe was so detailed, it is the perfect guide to make the best drip cake! I can’t wait to try a piece. Thank you!
Leah
My first take on making a chocolate drip cake. It was for my Brothers birthday. I was so delighted with how it turned out. Definitely will be making it again, along with more of Kat’s amazing recipes. I love her passion for baking. Inspirational!
thebakingexplorer
Thank you so much Leah! Your cake looked stunning!!
Becca, BCookbakes
My first time trying a chocolate drip cake following this recipe, and would definitely recommend - the tips were very well received! I tried the cheats drip recipe with oil which turned out perfectly.
Thanks Kat 🙂
Lucy Allen
With using the oil and chocolate method for the drip how much oil to chocolate is it 65g?
thebakingexplorer
Hi Lucy, the amounts are in the recipe card - 75g dark chocolate to 1 tsp oil
Momy
Ohh tnx to u...I lyk your own method cos is very easy to understand and at the end it gives a very beautiful outcome....I will surely give it a try..
Evelyn Temple
We really enjoyed watching. We are going to make it for my 9th birthday xxx
Cassie
What kind of white chocolate do you use for the chocolate ganache? I have tried several different kinds of white chocolate, but when melted they look more cream colored and don’t color well at all. I have had red turn out more like brick colored red. I use good quality gel coloring.
thebakingexplorer
Hi Cassie, as white chocolate has a yellowish tinge to it, there are a few products you can add to it to make it white before colouring it. You can try Sugarflair Superwhite powder or Wilton White White. Then the red will take to it better. I hope that helps 🙂
Ruth
Hi! Looking to make the chocolate drip cake in a few weeks. For the buttercream rosettes on top, do you use the same buttercream that is on the cake? It looks a darker colour. Thanks!
thebakingexplorer
Hi Ruth, yes it's the same batch of buttercream to do the rosettes, must just be the light or maybe a different screen making it look a different shade. Please let me know how you get on with the cake!
Maxine
How early in advance can I make a cake without it becoming too dry? What's the best way to store it? Iced or naked?
thebakingexplorer
Hi Maxine, you can freeze a cake for up to 3 months, so you can make it quite far in advance. Wrap it well in cling film before freezing it. I prefer to freeze them undecorated, but you can freeze them decorated. I hope that helps!
Abbie
Hi, I am cheating a little and have brought a cake! The cake is covered in hundreds and thousands which I am going to decorate by adding some biscuits, favourite chocolates to the top.. do you think a white chocolate ganache would run down the side of the hundreds and thousands or not ?
thebakingexplorer
Hi Abbie, there's nothing wrong with that! I'm not sure to be honest as I've never tried that so I couldn't say for definite, I think it would run down but it could look lumpy because of the sprinkles - I'm only guessing though!
Becky
Hi, I am wanting to try your recipe for a drip cake, however I only have 2 8 inch cake tins.
Would I be able to just split the mixture between the two? Or would I be better cooking 2 and saving the rest of the mixture to cook afterwards when a ton has become free? If so, would I store the mixture in the fridge? Thanks 😊
thebakingexplorer
Hi Becky, the best thing to do in this situation is to make two thirds of the batter, bake it in two tins, then wash one tin, make one third of the batter and bake the third layer. The mixture will be far too much for two tins, so you definitely need to reduce it. The batter needs to be baked as soon as possible after mixing it so you can't leave it on the side or in the fridge. I hope that helps!
Sarah
Fantastic site here! First time making a drip cake .. well any cake for that matter.. aimed high! Instructions are so well written and I created a delicious and very effective looking cake .. thank you .. I will be using you all the time now ☺️
thebakingexplorer
Thank you so much for the lovely feedback Sarah! I am so happy you found this guide helpful 😀
Elena
Hi, I have a question regarding freezing cakes before decorating them. If I make the cake layers the night before, is it okay to wrap them up individually and put them in the freezer overnight and start icing them straight from the freezer the next day? Do I need to defrost the layers or anything first?
thebakingexplorer
Hi Elena, yes you can start decorating them when they are still frozen. If you are only baking them the day before though, you don't need to freeze them. Just store the cakes in an airtight container and put baking paper between each one if they are on top of each other. I hope that helps!
Ruth
Hi! Can this be baked with 6 inch tins? What would the measurements need to be to use 2 6 inch tins?
Helen
Absolutely fabulous recipe thank you so much!! I used this to make my first drip cake and it turned out so much better than I imagined. Thank you!
Elizabeth
Hi! I’m making a cake covered in purple buttercream and want to do a black drip. I have gel food coloring that I intend to use. Two questions. Should I use chocolate ganache or white chocolate ganache and will it bleed into purple buttercream? Thank you so much!!
thebakingexplorer
Hi Elizabeth, I would recommend doing a dark chocolate ganache as it will be easier to turn it black without having to use an excess of food colouring. As long as the ganache is made and applied correctly it should not bleed into the buttercream. I hope that helps!
Valentina
Absolutely brilliant! I found this blog while searching for my first chocolate drip cake recipe. The easy to follow step by step guide is amazing and all the measures and tips are great and work to perfection.
Cake came out amazing to say the least!
I am on the search for an Easter cake recipe now, it looks like I will be spoilt for choice.
thebakingexplorer
Thank you so much for this wonderful feedback Valentina! I'm so pleased you found the guide helpful 😀
Katy
This was the first recipe I used from you and I'm absolutely hooked - 5 cakes on and I am so impressed with how well your cakes turn out! Easy to follow and perfect every time. Only problem is I am working my way through your entire catalogue now! What to choose next...?
Lucy
Love this cake. Great for birthday’s.
Jeanette
I made a drip cake the o my problem I have is how are you suppose to cut it since it’s hard?
thebakingexplorer
Hi Jeanette, what do you mean by hard? A drip cake can be cut with a large sharp knife. It often helps to let it come to room temperature first, but you can also cut it while it is cold.
Jade
Do you recommend chilling the cake before painting the drip so it doesn’t budge?
thebakingexplorer
Hi Jade, yes chill the cake until the drip is set and feels firm to the touch. I hope that helps 🙂
Laura
Hi,
I’ve made drip cakes a few times now - with chocolate ganache and caramel sauce drips. At first, everything is perfect, but then when I come back to the cake a few hours later, even when it’s been in the fridge, the buttercream piped on the top of the cake has slid off the side. I’m letting the drip set and the buttercream is a good consistency.
What am I doing wrong?
thebakingexplorer
Hi Laura, sorry to hear you've been having trouble with drip cakes! It wasn't clear in your comment, but can I check are these problems happening after following my recipe and method, or a different recipe and method?
Mandy
Hi there, I would like to make a white chocolate drip for my cake but I don’t want to use cream. Does your method with just vegetable oil and no cream behave the same please? And can I still colour it?
Thanks for your help.
thebakingexplorer
Hi, yes it behaves the same in my experience! The only difference is that is sets a bit more 'solid' than the one with cream. Like how regular melted chocolate sets. And yes you can still colour it too. Let me know how you get on!
Mandy
Ah ok thank you.
Nay
Amazing recipe! I’m just curious where did you purchase your large tupperware container? Thanks🙂
thebakingexplorer
Hi, it was from Tesco!
H
What piping top do you use to do the big swirls on top please?
thebakingexplorer
It was a Jem 1E nozzle
Catherine
Hi Kat , I'm making a birthday cake for a friend.. usually when I make a ganache I use chocolate and butter , is this ok for a drip cake instead of cream or oil ?
Thanks cathy
thebakingexplorer
Hi Cathy, if that works for you then you can absolutely do that 🙂
Patrick
Great recipe! I was asked to make a choc drip cake for my sister-in-law’s big birthday - no pressure! I followed your recipe and watched your videos several times and hey presto, it turned out great. Big thanks!
thebakingexplorer
Thank you so much for the lovely feedback Patrick!