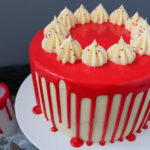
Halloween Red Velvet Drip Cake
Red velvet cake with jam filling, vanilla buttercream and red coloured white chocolate ganache
Servings 16
Calories 958kcal
Ingredients
For the sponge
- 500 g Butter or baking spread softened, unsalted
- 500 g Caster sugar
- 6 Eggs large
- 2 tsp Vanilla extract
- 200 ml Buttermilk
- 500 g Self raising flour
- 1 tsp Bicarbonate of soda
- 3 tbsp Cocoa powder
- 1-2 tbsp Red food colouring I use Sugarflair Red Extra
For the buttercream
- 400 g Butter softened, unsalted
- 800 g Icing sugar
- 2 tsp Vanilla extract
- 2-3 tbsp Milk
For the filling
- 200 g Strawberry or raspberry jam
For the ganache
- 140 g White chocolate
- 55 ml Double cream
- Red food colouring I use Sugarflair Red Extra
For decoration
- Red sprinkles optional
Instructions
- Pre-heat your oven to 160C Fan/350F/Gas Mark 4, and grease and line three 8" cake tins (that are at least 2" deep)
- Make the sponge by mixing the butter and caster sugar in a large bowl, ideally using an electric hand mixer or in the bowl of a stand mixer, until light and fluffy (about 2-3 minutes)
- Add the eggs and buttermilk, and mix until fully incorporated
- Add the self raising flour and cocoa powder and mix in gently and just until you can't see any flour anymore
- Add the red food colouring and mix gently until you get the desired shade
- Divide the mixture between the tins, use scales for accuracy if you like
- Bake them for 30-35 minutes or until a skewer inserted in the middle comes out clean. Leave them to fully cool either in the tins or remove from the tins and place on cooling racks
- To make the buttercream mix the butter on it's own for a few minutes, then add the icing sugar, vanilla extract and milk, and mix until smooth. Use an electric mixer for best results. If the buttercream is too stiff, you can add more milk
- If the cakes have domed on top, level them off with a cake leveller or a serrated knife
- Put one of the sponges on a decorating turntable and put some of the buttercream in a piping bag to pipe a border of buttercream around the edge of the sponge - this is to stop the jam seeping into the buttercream that you will spread around the sides of the cake
- Fill in the centre of the sponge with half of the jam, then add the next sponge on top
- Do the same again - pipe a buttercream border and fill the centre with the remaining jam, then add the final sponge
- Use a thin layer of buttercream to fully crumb coat the cake, then put it in the fridge for 30 minutes to firm up
- Remove from the fridge and smooth on a final thicker layer of the buttercream, use a palette knife or buttercream smoother to make it smooth all over. Refrigerate again for 30 mins
- To make the white chocolate ganache, put the ingredients into a bowl and microwave for 20 seconds, then stir. Continue microwaving in 10 second blasts, stirring between each blast, until melted and smooth
- Then add the red food colouring and mix until you have the desired shade
- Put the ganache into a piping bag and snip a small section off the end, or put it in a squeezy bottle
- Pipe blobs around the edge of the cake, allowing the ganache to drip down the sides in varying amounts
- Pipe more ganache on top of the cake and use a palette knife to smooth it out
- Then put the remaining buttercream into a piping bag fitted with a nozzle of your choice and pipe rosettes in a circle on top of the cake
- Add sprinkles if desired, and a bloody plastic knife for a spooky effect!
- Leftovers will keep in an airtight container in a cool place or in the fridge for 3-4 days
Video
Notes
To make the cake with two layers you will need:
335g Butter, 335g, Caster sugar, 130ml Buttermilk, 6 eggs, 335g self raising flour, ½ tsp bicarbonate of soda, 2 tbsp cocoa powder and red food colouring.

- Make sure all your ingredients (particularly the eggs, butter and buttermilk) are at room temperature before you start baking.
- I prefer to use a baking spread like Stork for the cake, and unsalted butter for the buttercream as I find they provide the best results.
- For the brightest red shade that stays vibrant and strong after baking, use a good quality professional food colouring. My favourite brands are Pro Gel and Sugarflair. Sugarflair do a shade called Red Extra, which is excellent for red velvet cakes.
- For all the tips and tricks on how to make a drip cake, including a how to video, check out my Ultimate Drip Cake How To Guide!
- Although I provide cup measurements, I highly recommend weighing your ingredients out using digital kitchen scales. It is the most accurate way to measure ingredients and will ensure the best results. Digital scales are very low cost and can be purchased for around £12 ($16.50).
- For teaspoon (tsp) and tablespoon (tbsp) measurements, please use measuring spoons and not the type of spoons you eat with. Again this will ensure accuracy and provide the best results.
Nutrition
Calories: 958kcal | Carbohydrates: 118g | Protein: 7g | Fat: 53g | Saturated Fat: 32g | Polyunsaturated Fat: 2g | Monounsaturated Fat: 14g | Trans Fat: 2g | Cholesterol: 193mg | Sodium: 452mg | Potassium: 134mg | Fiber: 1g | Sugar: 91g | Vitamin A: 1600IU | Vitamin C: 1mg | Calcium: 63mg | Iron: 1mg
