

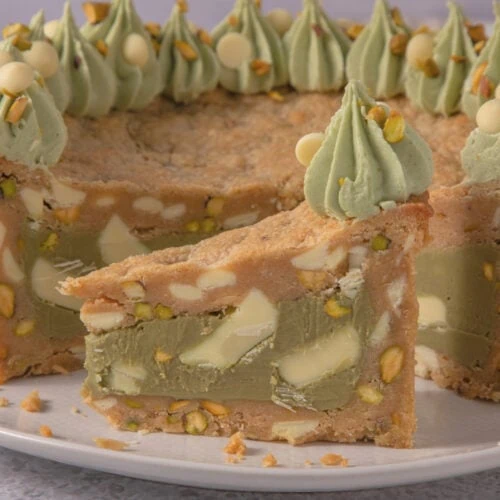
Easter egg cheesecakes are a must make for Easter and spring time! This Pistachio Easter Egg Cheesecake is an easy no bake treat for pistachio lovers. It's a chocolate Easter egg shell split in half, filled with a buttery biscuit base that's studded with chopped pistachios, a creamy no bake filling that's infused with pistachio cream spread, on top is more gorgeous green pistachio cream spread and more chopped pistachios. This is such an indulgent and heavenly treat!
This post may contain affiliate links. I earn from qualifying purchases.

Ingredient Tips & Equipment Information
- Normally I would insist that you use full fat cream cheese and double cream for a no bake cheesecake, as both of these ingredients are essential to ensure it sets. However, as these cheesecakes are served in Easter eggs you don't need them to set firmly enough to be sliced. Therefore if you want to make a low fat version you can absolutely do this, but please be aware the cheesecake will have a looser consistency.
- I am based in the UK and I find that Philadelphia cream cheese is the thickest and best quality cream cheese to use for no bake cheesecakes. I have made many cheesecakes with supermarket own brand cream cheeses too, and they have worked great. If you can though, I think it is worth spending a little more for Philadelphia (and no they haven't paid me to say this!)
- I like to use Digestive biscuits (Graham crackers if you're in the US) for the base, but you could substitute if for another similar biscuit like Hobnobs.
- You can use either butter or baking spread for the biscuit base.
- The pistachio cream spread I used is from Black Milk. You can use any similar spread, Amazon sell various options, you can also buy it from Costco.
- Although I provide cup measurements, I highly recommend weighing your ingredients out using digital kitchen scales. It is the most accurate way to measure ingredients and will ensure the best results. Digital scales are very low cost and can be purchased for around £12 ($16.50) .
- For teaspoon (tsp) and tablespoon (tbsp) measurements, please use measuring spoons and not the type of spoons you eat with. Again this will ensure accuracy and provide the best results.
For the full recipe with measurements, head to the recipe card at the end of this post.
How to make Pistachio Easter Egg Cheesecake


Carefully cut the Easter egg in half and place onto a plate. To make the biscuit base, use a food processor to crush the biscuits into crumbs. Or you can place them in a bowl or a ziploc bag, and gently bash them with a rolling pin. Mix the chopped pistachios into the biscuit crumbs, then add the melted butter and mix it in. Use the back of a small spoon to very gently press the mixture into the bottom of each Easter egg half. Put in the fridge while you make the filling.


To make the filling, mix together the cream cheese, icing sugar and pistachio spread until smooth. Add the double cream and whisk until thick. Divide the filling between the Easter egg halves and smooth out the top. Set in the fridge, then decorate with pistachio spread and chopped pistachios.
For the full recipe with measurements, head to the recipe card at the end of this post.

Where do you get the pistachio cream spread from?
The spread I used for the filling is from Black Milk. You can use any similar spread, Amazon sell various options, you can also buy it from Costco. It's usually called pistachio cream spread or pistachio butter.
What size Easter egg is this recipe for?
This recipe is for a large Easter egg. I have noticed that supermarkets have started marking Easter eggs with L for large, M for medium, and XL for extra large. The Easter egg I used weighed 150g, however the pack size was larger (233g) because it included extra chocolate.
How do you cut the Easter egg in half neatly?
Warm a large sharp knife under a hot water tap, carefully dry it off, then very gently press it around the egg where the seam is. Keep slowly and gently working your way around the egg, re-warming the knife if needed, until the two halves separate.
Can you make this recipe in advance?
Yes, the cheesecake will last for 3-4 days when stored in the fridge. If you decorate it with whipped cream, it will only last up to 2 days.
Can you freeze the cheesecake?
You can freeze the undecorated cheesecake, however you do need to let it set in the fridge first. Setting it in the freezer will affect the texture and it won't be as nice. Once it's set in the fridge, you can then put the cheesecake in the freezer for up to three months. Defrost at room temperature for a couple of hours.

Who is this cheesecake suitable for?
This cheesecake is suitable for vegetarians. It is also egg free, although please do check the ingredient labels of everything you use before serving to anyone with an allergy or intolerance.
Can this cheesecake be made gluten free?
Yes! To make this recipe gluten free, swap the biscuits in the biscuit base for gluten free biscuits. I would also recommend that you check the packaging of everything you're using in the recipe in case of cross contamination.
Can this recipe be made dairy free?
I have not tested this recipe with dairy free ingredients, but I think it would be suitable to make dairy free by substituting the dairy ingredients for alternatives. You can also check out my Vegan Easter Egg Cheesecake recipe.
More tips for making the Pistachio Easter Egg Cheesecake:
- This cheesecake would also be delicious decorated with some white chocolate, either melted and drizzled on, or white chocolate chips sprinkled over the top.
- You can eat the cheesecakes straight away, but they go firmer and are a nicer consistency after a few hours chilling in the fridge, or overnight.
- This recipe serves four people (or two very hungry people!)

Troubleshooting
My number one tip for getting the best results is to read through this whole page of tips and recommendations before starting, and follow the recipe exactly. If you have any questions about this recipe, or if something went wrong and you need help, please use the comment form below and I will get back to you. You can also get in touch with me on my Twitter, Instagram or Facebook. I'd love to hear from you!
Recommended equipment & ingredients
- Mixing bowls
- Measuring spoons
- Kitchen scales
- Electric hand mixer
- Piping bags
- Food processor
- Angled palette knife
- Black Milk Pistachio cream
- Pistachio cream spread
I earn a small amount of money if you buy the products after clicking on the links. You will not be charged anything extra for this. Thank you for supporting The Baking Explorer!

More pistachio recipes...


Pistachio Easter Egg Cheesecake
Ingredients
For the Easter egg
- 1 Large Easter Egg approx 150g
For the biscuit base
- 60 g Digestive biscuits
- 20 g Pistachios chopped
- 30 g Butter or baking spread melted
For the filling
- 160 g Full fat cream cheese
- 85 g Pistachio cream spread I used Black Milk
- 40 g Icing sugar
- 100 ml Double cream
For decoration
- 50 g Pistachio cream spread I used Black Milk
- 15 g Pistachios chopped
Instructions
- To cut the Easter egg in half, warm a large sharp knife under a hot water tap. Carefully dry it off, then very gently press it around the egg where the seam is. Keep slowly and gently working your way around the egg, re-warming the knife if needed, until the two halves separate
- To make the biscuit base, crush the biscuits into crumbs. You can do this using a food processor, or put the biscuits into a sandwich bag or a bowl, and gently bash them with the end of a rolling pin. Mix the chopped pistachios into the biscuit crumbs
- Melt the butter, either in the microwave or in a small pan, and add it to the biscuit crumbs. Mix well until the mixture looks like wet sand
- Divide the biscuit base evenly between the Easter egg halves, use the back of a small spoon to press it down gently until it is compact and even. Place them in the fridge to chill while you make the filling
- To make the cheesecake filling, put the cream cheese, icing sugar and pistachio spread into a mixing bowl and mix with an electric mixer until smooth
- Add the double cream and mix until thick and the filling holds its shape. Divide the filling between the Easter egg halves and use a small palette knife, or the back of a small spoon to gently press the mixture into them and smooth the top. Put into the fridge to set for 2 hours
- Decorate the cheesecakes with the pistachio spread. I warmed it in the microwave first for 20-30 seconds. You can drizzle it on with a piping bag or a spoon. Then sprinkle over the chopped pistachios
- Serve immediately, or store in the fridge for 3-4 days
Notes
- Normally I would insist that you use full fat cream cheese and double cream for a no bake cheesecake, as both of these ingredients are essential to ensure it sets. However, as these cheesecakes are served in Easter eggs you don't need them to set firmly enough to be sliced. Therefore if you want to make a low fat version you can absolutely do this, but please be aware the cheesecake will have a looser consistency.
- I am based in the UK and I find that Philadelphia cream cheese is the thickest and best quality cream cheese to use for no bake cheesecakes. I have made many cheesecakes with supermarket own brand cream cheeses too, and they have worked great. If you can though, I think it is worth spending a little more for Philadelphia (and no they haven't paid me to say this!)
- I like to use Digestive biscuits (Graham crackers if you're in the US) for the base, but you could substitute if for another similar biscuit like Hobnobs.
- You can use either butter or baking spread for the biscuit base.
- The pistachio cream spread I used is from Black Milk. You can use any similar spread, Amazon sell various options, you can also buy it from Costco.
- Although I provide cup measurements, I highly recommend weighing your ingredients out using digital kitchen scales. It is the most accurate way to measure ingredients and will ensure the best results. Digital scales are very low cost and can be purchased for around £12 ($16.50) .
- For teaspoon (tsp) and tablespoon (tbsp) measurements, please use measuring spoons and not the type of spoons you eat with. Again this will ensure accuracy and provide the best results.
Leave a review & recipe rating