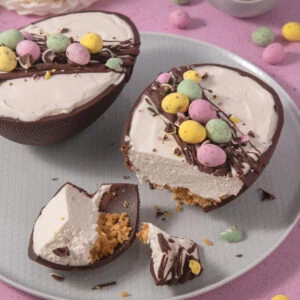
This Vegan Easter Egg Cheesecake is a delicious and easy to make treat for Easter time! It's no bake and so quick and simple to put together with only a few ingredients. You can make the cheesecake in advance and decorate it with any Easter treats you like. This recipe is also dairy free and egg free, so it's perfect for a vegan Easter dessert!
This post may contain affiliate links. I earn from qualifying purchases.

Ingredient Tips & Equipment Information
- I like to use Digestive biscuits (Graham crackers if you're in the US) for the base, plus lots of them are vegan and dairy free, but you could substitute if for another similar vegan friendly biscuit like ginger nuts or Hobnobs.
- You can use either a dairy free butter alternative or a dairy free baking spread for the biscuit base.
- The Easter Egg I used for this recipe was a Doisy & Dam Really Good Egg.
- For the filling, I used Philadelphia plant based cream cheese and Oatly Whippable Creamy Oat.
- I used dark chocolate and vegan mini eggs (Doisy & Dam Good Eggs) to decorate the cheesecakes, but you can decorate with anything you like - dairy free white chocolate, other dairy free Easter treats, dairy free caramel sauce... there are lots of yummy choices! Of course make sure to check the labels if you want to serve this to vegans or anyone with a dairy intolerance or allergy.
- Although I provide cup measurements, I highly recommend weighing your ingredients out using digital kitchen scales. It is the most accurate way to measure ingredients and will ensure the best results. Digital scales are very low cost and can be purchased for around £12 ($16.50) .
- For teaspoon (tsp) and tablespoon (tbsp) measurements, please use measuring spoons and not the type of spoons you eat with. Again this will ensure accuracy and provide the best results.
For the full recipe with measurements, head to the recipe card at the end of this post.
How to make Vegan Easter Egg Cheesecake
To make the biscuit base, use a food processor to crush the biscuits into crumbs. Or you can place them in a bowl or a ziploc bag, and gently bash them with a rolling pin. Mix melted dairy free butter into the biscuit crumbs, then using the back of a small spoon, very gently press the mixture into the bottom of each Easter egg half. Put in the fridge while you make the filling.
To make the filling, mix together the plant based cream cheese, icing sugar and vanilla extract until smooth. Add the dairy free double cream and whisk until thick. Divide the filling between the Easter egg halves and smooth out the top. Chill in the fridge for at least 2 hours. Decorate with melted dairy free chocolate, and some vegan Easter treats.
For the full recipe with measurements, head to the recipe card at the end of this post.

What size Easter egg is this recipe for?
I used a Doisy & Dam Really Good Egg for this recipe, which is a 150g weight dairy free Easter egg.
How do you cut the Easter egg in half neatly?
Warm a large sharp knife under a hot water tap, carefully dry it off, then very gently press it around the egg where the seam is. Keep slowly and gently working your way around the egg, re-warming the knife if needed, until the two halves separate.
Can you make this recipe in advance?
Yes, the cheesecake will last for 3-4 days when stored in the fridge, although I do recommend enjoying it when it's fresh.
Can you freeze the cheesecake?
You can freeze the undecorated cheesecake, however you do need to let it set in the fridge first. Setting it in the freezer will affect the texture and it won't be as nice. Once it's set in the fridge, you can then put the cheesecake in the freezer for up to three months.

Who is this cheesecake suitable for?
This cheesecake is suitable for vegetarians and vegans. It is also dairy free and egg free, although please do check the ingredient labels of everything you use before serving to anyone with an allergy or intolerance.
Can this cheesecake be made gluten free?
Yes! To make this recipe gluten free, swap the biscuits in the biscuit base for gluten free biscuits. I would also recommend that you check the packaging of everything you're using in the recipe in case of cross contamination.
More tips for making the Vegan Easter Egg Cheesecake:
- You can eat the cheesecakes straight away, but they go firmer and are a nicer consistency after a few hours chilling in the fridge, or overnight.
- This recipe serves four people (or two very hungry people!)

Troubleshooting
My number one tip for getting the best results is to read through this whole page of tips and recommendations before starting, and follow the recipe exactly. If you have any questions about this recipe, or if something went wrong and you need help, please use the comment form below and I will get back to you. You can also get in touch with me on my Twitter, Instagram or Facebook. I'd love to hear from you!
Recommended equipment & ingredients
- Mixing bowls
- Measuring spoons
- Kitchen scales
- Electric hand mixer
- Piping bags
- Food processor
- Dark chocolate
- Doisy & Dam Good Eggs
I earn a small amount of money if you buy the products after clicking on the links. You will not be charged anything extra for this. Thank you for supporting The Baking Explorer!

More Easter recipes...
Vegan Easter Egg Cheesecake
Ingredients
For the Easter egg
- 150 g Dairy free Easter egg I used a Doisy & Dam Really Good Egg
For the biscuit base
- 60 g Digestive biscuits crushed
- 25 g Dairy free butter melted
For the cheesecake
- 185 g Dairy free cream cheese I used Philadelphia
- 30 g Icing sugar
- 1 tsp Vanilla extract
- 75 g Dairy free cream I used Oatly Whippable Cream
For decoration - optional, decorate however you like!
- 45 g Dark chocolate
- 50 g Vegan mini eggs I used Doisy & Dam Good Eggs
Instructions
- To cut the Easter egg in half, warm a large sharp knife under a hot water tap. Carefully dry it off, then very gently press it around the egg where the seam is. Keep slowly and gently working your way around the egg, re-warming the knife if needed, until the two halves separate
- To make the biscuit base, crush the biscuits into crumbs. You can do this using a food processor, or put the biscuits into a sandwich bag or a bowl, and gently bash them with the end of a rolling pin
- Melt the dairy free butter, either in the microwave or in a small pan, and add it to the biscuit crumbs. Mix well until the mixture looks like wet sand
- Divide the biscuit base evenly between the Easter egg halves, use the back of a small spoon to press it down gently until it is compact and even. Place them in the fridge to chill while you make the filling
- To make the cheesecake filling, put the dairy free cream cheese, icing sugar, dairy free whippable cream and vanilla extract into a mixing bowl and mix with an electric mixer until smooth and thickened
- Divide the filling between the Easter egg halves and use a small palette knife, or the back of a small spoon to gently press the mixture into them and smooth the top
- Put into the fridge to set for at least 2 hours
- To decorate, melt the dark chocolate. You can do this in the microwave, start with a 30 second blast, then stir. Blast in 10 second intervals, stirring between each one. Drizzle the dark chocolate over the top of the cheesecakes, and decorate with the vegan mini eggs - or any vegan Easter treats you prefer
- Serve immediately, or store in the fridge for 3 days
Notes
- I like to use Digestive biscuits (Graham crackers if you're in the US) for the base, plus lots of them are vegan and dairy free, but you could substitute if for another similar vegan friendly biscuit like ginger nuts or Hobnobs.
- You can use either a dairy free butter alternative or a dairy free baking spread for the biscuit base.
- The Easter Egg I used for this recipe was a Doisy & Dam Really Good Egg.
- For the filling, I used Philadelphia plant based cream cheese and Oatly Whippable Creamy Oat.
- I used dark chocolate and vegan mini eggs (Doisy & Dam Good Eggs) to decorate the cheesecakes, but you can decorate with anything you like - dairy free white chocolate, other dairy free Easter treats, dairy free caramel sauce... there are lots of yummy choices! Of course make sure to check the labels if you want to serve this to vegans or anyone with a dairy intolerance or allergy.
- Although I provide cup measurements, I highly recommend weighing your ingredients out using digital kitchen scales. It is the most accurate way to measure ingredients and will ensure the best results. Digital scales are very low cost and can be purchased for around £12 ($16.50) .
- For teaspoon (tsp) and tablespoon (tbsp) measurements, please use measuring spoons and not the type of spoons you eat with. Again this will ensure accuracy and provide the best results.



Leave a review & recipe rating