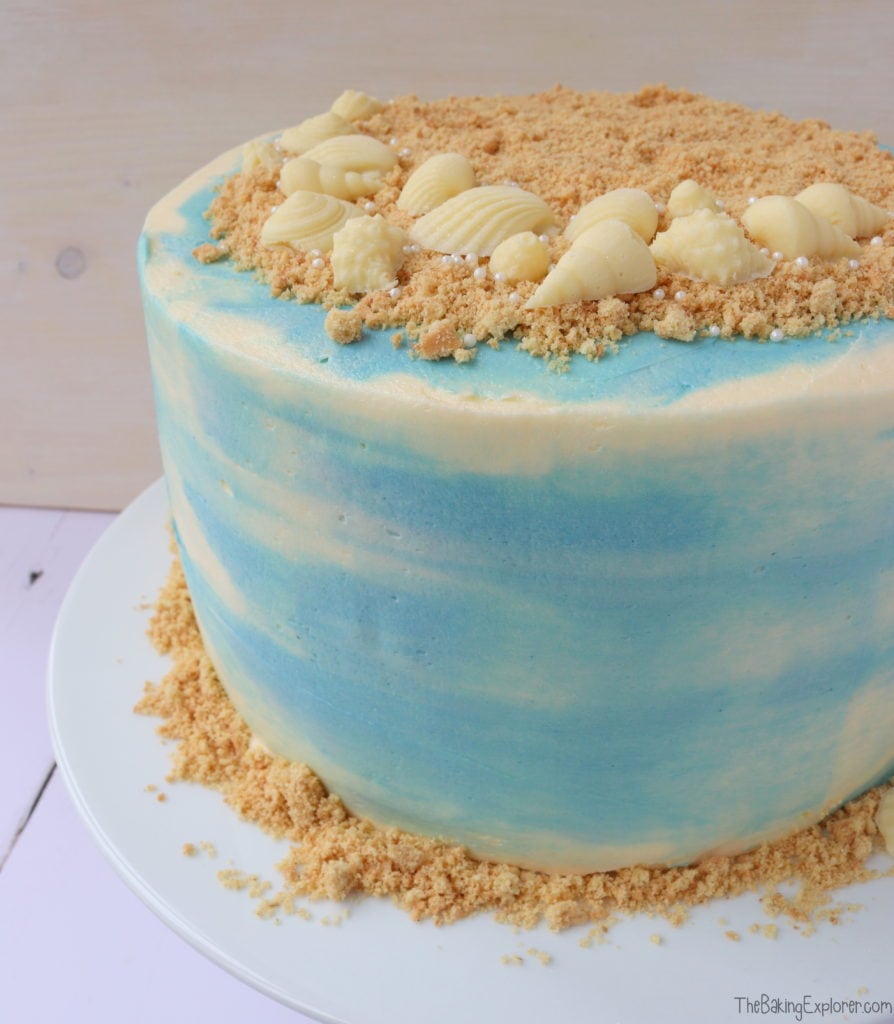
When I think of beaches and tropical islands, coconut always comes to mind. I wanted to create a cake that transports your mind and your tastebuds to a far away land and so this Coconut Beach Cake was created! It's made of a flavour packed coconut sponge using coconut oil, creamed coconut blocks (which you can find in the Asian food section of your local supermarket) and dessicated coconut. I've filled and covered it with a coconut flavoured buttercream with a blue watercolour effect to remind you of those beautiful blue seas from exotic lands. On top is crushed digestive biscuit and white chocolate shells for more of that beach vibe!

For the full recipe with measurements, head to the recipe card at the end of this post.
How to make Coconut Beach Cake
To start melt the creamed coconut blocks with coconut oil, then stir them into caster sugar and let the mixture cool for 10 minutes.
Whisk in eggs, then self raising flour and dessicated coconut.
Divide the batter between the tins and bake the cakes for 35 minutes.

To make the buttercream, mixed together butter, icing sugar and coconut flavouring until smooth.
Stack up the cake, spreading buttercream between each layer. Then cover the whole cake in a crumb coat of buttercream and chill it in the fridge.
To create the watercolour icing effect, first separate some of the buttercream into bowls and colour it two shades of blue. Then cover the cake in a layer of the white buttercream, and add blobs of the blue buttercreams all around.

Smooth the buttercream out to create the watercolour effect. To decorate, add crush digestive biscuits as sand and some white chocolate shells (I made mine in a silicone mould).
For the full recipe with measurements, head to the recipe card at the end of this post.

Can this cake be made in different size tins?
Yes! If you would like to make this cake in different size tins, please check my Conversion Guide to find out how to adjust the recipe.
How long does the cake last for and can you freeze it?
The cake will keep in an airtight container for 3 days in a cool place. You can freeze the sponges either alone, or decorated (but do not freeze the biscuits or chocolate). Once the sponges are fully cool, wrap them well with cling film or put them in an airtight container with some baking paper between them. You can freeze the buttercream on it's own in a tub, or you can decorate the cake and freeze it fully assembled. To do this and avoid damage to the decoration, freeze it either in an airtight container. Or let it freeze solid on a cake board or plate, then wrap in cling film. Remove the cling film when you take it out to defrost it, if you don't it could damage the decoration as it defrosts and softens. You can also freeze slices of the cake, again well wrapped in cling film or in airtight containers.

This cake will fill your mind with memories of your last beach holiday, and make you want to book another one immediately! The sponge of the Coconut Beach Cake is a different texture to the cakes I normally make using butter, it's denser but in a good way! And it's absolutely packed with coconut flavour!

Recommended equipment & ingredients*
- 8" cake tins
- Mixing bowls
- Cooling rack
- Kitchen scales
- Creamed coconut
- Blue food colouring
- Shell mould
- Electric hand mixer
- Round cake tin liners
- Decorating turntable
- Buttercream scraper/smoother
- Angled palette knife
*I earn a small amount of money if you buy the products after clicking on the links. You will not be charged anything extra for this. Thank you for supporting The Baking Explorer!
More coconut recipes...

Coconut Beach Cake
Ingredients
For the sponge
- 400 g Creamed coconut block
- 100 g Coconut oil
- 500 g Caster sugar
- 9 Eggs large
- 500 g Self raising flour
- 150 g Dessicated coconut
For the buttercream
- 475 g Butter or baking spread
- 950 g Icing sugar
- 3 tsp Coconut flavouring
- Blue food colouring I use Pro Gel
For the decorations
- 6 Digestive biscuits crushed
- White chocolate shells optional
Instructions
- Pre-heat your oven to 160C Fan/180C/350F/Gas Mark 4, and grease and line three 8" cake tins (that are at least 2" deep)
- Melt the coconut oil and creamed coconut blocks in a pan on a low heat
- Remove from the heat and pour into a mixing bowl, add the caster sugar and mix well, leave to cool for 10 minutes
- Add the eggs and whisk until fully incorporated
- Add the self raising flour and whisk in until you can't see any flour anymore
- Mix in the dessicated coconut
- Divide the mixture between the tins, use scales for accuracy
- Bake them for 30-35 minutes or until a skewer inserted in the middle comes out clean. Leave them to fully cool either in the tins or remove from the tin and place on cooling racks
- To make the buttercream mix the butter and icing sugar together. Once it starts to come together add the coconut flavouring and mix until smooth. I use my electric hand whisk to do this but you can also do it by hand with a spoon. If the buttercream is too stiff then you can add some milk to it
- If the cakes have domed on top, level them off with a cake leveller or a serrated knife
- Put one of the sponges on a decorating turntable and spread over some buttercream, add the second sponge and spread over more buttercream, then add the third sponge
- Fully crumb coat the cake, this means cover the whole cake in a thin layer of buttercream to seal in the cake crumbs, then put it in the fridge for 30 minutes to firm up
- Put two heaped tablespoons of buttercream into a bowl and colour with the blue food colouring to a light blue shade, do the same with two more heaped tablespoons of buttercream in another bowl and colour it a slightly darker blue (or lighter if you've gone too dark with the first batch)
- Cover the whole cake in a layer of the white buttercream then add blobs of the two blue buttercreams randomly all around the sides
- Use a cake scraper to smooth the sides and create the watercolour effect, making sure to wipe off excess buttercream from the scraper as you go. Once the sides are smoothed to your liking, add some blue buttercream to the top of the cake and smooth it out using a palette
knife - Transfer the cake to your cake stand or serving plate
- Add the digestive biscuit on top and around the sides
- Add your chocolate shells and any other decoration you are using
- Leftovers will keep in an airtight container in a cool place for 2-3 days


Miss C Flash
Your cake is stunning! I like how you turned the cake into a mini beach. I'm sure it tasted lovely too x
Bertha Lesia
Jealous down your cake is stunning Please E-mail me your recipes step by step just like this one
thebakingexplorer
Thank you Bertha! You can sign up to my newsletter and you'll get an email every time I post a new recipe 🙂
bakearama
Brilliant idea and very well done - love it!
lovehounduk
lovely
Millicent
Please I have no idea of what the coconut block is...I know of the coconut oil in a thick creamy texture...
thebakingexplorer
Hi Millicent, it is called creamed coconut and you buy it in blocks. The brand I bought was called Blue Dragon, but many other brands sell it too. I would suggest typing "creamed coconut block" into Google, then you can see what it looks like.