
Ad. This post is sponsored by Kitchenaid. All opinions are my own.
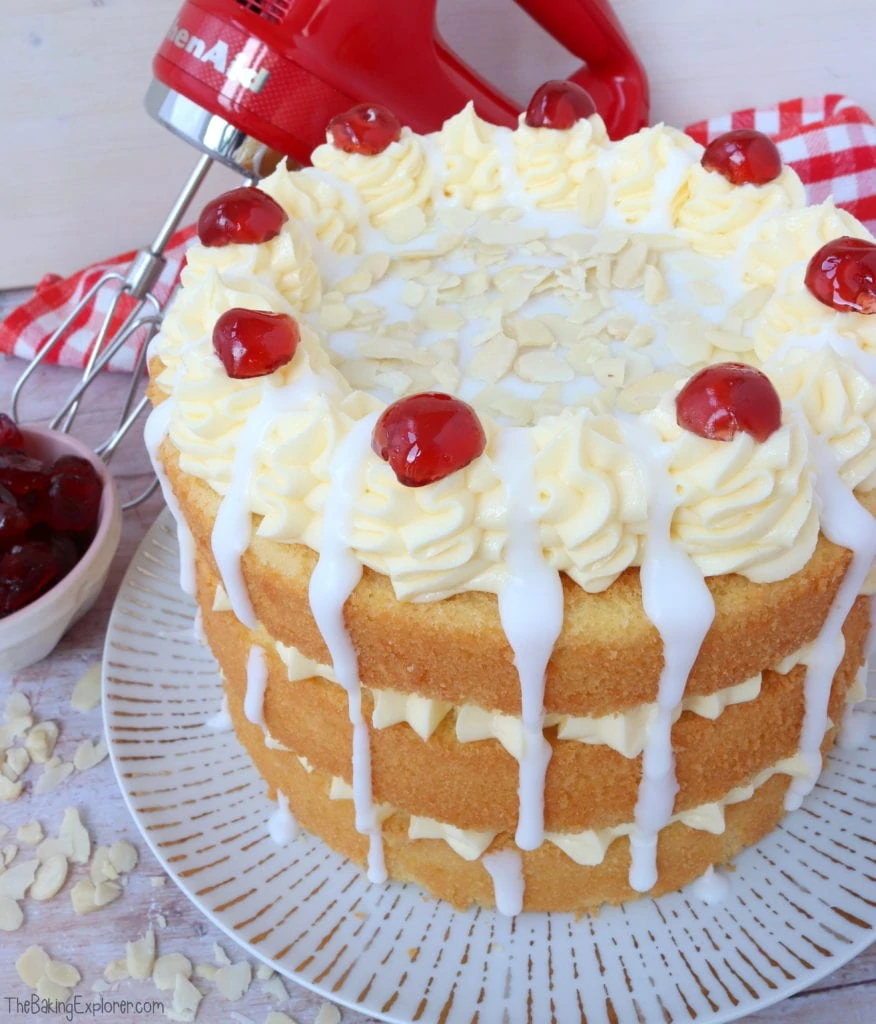
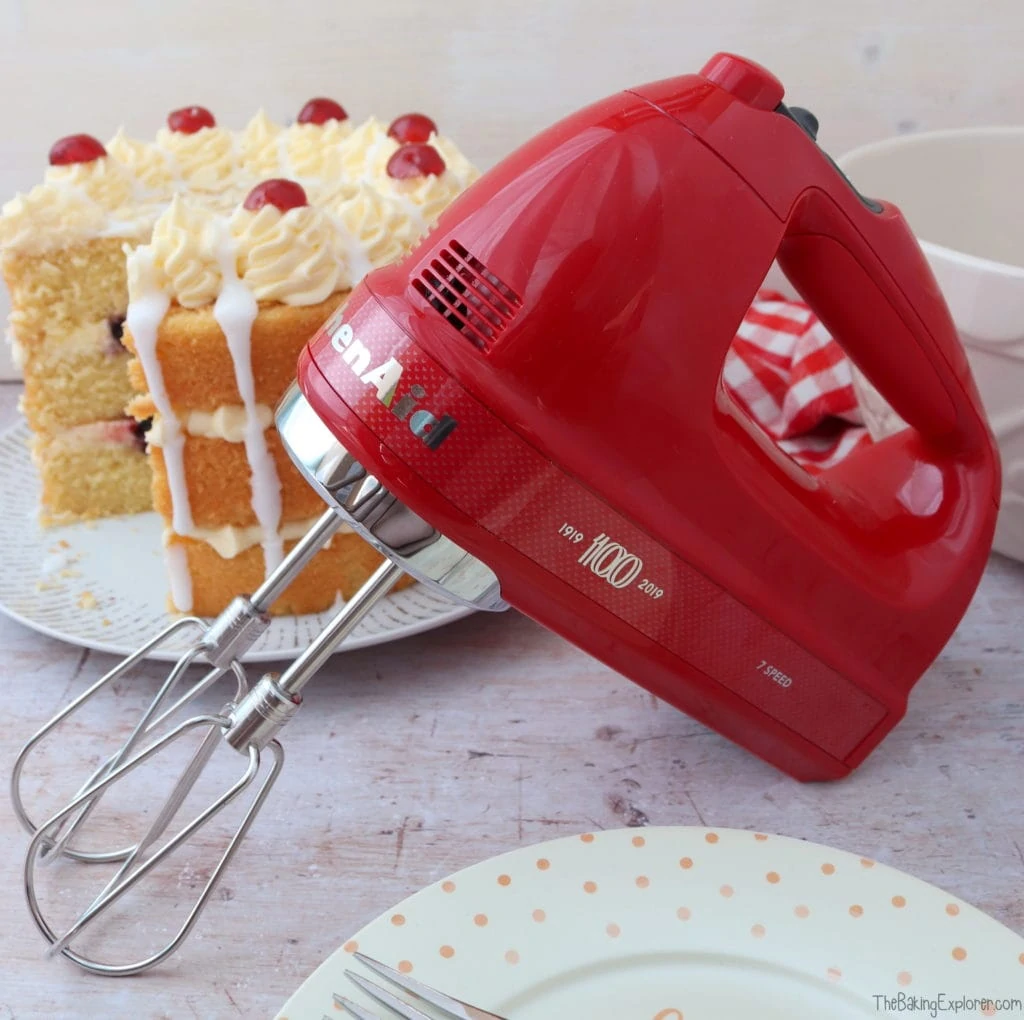
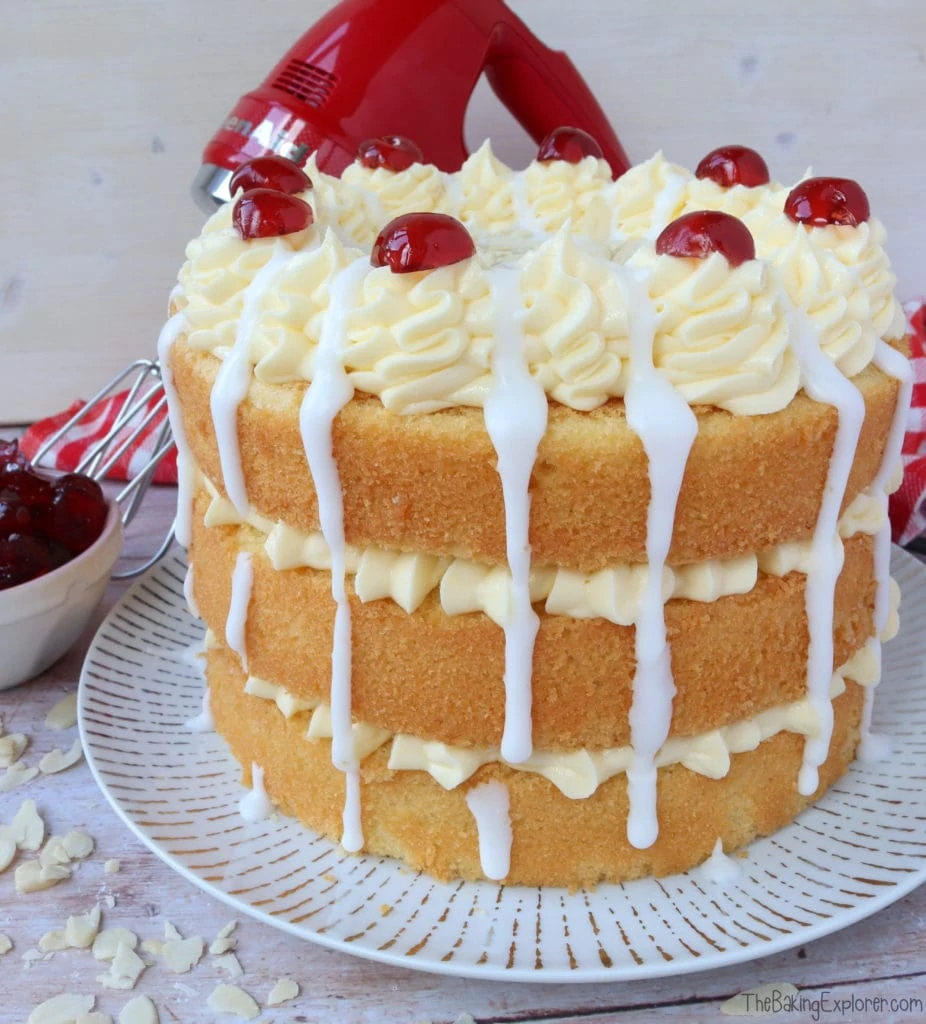
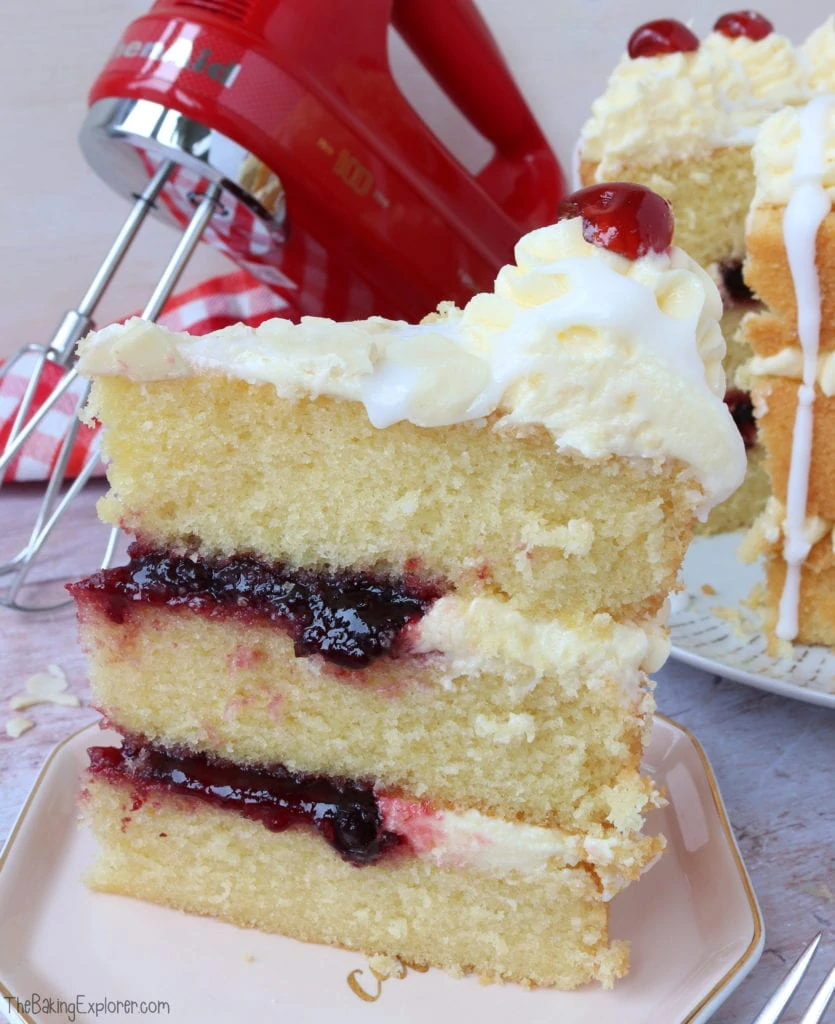
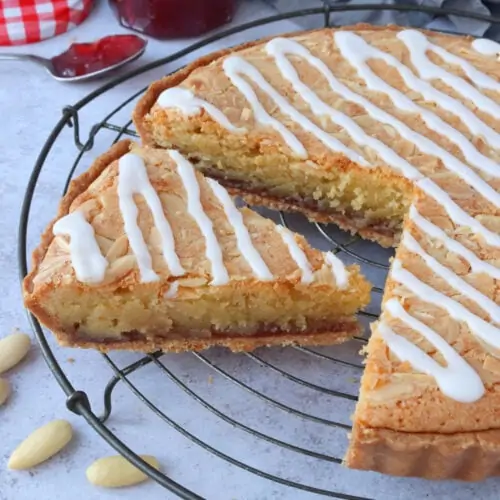
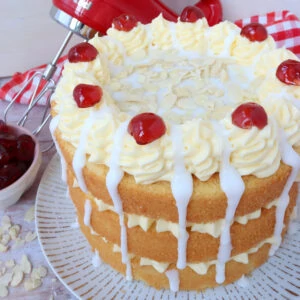
I used the fabulous new Queen of Hearts KitchenAid Hand Mixer to make this gorgeous Cherry Bakewell Cake. In order to create something I thought that could live up to the KitchenAid brand and their incredible history I've fused together a traditional bake of the past and brought it into the present with this new twist. It's an almond sponge, filled with cherry jam and almond buttercream, topped with icing, flaked almonds and glace cherries. It's absolutely delicious and such a showstopper!
This post may contain affiliate links. I earn from qualifying purchases.
I'm pretty certain that anyone interested in food or baking has heard of KitchenAid - you'd certainly struggle to find someone with these interests that hasn't! But did you know that KitchenAid has now been around for 100 years? They started in 1919, and to celebrate their 100 year anniversary they've released a new Queen of Hearts range in a gorgeous passion red shade with mini hearts detailing. As well as honouring the past century, KitchenAid are also looking ahead to the future and the creativity of it's makers to come.
I expected the Queen of Hearts KitchenAid Hand Mixer to be an excellent product coming from such an iconic brand, however I was surprised to find it actually improved the texture of my cakes! This Cherry Bakewell Cake was so light and airy! I'm excited to keep using it with all my future bakes!
Ingredient Tips & Equipment Information
- Make sure all your ingredients (particularly the butter and eggs) are at room temperature before you start baking.
- I used unsalted butter for the buttercream, for the cake I used a baking spread.
- I decorated the cake with Glace cherries as they are traditional on cherry bakewell tarts, however if you prefer fresh cherries and they're in season then you could use those instead.
- For better flavour, use Almond extract, not essence.
- Although I provide cup measurements, I highly recommend weighing your ingredients out using digital kitchen scales. It is the most accurate way to measure ingredients and will ensure the best results. Digital scales are very low cost and can be purchased for around £12 ($16.50).
- For teaspoon (tsp) and tablespoon (tbsp) measurements, please use measuring spoons and not the type of spoons you eat with. Again this will ensure accuracy and provide the best results.
For the full recipe with measurements, head to the recipe card at the end of this post.
How to make Cherry Bakewell Cake
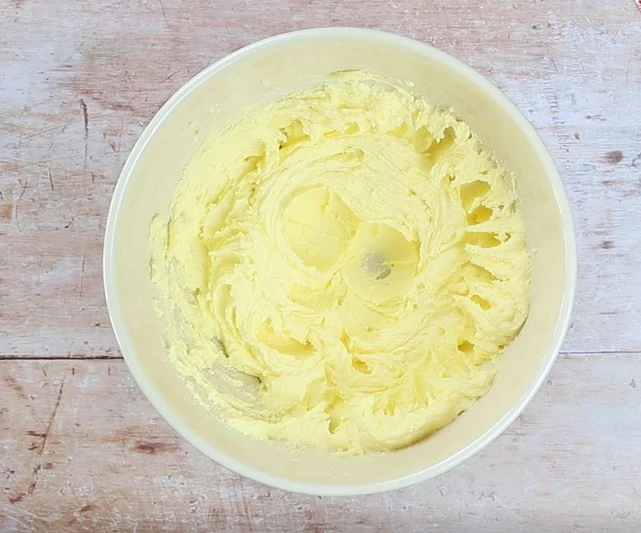
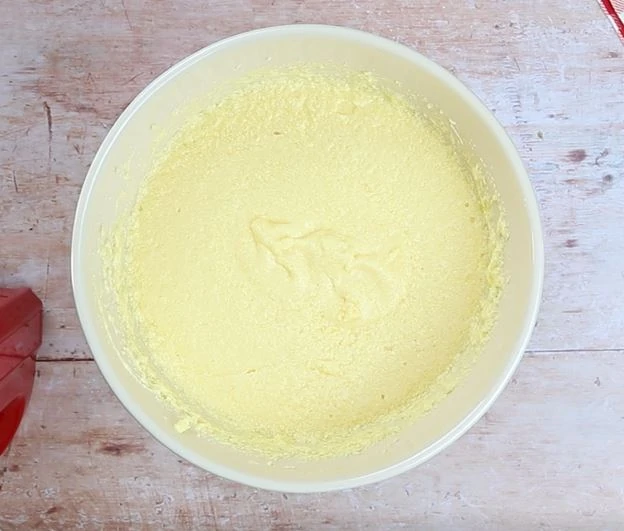
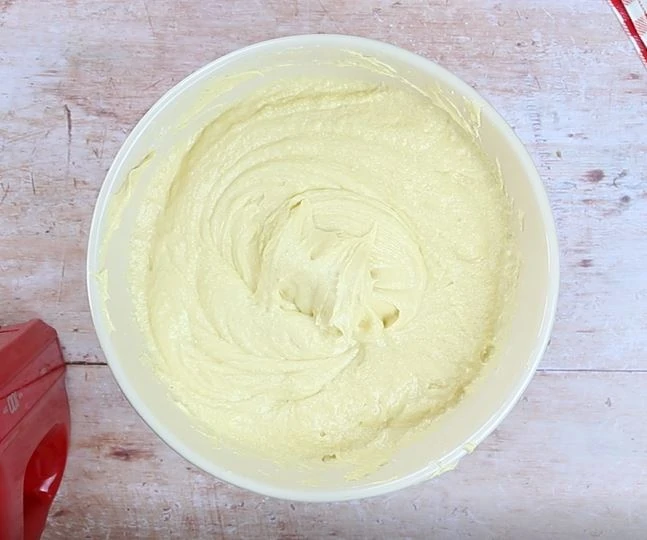
To make the sponges, mix together the butter and sugar until fluffy. Then add the eggs and vanilla, and whisk them in.
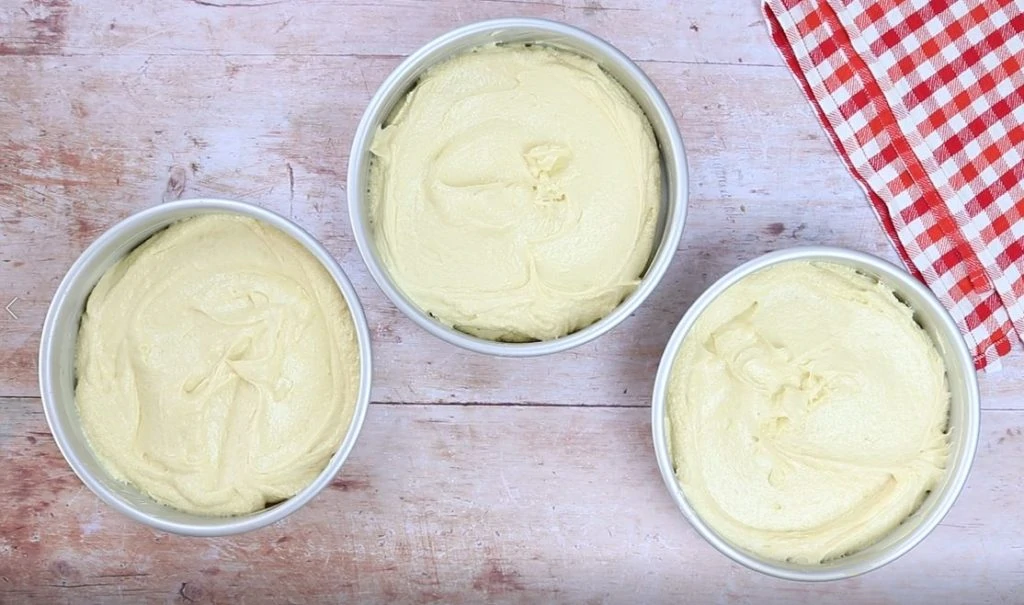
Next, add the self raising flour and ground almonds, and divide the mixture between 3 lined 8″ tins.
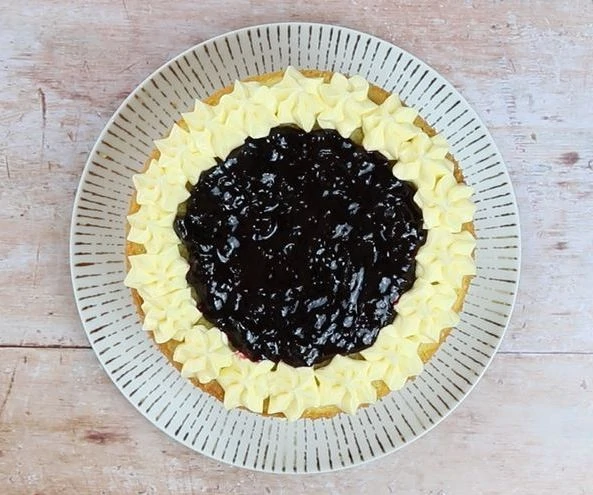
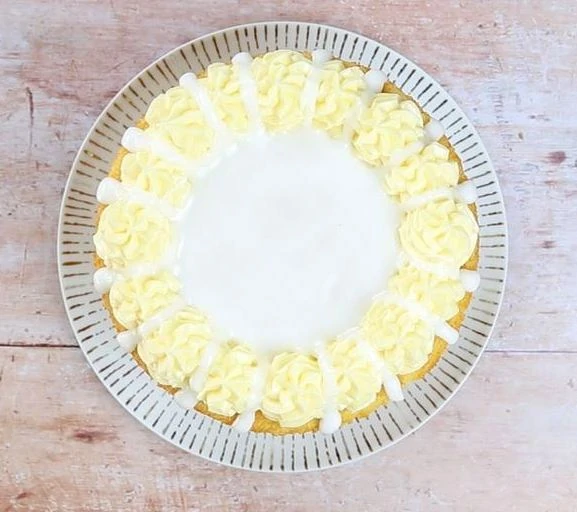
Once the cakes are baked and cooled, start piling them up. Pipe almond buttercream around the edges and fill the centre with cherry jam. For the top layer, fill the centre with icing instead, then decorate with glace cherries and flaked almonds.
For the full recipe with measurements, head to the recipe card at the end of this post.
How should the cake be stored and can it be frozen?
The cake should be stored in an airtight container in a cool place and will last for 3 days. You can freeze the sponges either alone, or decorated (but do not freeze the glace cherries). Once the sponges are fully cool, wrap them well with cling film or put them in an airtight container with some baking paper between them. You can freeze the buttercream on it’s own in a tub, or you can decorate the cake and freeze it fully assembled (again, do not freeze the glace cherries). To do this and avoid damage to the decoration, freeze it either in an airtight container. Or let it freeze solid on a cake board or plate, then wrap in cling film. Remove the cling film when you take it out to defrost it, if you don’t it could damage the decoration as it defrosts and softens. You can also freeze slices of the cake, again well wrapped in cling film or in airtight containers.
Can you make the cake with plain/all purpose flour?
Self raising flour, which is very commonly used in the UK where I am based, already contains a raising agent and a little salt too. Therefore if you want to swap it for plain or all purpose flour, you will need to add some additional baking powder and also a little salt if you like. Some people like to add salt to cake recipes and some don't, so I'll leave that up to you as it won't affect the bake. The general advice is to add 2 teaspoons baking powder (a measuring teaspoon, not the kind you stir your coffee with) per every 200g plain or all purpose flour. So for this recipe you'd need to add 4 + ½ teaspoons baking powder. Please note, I have not tested this recipe using plain or all purpose flour.
Can this recipe be made gluten or dairy free?
Yes! To make this recipe gluten free you can replace the self raising flour with a gluten free self raising flour blend. If you only have a gluten free plain flour blend, you will need to add additional baking powder. The general advice is to add 2 tsp baking powder per 200g flour, so for this recipe you'd need to add 4 + ½ teaspoons baking powder. You may also like to add ½ tsp xanthan gum for better texture. For a dairy free version, use a dairy free baking spread for both the cake and buttercream. Please do check the labels for everything you use to make the cake if you are serving it to someone with an allergy or intolerance.
Can this cake be made in different size cake tins?
Yes! If you would like to make this cake in different size tins, please check my Conversion Guide to find out how to adjust the recipe.
Can this recipe be made into cupcakes?
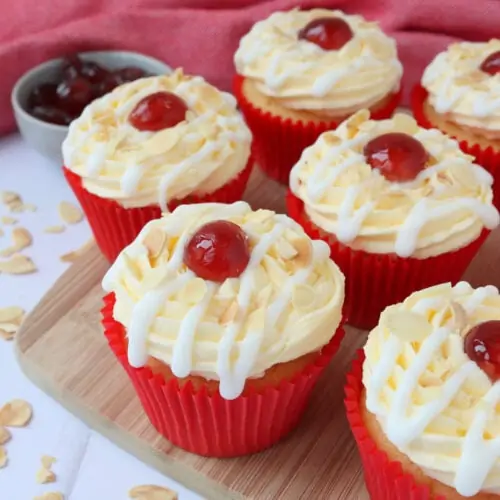
Yes! Check out my Cherry Bakewell Cupcakes recipe for the details.
More tips for making the Apple Crumble Cake:
- I like to pipe the buttercream between the layers, but you can also spread it with a spoon or palette knife.
- I decorated the cake with glace cherries as they are traditional on cherry bakewell tarts, however if you prefer fresh cherries and they're in season then you could use those instead.
- I used a Wilton 2D nozzle to pipe the buttercream onto the cake, but you can use any nozzle you prefer or spread it on with a spoon.
Troubleshooting
If you have any questions about this recipe, or if something went wrong and you need help, please use the comment form below and I will get back to you. You can also get in touch with me on my Twitter, Instagram or Facebook. I'd love to hear from you!
Recommended equipment & ingredients
- 8" cake tins
- Electric hand mixer
- Cooling rack
- Mixing bowls
- Kitchen scales
- Piping bags
- Almond extract
- Glace cherries
- Round cake tin liners
- Wilton 2D Piping nozzle
I earn a small amount of money if you buy the products after clicking on the links. You will not be charged anything extra for this. Thank you for supporting The Baking Explorer!
More bakewell recipes...

Cherry Bakewell Cake
Ingredients
For the sponge
- 500 g Caster sugar
- 500 g Butter or baking spread softened, unsalted
- 9 Eggs large
- 100 g Ground almonds
- 400 g Self raising flour
- ½ tsp Baking powder
- 1 tsp Vanilla extract
For the buttercream & filling
- 250 g Butter softened, unsalted
- 500 g Icing sugar
- 1 ½ tsp Almond extract
- 285 g Cherry jam
For the decoration
- 200 g Icing sugar
- 2 tbsp Water
- 20 g Flaked almonds
- 4 Glace cherries cut in half
Instructions
- Pre-heat your oven to 160C Fan/180C/350F/Gas Mark 4, and grease and line three 8" cake tins (that are at least 2" deep)
- Make the sponge by mixing the butter and caster sugar in a large bowl with a spoon until fluffy, or mix using an electric hand mixer
- Add the eggs and vanilla extract, and whisk until fully incorporated
- Add the self raising flour, ground almonds and baking powder, and whisk in until you can't see any flour anymore
- Divide the mixture between the tins, use scales for accuracy
- Bake them for 30-35 minutes or until a skewer inserted in the middle comes out clean. Leave them to fully cool either in the tins or on cooling racks
- To make the buttercream, mix together the butter and icing sugar, you can use either an electric hand mixer or do this by hand with a silicone spoon
- When it starts to come together add the almond extract, and mix until smooth
- If the cakes have domed on top, level them off with a cake leveller
- Stack the sponges up on your plate or cake stand, piping buttercream between each layer around the edges and filling the centre with cherry jam
- When you get to the last layer pipe larger rosettes around the edge
- Mix the icing sugar and water together until you get a thick paste (you may not need all of the water so add it slowly)
- Pour or pipe the icing into the centre of the cake then drizzle it between the buttercream rosettes and let it drip down the sides of the cake
- Sprinkle flaked almonds in the centre over the icing, and add the glace cherries on top of the buttercream rosettes
- Serve immediately, store leftovers in an airtight container in a cool place and eat within 3 days
Video
Notes
- Make sure all your ingredients (particularly the butter and eggs) are at room temperature before you start baking.
- I used unsalted butter for the buttercream, for the cake I used a baking spread.
- I decorated the cake with glace cherries as they are traditional on cherry bakewell tarts, however if you prefer fresh cherries and they're in season then you could use those instead.
- For better flavour, use almond extract, not essence.
- Although I provide cup measurements, I highly recommend weighing your ingredients out using digital kitchen scales. It is the most accurate way to measure ingredients and will ensure the best results. Digital scales are very low cost and can be purchased for around £12 ($16.50).
- For teaspoon (tsp) and tablespoon (tbsp) measurements, please use measuring spoons and not the type of spoons you eat with. Again this will ensure accuracy and provide the best results.
Michelle
This looks lush! I love Bakewell tarts and of course cake! This is a great meeting of the two, definitely on my to make list. And thanks for the link to the tubs, I was looking for deep tins and saved me the bother of looking elsewhere! Cheers. Michelle.
Hannah
This looks absolutely delicious - and I had no idea kitchenaid had been around so long! The cake looks so good I’m considering testing it for our summer bbq - it looks like an incredible and beautiful dessert!
Jacqui Bellefontaine
Ohh yum How delicious! I love the sound of this cake and would love a slice with a cuppa.
Priya
This sounds like a delicious cake! And even though I have a stand mixer I feel the need to now get one of these!
The Girl Next Door
This looks so delicious! A stunningly beautiful cake as well. I can imagine the surprise one's tastebuds would get from the cherry jam filling!
Irene
Beautiful cake!
Donna
I'm absolutely dying for a kitchen aid of any kind!! Your cake looks awesome too.
Dan
Hello, excellent cake , u was wondering how to make this into a 10 inch cake , as I've been asked to make this for a friend's wedding, do you have an idea please?
Tia
Cake mule
thebakingexplorer
Hi, yes please check out my conversions guide for details on how to do this: https://thebakingexplorer.com/ingredients-conversions/
Mrs F
Hi there,
I am going to have a go at this lovely cake but would like to scale it down to a smaller 2 layer cake for the first try. Can you help please? Also, does the glaze run into the buttercream edge on the top as it is quite thin looking? Thank you.
thebakingexplorer
Hi there, yes you can make it with two layers instead, just decrease the ingredients by a third (1/3). The idea is for the glaze to drip down the cake, but you can make it thicker by adding less water if you don't want it to do that. Hope you enjoy the cake!
Leandra
Wow! Could this look anymore beautiful!!! My favourite cake madeover and I absolutely can’t wait to try this myself.
Of Goats and Greens
Very pretty! And it matches that Kitchen Aid mixer nicely... Thank you for sharing with Fiesta Friday.
Harriet
If I wanted to just make this a two layer cake what quantities would you recommend? 😊
thebakingexplorer
Two thirds of the quantities will give you a two layer cake 🙂
Alison
Thank you.
Gail
Made this cake as one of my daughters wedding cake tiers. It was absolutely beautiful. I received so many lovely compliments. Plus my family love it to. Thank you for sharing
Monika Dabrowski
What a glorious cake, looks so light and fluffy and I personally adore cherry flavoured cakes (in addition to chocolate ones!). Thank you for bringing your lovely recipe to #CookBlogShare
Corina Blum
I love the flavours in this cake. It's a lovely twist on the traditional and the Kitchen Aid looks great too!
Jo Allison / Jo's Kitchen Larder
That is one showstopper of a cake Kat! It looks beautiful and I love all the Bakewell flavours here. We are all huge fans of cherry and almond combination so I've marked the recipe up to make soon. Thank you so much for bringing it to #BakingCrumbs 🙂
Rebecca Smith
I adore Cherry Bakewells, it's defo one of my favs. I don't mind what form it's presented in either but to be fair (thinking....) can't say I've ever had a cake version before and certainly not one this grand. Love the fact the cherry filling is hidden from sight for a delicious surprise.
Petra
What a gorgeous looking cake! And I love cherries!
I do have a few Kitchen aid machines at home and I use my blender almost daily, it is amazing!
Thank you for bringing your Cherry Bakewell cake to Fiesta Friday!
Lou | Crumbs & Corkscrews
Ooo Kat, what an amazing cake; I love the piping and filling on the layers! #bakingcrumbs
Elisha Blogs
This looks and sounds amazing! The sponge looks so soft!!
Sisley White
This looks absolutely incredible. Your bakes are just amazing.
Cat | Curly's Cooking
This looks fantastic! Such delicious classic flavours in a modern and unique cake.
Jenny Walters
Sweet Lord what a cake! Not only is it stunning to drool over it’s covered in incredible icing and flavours. I am seriously in awe you make it look so simple! I too love my KitchenAid mixer and this one sounds like it’s worth it’s weight!Thank you so much for bringing this beauty to #BakingCrumbs
Rebecca Leverett
This cake looks so amazingly delicious! Bake well is one of my favourite flavours, I’d really like to have a go at making a smaller version. Would I be ok to half the i ingredients?
thebakingexplorer
Hi Rebecca, why not try my Cherry Bakewell Cupcakes for a smaller portion 🙂 https://thebakingexplorer.com/cherry-bakewell-cupcakes/
Jane
Made this cake for my lockdown birthday cake, it was perfect, makes a large cake but that didn’t bother me as i love cake ?turned out perfect.
thebakingexplorer
Happy belated birthday Jane! I'm so glad you liked the cake 🙂
Sabrina
Hi this cake looks gorgeous !!! Is it possible to use it as a fondant covered celebration cake?
thebakingexplorer
Hi Sabrina, thank you!! Yes I don't see why not 😀
Cerys
Can confirm I've made this - you can check it out on my Instagram!
It's a fabulous recipe, I made it for a friends 30th birthday. It's a huge amount of ingredients, so I actually halved the cake recipe and it still made the three layers, it was still a big cake even halved.
Very easy to follow the recipe, as beautiful as the cake is, it's actually quite simple in it's ingredients and how to follow the instructions. Anyone could give this cake a go and do well.
I only halved the cake ingredients - the buttercream and icing I kept the same.
Highly recommended!
thebakingexplorer
Hi Cerys. Thanks you so much for your lovely feedback! Your cake looked amazing!!
Sara
This looks amazing! Can you share the recipe for 2 layers please?
thebakingexplorer
Thank you! Just use two thirds of the ingredients to make it into two layers 🙂
Danielle Bainbridge
This looks delish!!
What quantities could I use for 2 x deep 6 inch tins please? I want to slice and make 4 layers from them?
Thank you!
thebakingexplorer
Hi Danielle, check my conversion guide to find out how to adjust the quantities for a smaller cake: https://thebakingexplorer.com/ingredients-conversions/ I hope you enjoy the cake!
Susan
wondering if there's any specific reason you use vanilla extract rather than almond in the cake mix?
Thanks, Sue
thebakingexplorer
Hi Sue, no reason, feel free to use almond instead 🙂