

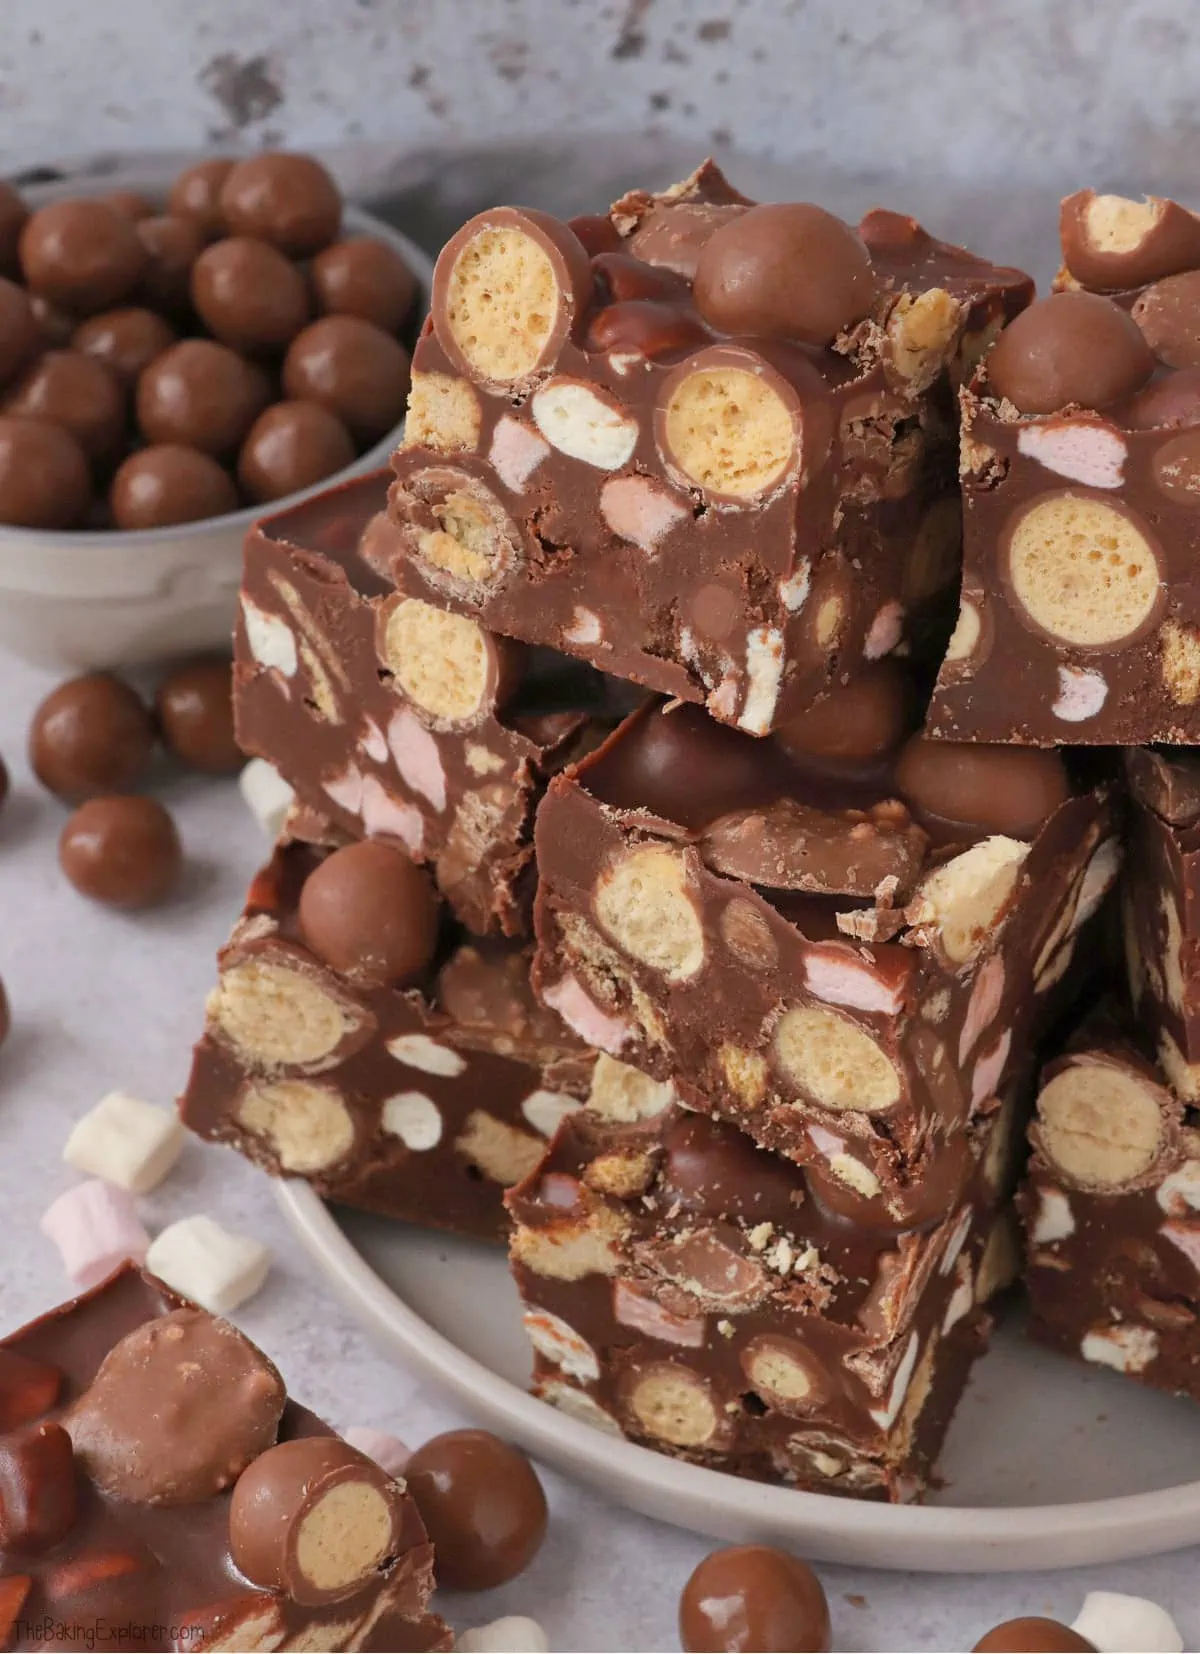
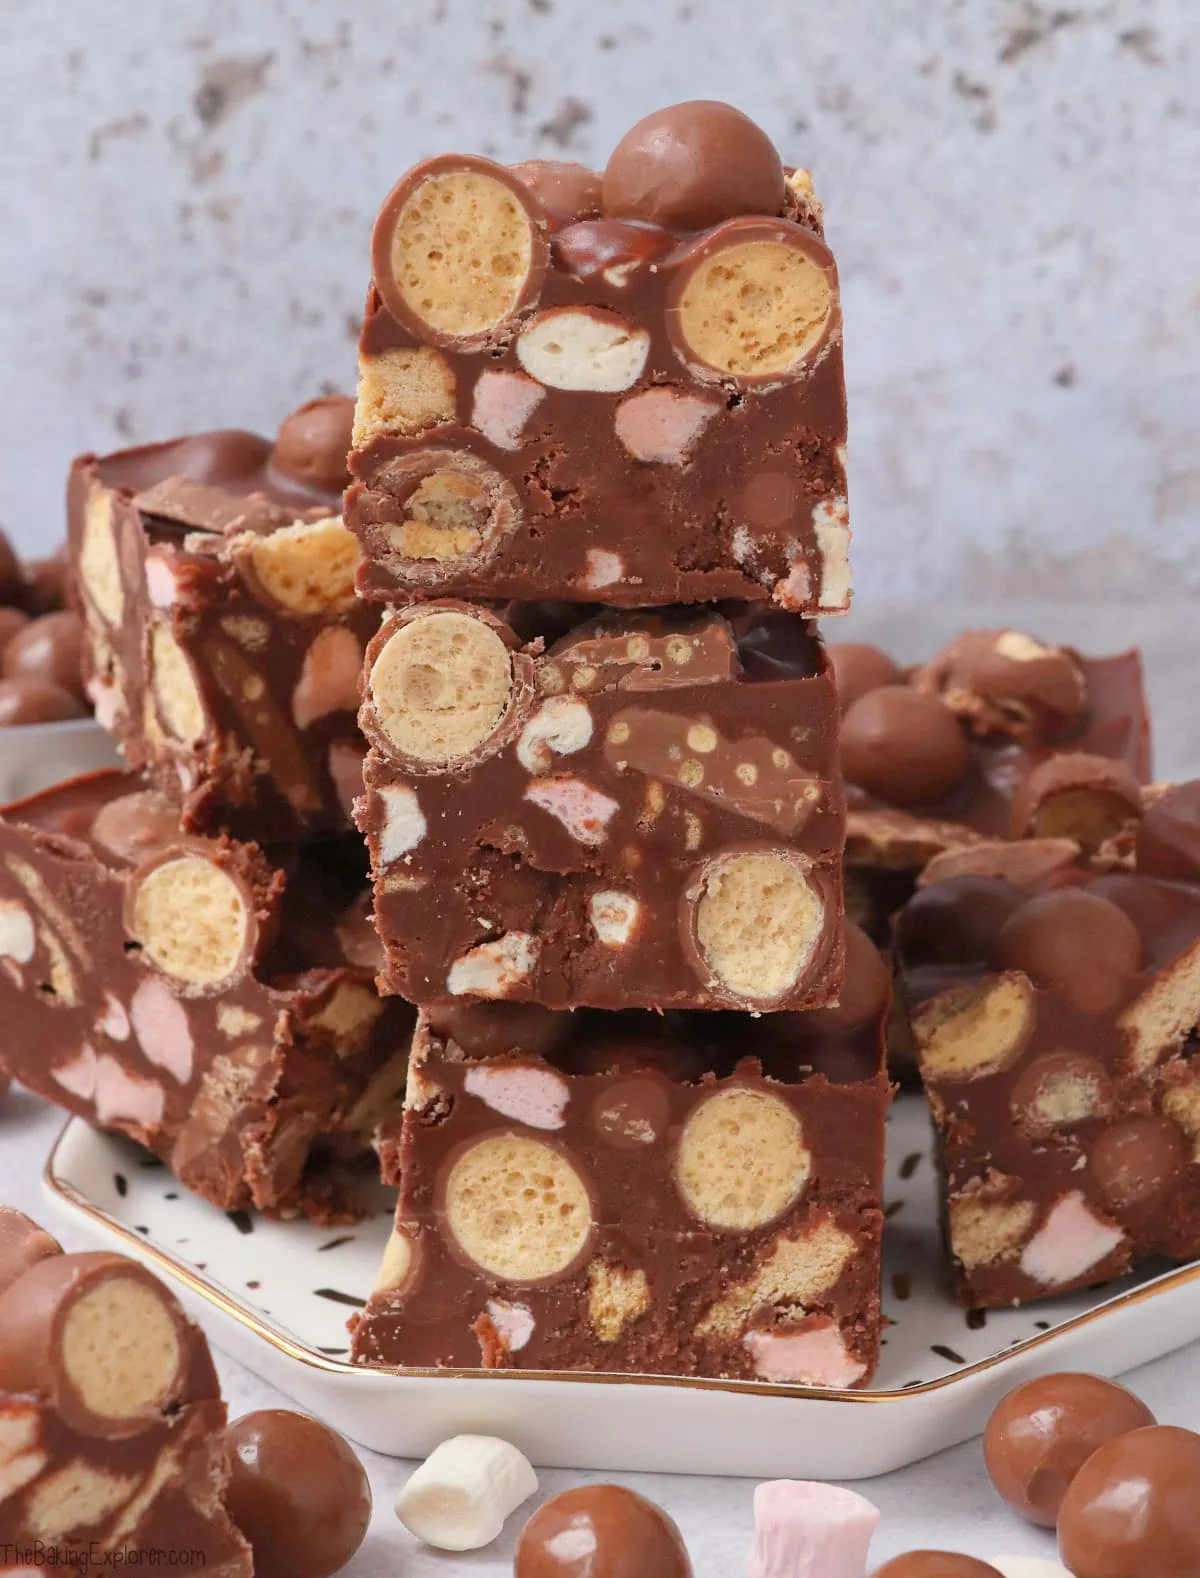
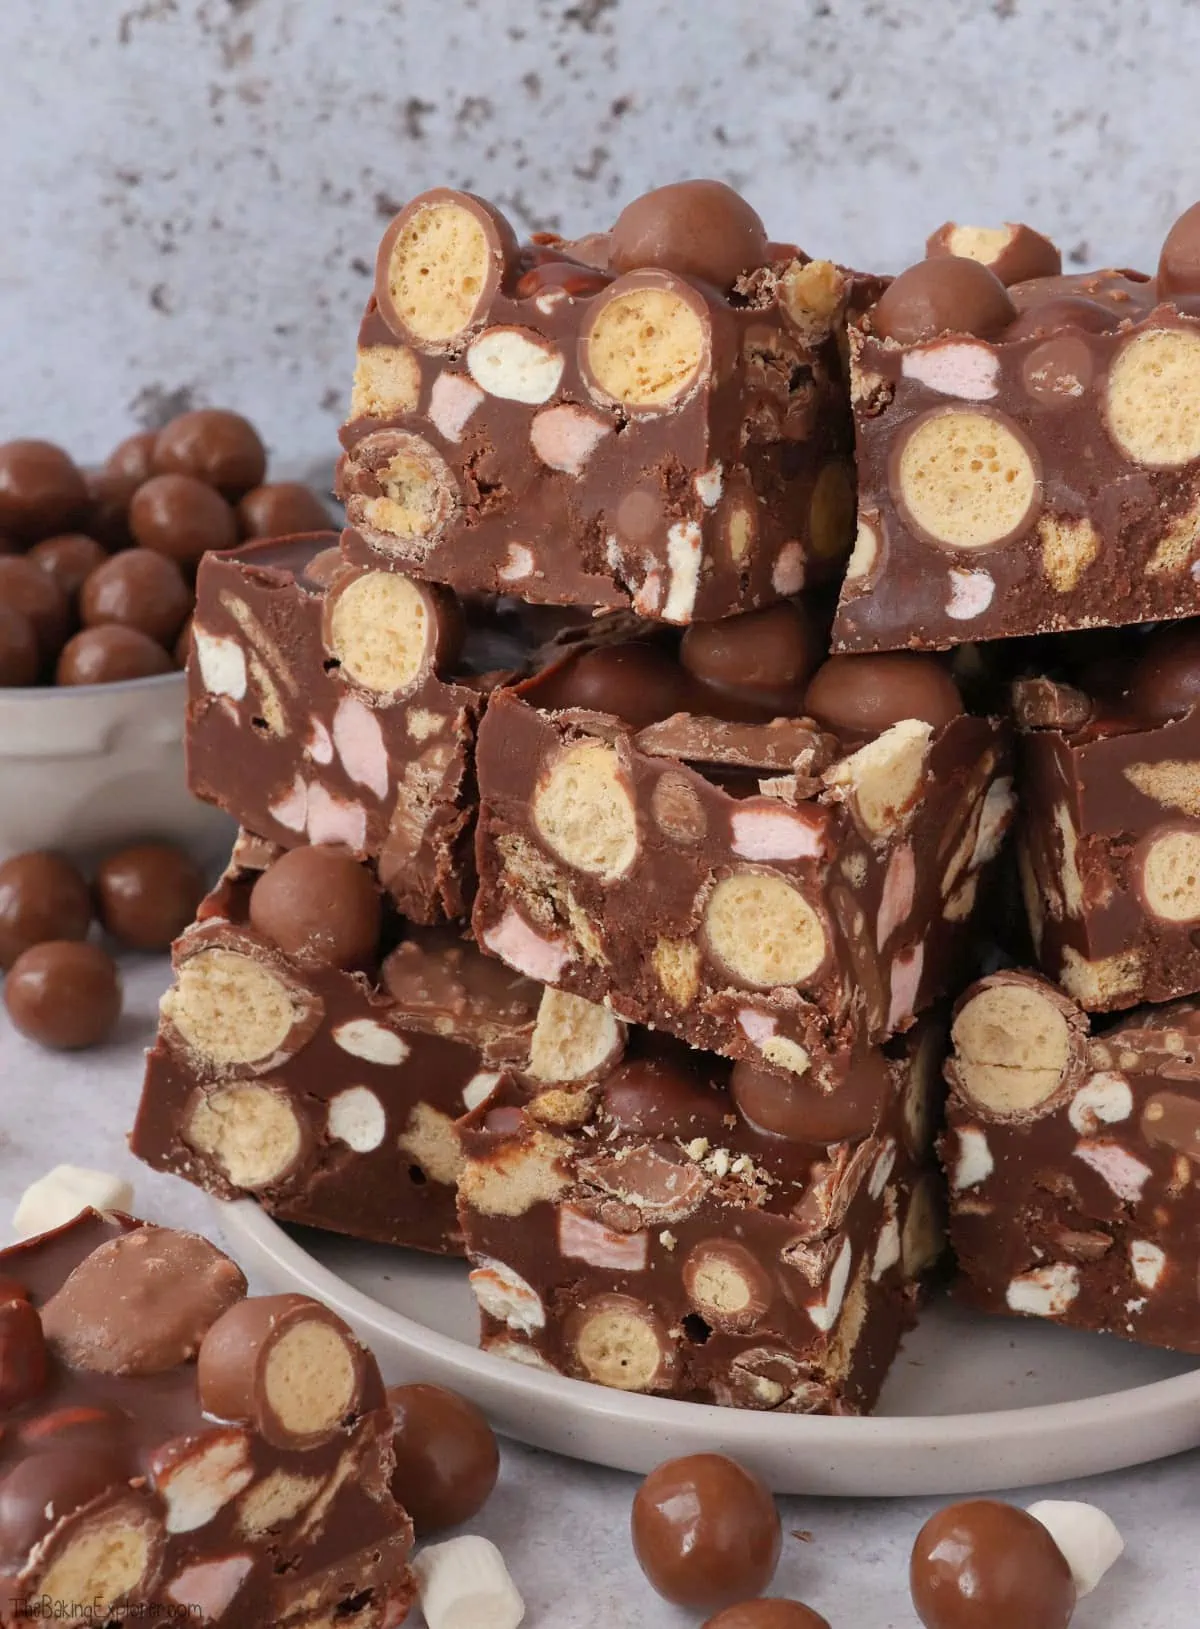
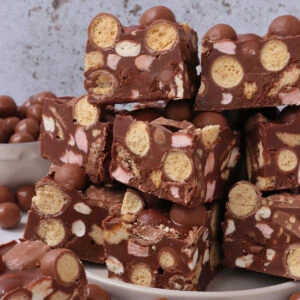
Even though I always knew Maltesers were a pretty fabulous chocolate treat, I've been really overwhelmed by how much you all loved my Maltesers Fudge recipe and how many of you made it. So I'm treating you to another Maltesers recipe - Maltesers Rocky Road! It's an easy no bake chocolate treat, packed with malted milk biscuits, marshmallows and Maltesers of course. I also added in Malteser Teaser chocolate, but this is optional. This Maltesers Rocky Road is so chocolatey and extra crunchy with all the Maltesers in it. It's such a yummy treat!
This post may contain affiliate links. I earn from qualifying purchases.

Ingredient Tips & Equipment Information
- You can use a baking spread like Stork in rocky road, but I much prefer using butter as I think it tastes better. But of course it’s down to personal preference!
- I used malted milk biscuits for this rocky road, but you could also use digestive biscuits, shortbread or another biscuit like Hob Nobs.
- You can use any combination of dark or milk chocolate that you like, or even make it all milk or all dark chocolate! Just make sure it reaches the total amount of 500g.
- I use Freedom Marshmallows in all my rocky road as they are vegetarian (they haven't paid me to recommend them, I'm just a fan!). Many marshmallows contain beef or pork gelatine so check the packet if you are serving this rocky road to vegetarians. Freedom marshmallows are available online and in Sainsburys. M&S also do a gelatine free marshmallow.
- Golden syrup is sold all over the world, so check the international section in your supermarket if you're not based in the UK. You can also buy it online from Amazon (see link below). If you can't get hold of it, light corn syrup or glucose syrup are the closest things to it, however I've not tested this recipe with them. Please note, you will not get the same results if you omit the golden syrup.
- If you like glace cherries in your rocky road, you can add 75g of them to this recipe.
- Although I provide cup measurements, I highly recommend weighing your ingredients out using digital kitchen scales. It is the most accurate way to measure ingredients and will ensure the best results. Digital scales are very low cost and can be purchased for around £12 ($16.50) .
- For teaspoon (tsp) and tablespoon (tbsp) measurements, please use measuring spoons and not the type of spoons you eat with. Again this will ensure accuracy and provide the best results.
For the full recipe with measurements, head to the recipe card at the end of this post.
How to make Maltesers Rocky Road
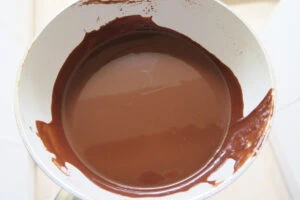

Start by melting both chocolates, the golden syrup and butter together in a pan on a low heat. Then leave the mixture to cool for 10 minutes. Prepare the fillings and stir them together in a mixing bowl.


Mix about two thirds of the melted chocolate into the bowl of fillings until well coated. Then pour it into the tin and press it down. Pour the remaining melted chocolate mixture on top and fill in any gaps. Decorate the top with Maltesers and extra Malteser Teasers or buttons. Put it in the fridge to set for a few hours, then chop it up into slices ready to be devoured!
For the full recipe with measurements, head to the recipe card at the end of this post.


What is the best kind of chocolate to use for rocky road?
I used chocolate callets by Callebaut for this rocky road, any good quality chocolate will work well and taste delicious. I’ve also made rocky road many times using supermarket own brand chocolate. I recommend avoiding cooking or baking chocolate.
How should you store rocky road?
Rocky road is best kept in the fridge. It can be stored at room temperature, but it will be much softer in texture and not last as long. Stored in the fridge, rocky road can last up to 3 weeks (well technically… you’ll probably eat it before then!!) It can also be frozen either wrapped individually, or in a tupperware container or freezer bags.
What size tin do you need for this recipe?
I use an 8" (20cm) square tin to make rocky road as I find it produces the perfect thickness when the rocky road is sliced up. If you want to use a 9" (23cm) square tin, I recommend increasing the ingredients by 25% to retain the thickness. Or you can make it with the same amounts for a thinner rocky road.
Who is this recipe suitable for?
You may not know, but most marshmallows contain beef or pork gelatine, which makes them unsuitable for vegetarians. However if you use gelatine free marshmallows like I have, then the recipe will be suitable for vegetarians. My favourite brand is Freedom Mallows, but there are now several gelatine free brands available such as Free From Fellows and Dandies.
Can this recipe be made gluten free?
Yes! To make this recipe gluten free, replace the malted milk biscuits with a gluten free alternative. You will also need to replace the Maltesers with a gluten free alternative, I recommend Schar's Delishios. Please also check the labels of all the ingredients you use to ensure they are gluten free and avoid cross contamination.
Can this recipe be made dairy free or vegan?
Yes! To make this recipe dairy free and vegan, you can use dairy free chocolate, dairy free butter and some dairy free biscuits instead. Please also check the labels of all the ingredients you use to avoid cross contamination, and especially if you are serving to someone with an allergy or intolerance.
How do you cut rocky road?
I use a large sharp knife that is longer in length than the rocky road. Gently but firmly push it through the rocky road. Rocky road slices fairly easily as the addition of butter and golden syrup makes the chocolate soft enough to slice through.
Troubleshooting
If you have any questions about this recipe, or if something went wrong and you need help, please use the comment form below and I will get back to you. You can also get in touch with me on my Twitter, Instagram or Facebook. I'd love to hear from you!
Recommended equipment & ingredients
- 8" Square tin
- Mixing bowls
- Freedom Marshmallows
- Kitchen scales
- Maltesers Teasers
- Maltesers
- Dark chocolate
I earn a small amount of money if you buy the products after clicking on the links. You will not be charged anything extra for this. Thank you for supporting The Baking Explorer!
More Maltesers recipes...


Maltesers Rocky Road
Ingredients
- 250 g Dark chocolate
- 200 g Milk chocolate
- 200 g Butter or baking spread
- 150 g Golden syrup
- 100 g Malted milk OR digestive biscuits Broken up
- 75 g Mini marshmallows gelatine free if serving to vegetarians, I use Freedom Mallows
- 200 g Maltesers
- 75 g Malteser Teasers or Maltesers Buttons optional
For decoration
- 35 g Maltesers
Instructions
- Line an 8" square tin with baking paper. I grease the tin first with a little butter to help the paper stick to it
- Put the butter, golden syrup, dark chocolate and milk chocolate in a pan and melt together on a low heat, stirring together as it melts. Once melted and combined, remove from the heat and leave to cool for 10 minutes
- Prepare a mixing bowl filled with the broken up biscuits, the marshmallows, the Maltesers and the Malteser Teasers
- Pour about two thirds of the chocolate mixture into the mixing bowl of biscuits etc. and stir to fully coat the fillings with chocolate
- Pour the whole lot into the lined tin, smooth down then add the remaining chocolate mixture to fill in any gaps. Tap the tin on the work surface a few times to help the remaining chocolate fill in any gaps and remove air bubbles
- Add the remaining Maltesers on top, cut some in half with a knife and dot them around
- Put in the fridge overnight, or for 3-4 hours to set
- Remove from the tin and slice into pieces. Store in the fridge for a firmer texture, or in a cool place for a softer texture
- If you store the rocky road in an airtight container it can be kept for 1 - 2 weeks, and up to 3 weeks in the fridge. It is best kept in the fridge
Video
Notes
- You can use a baking spread like Stork in rocky road, but I much prefer using butter as I think it tastes better. But of course it’s down to personal preference!
- I used malted milk biscuits for this rocky road, but you could also use digestive biscuits, shortbread or another biscuit like Hob Nobs.
- You can use any combination of dark or milk chocolate that you like, or even make it all milk or all dark chocolate! Just make sure it reaches the total amount of 500g.
- I use Freedom Marshmallows in all my rocky road as they are vegetarian (they haven't paid me to recommend them, I'm just a fan!). Many marshmallows contain beef or pork gelatine so check the packet if you are serving this rocky road to vegetarians. Freedom marshmallows are available online and in Sainsburys. M&S also do a gelatine free marshmallow.
- Golden syrup is sold all over the world, so check the international section in your supermarket if you're not based in the UK. You can also buy it online from Amazon (see link below). If you can't get hold of it, light corn syrup or glucose syrup are the closest things to it, however I've not tested this recipe with them. Please note, you will not get the same results if you omit the golden syrup.
- If you like glace cherries in your rocky road, you can add 75g of them to this recipe.
- Although I provide cup measurements, I highly recommend weighing your ingredients out using digital kitchen scales. It is the most accurate way to measure ingredients and will ensure the best results. Digital scales are very low cost and can be purchased for around £12 ($16.50) .
- For teaspoon (tsp) and tablespoon (tbsp) measurements, please use measuring spoons and not the type of spoons you eat with. Again this will ensure accuracy and provide the best results.
Nutrition
If you like this, check out more of my Rocky Road recipes!
NB. This post is NOT in anyway sponsored by Maltesers - I just love their product!
Jacqui Bellefontaine
Ive never made a malteser rocky road or even any other bake with malteser which is strange as i do rather love them. I could very happily tuck into this one, so if i get a chance to make one this year I shall try this one as it looks so scrummy. Thank you for linking to #CookBlogShare.
thebakingexplorer
I hope you get to try this Jacqui!
Amy
Looks fabulous!
thebakingexplorer
Thanks Amy!
Mila
Hi Kat!
What a lovely name, never heard of it before. and those little squares looks very yummy 🙂
thebakingexplorer
Ah thank you Mila!
Rita
I want these now, they look so good. Thanks for sharing on Fiesta Friday group.
thebakingexplorer
I wish I could send you some!
Coco in the Kitchen
This looks dangerously yummy!
thebakingexplorer
You are right on the mark there!
Jenny Paulin
I have made my own version of this on my blog so I know how utterly delicious it is, and how moreish it is too. I made a batch of crunchy rocky road at the weekend, but I didn't get chance to photograph it because my friends and family scoffed it too fast!
It looks so good Kat! Thank you for sharing with #BakeoftheWeek x
thebakingexplorer
Ooo crunchie rocky road sounds really good too! There are so many treats to experiment with!
Alicia
Made these today. They are dead easy to make, and I’m a helpless baker! End result it’s so impressive and the kids (and husband) love them. I love when recipes work and yours always do for me. Will be trying more of your recipes for sure. Thank you.
Alice
The BEST rocky road I have ever tasted! Such a great, simple recipe that I’m sure I’ll continue to use and pass on to others!
thebakingexplorer
Thank you so much Alice!
Louise
Hi Kat. I was just wondering if you could help me. I am looking to make this in a 9x13 inch tin. Could you advice me on the extra quantities of ingredients I would need for this size tin. Many thanks.
thebakingexplorer
Hi Louise, I've never made it in a tin that big, at a guess I would say to double the quantities.
Geo
Hey, I adore this recipe but I regularly find that my syrup, butter & chocolate mixture tends to separate a lot, I always make sure to use a very low and slow approach but is there something I could change to stop this happening? Thanks!
thebakingexplorer
Hi Geo, a good way to avoid this is to melt the butter and golden syrup together, then take off the heat, add the chocolate (chop it up small) and stir until it melts. You can put it back on a low heat if needed. I hope that helps!