
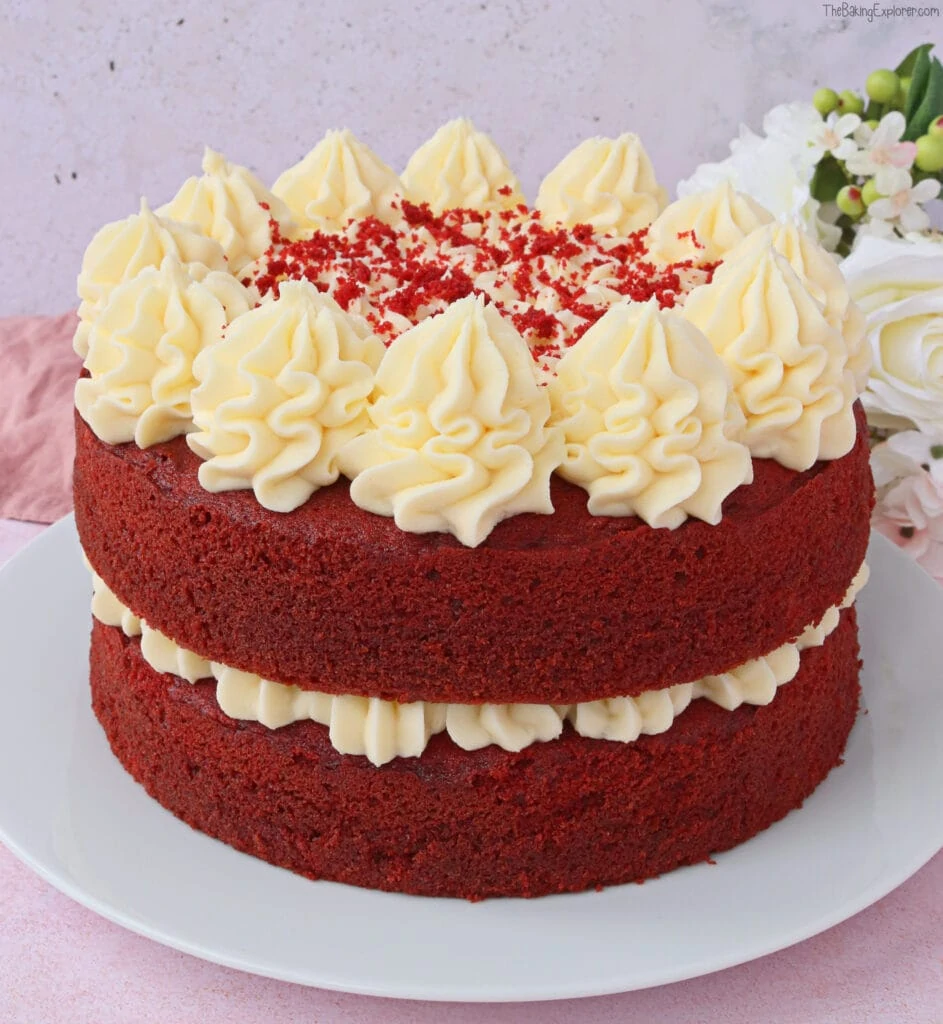
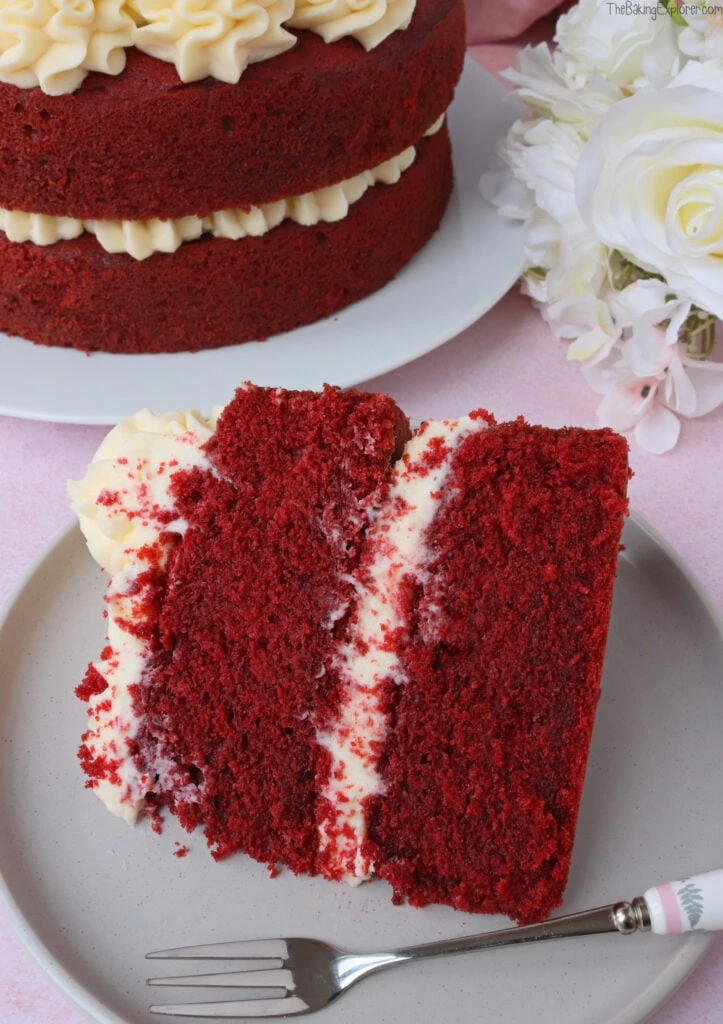
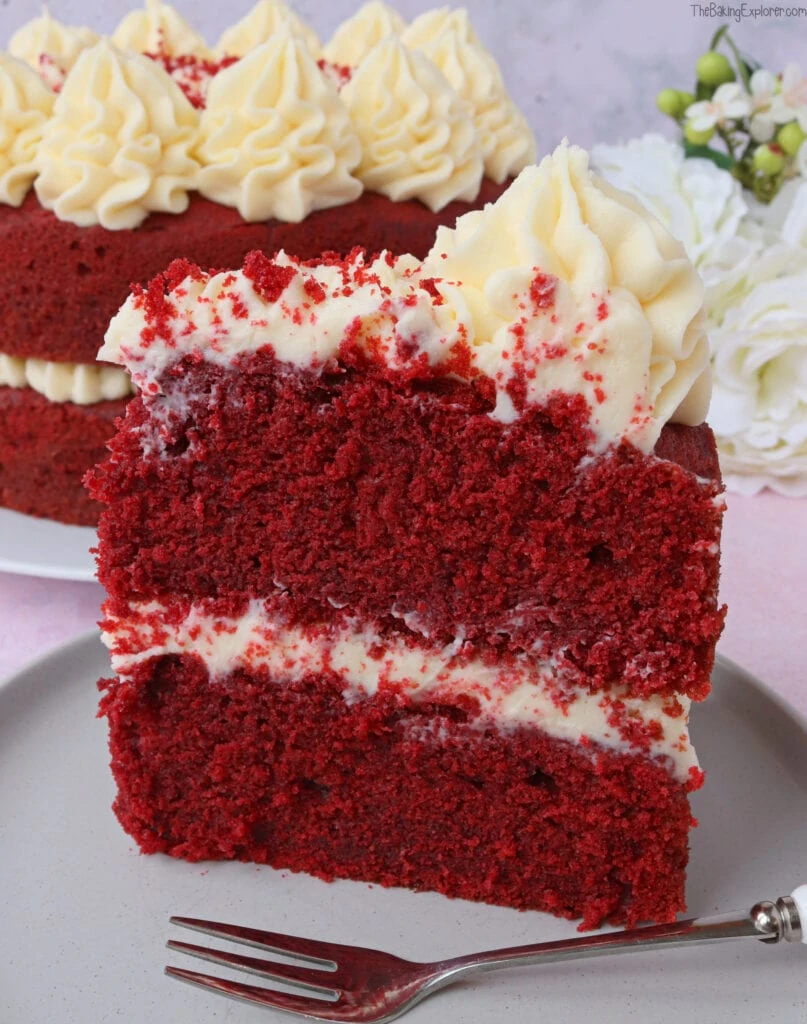
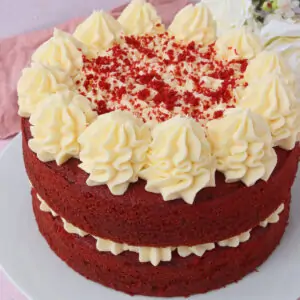
I've had so many requests for a Red Velvet Cake recipe, so I'm very excited to share this recipe with you all! It's super light and fluffy, while also being perfectly moist - surely everything you want in a cake?! It has a lovely vanilla flavour, with a hint of cocoa. This easy recipe can be enjoyed any time of year, but I do always end up associating red velvet with Valentine's Day for some reason!
This post may contain affiliate links. I earn from qualifying purchases.
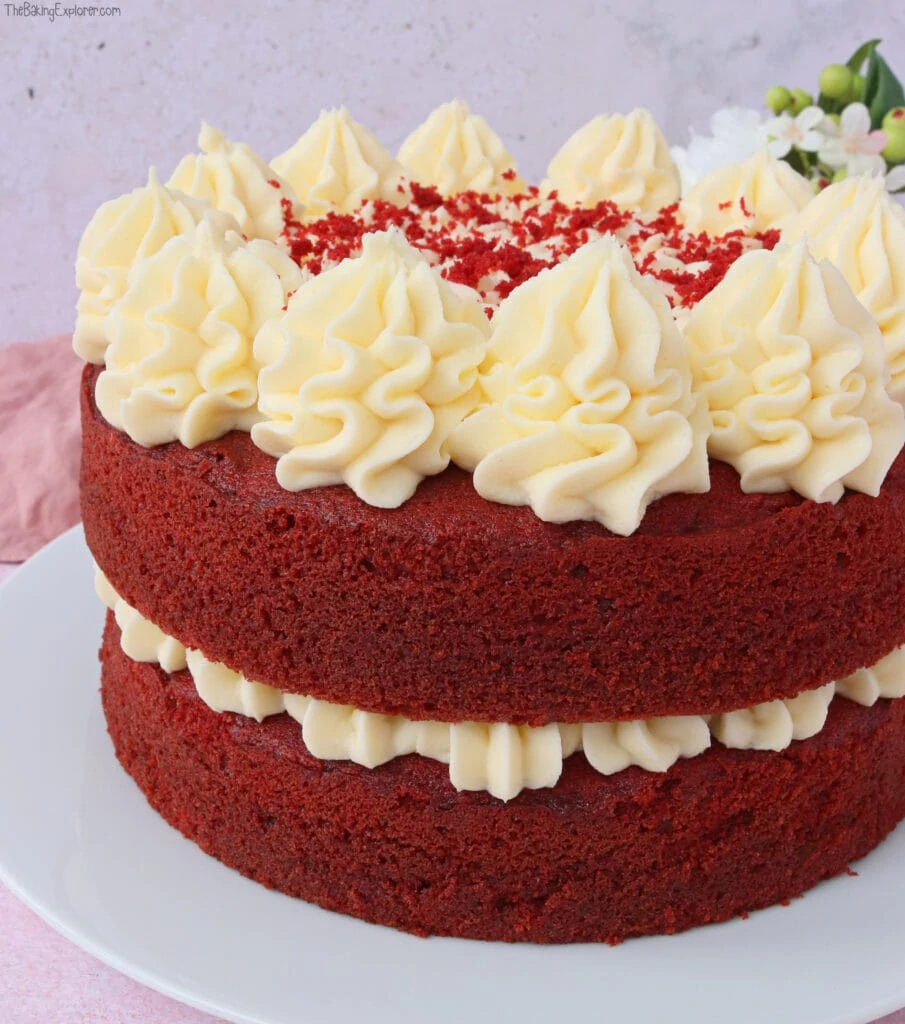
Although I adore the sponge of this cake very much, the cream cheese frosting is the star of the show for me. It can be hard to make thick and perfectly pipeable cream cheese frosting in the UK, as we don't have the cream cheese blocks that are sold in the USA. However, this recipe solves that issue and this cream cheese frosting is truely epic!! It pipes like a dream and is so thick and creamy.
Ingredient Tips & Equipment Information
- Make sure all your ingredients (particularly the butter, buttermilk and eggs) are at room temperature before you start baking.
- I used unsalted butter for the buttercream, for the cake I used a baking spread.
- You will need to use a professional grade gel food colouring to get the same shade of red that you can see in my photos. Brands I recommend are Pro Gel and Sugarflair. I have also heard good things about Colour Mill and Americolor.
- I prefer to use Philadelphia full fat cream cheese for the buttercream as it gives me the best results.
- Although I provide cup measurements, I highly recommend weighing your ingredients out using digital kitchen scales. It is the most accurate way to measure ingredients and will ensure the best results. Digital scales are very low cost and can be purchased for around £12 ($16.50).
- For teaspoon (tsp) and tablespoon (tbsp) measurements, please use measuring spoons and not the type of spoons you eat with. Again this will ensure accuracy and provide the best results.
For the full recipe with measurements, head to the recipe card at the end of this post.
How to make Red Velvet Cake
To make the cake sponge, whisk together the butter and sugar, then whisk in the eggs and vanilla extract.
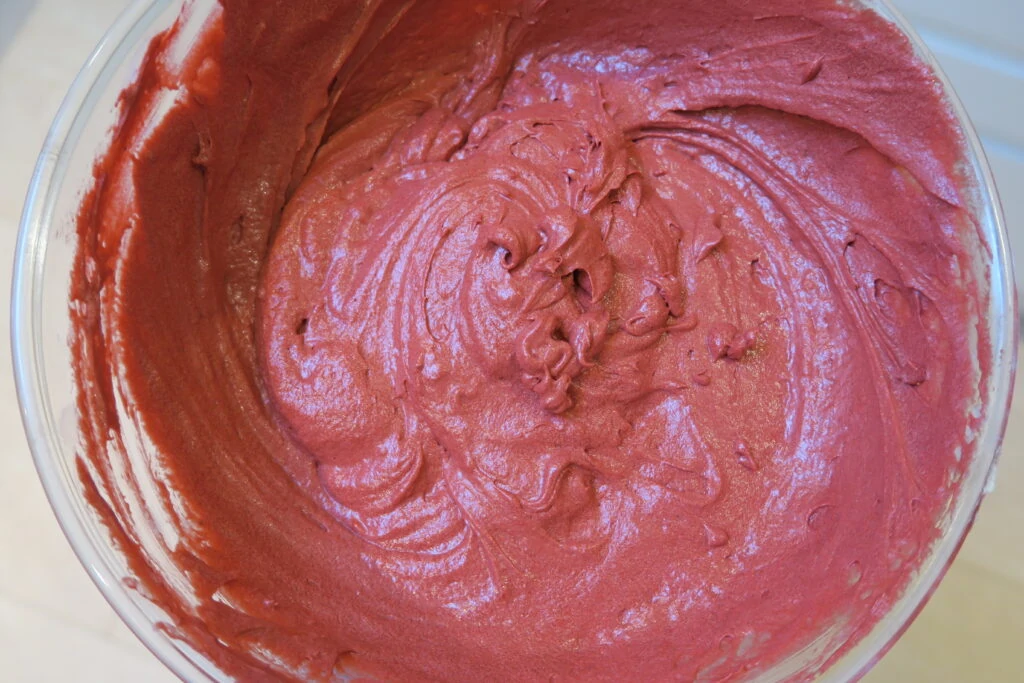
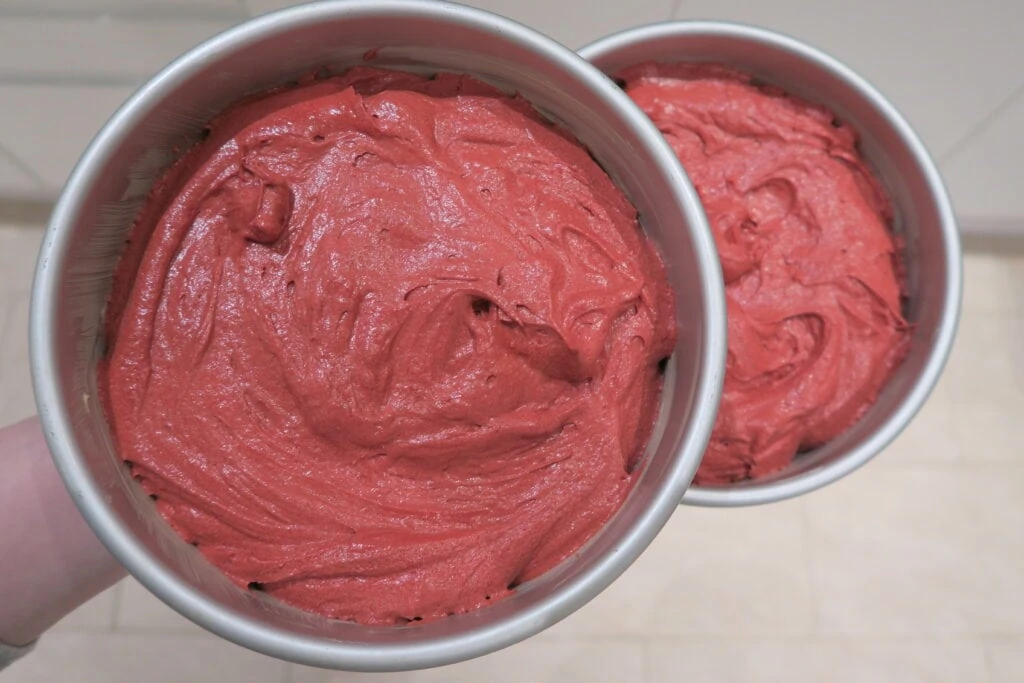
Whisk in the buttermilk, red food colouring, bicarbonate of soda, cocoa powder and self raising flour until smooth. Then divide the mixture between the cake tins.

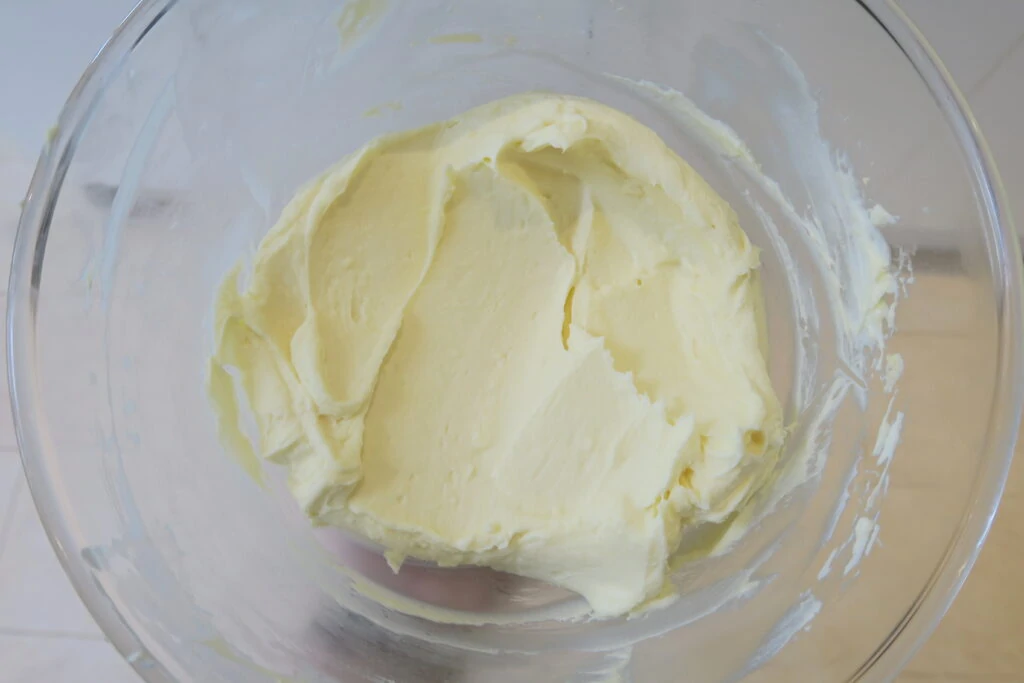
Bake them for 40 minutes, then leave them to cool. To make the cream cheese frosting, mix together butter and icing sugar, then add cream cheese and vanilla extract and mix until smooth.
For the full recipe with measurements, head to the recipe card at the end of this post.

What is the best food colouring to use?
To get a bright red shade that remains strong after the cake is baked you need to use a professional grade gel food colouring. You can buy these easily from many online shops, including Amazon. I used the Sugarflair Red Extra for this cake. Pro Gel, Colour Mill and Americolor are other popular brands.
What if you can’t get hold of buttermilk?
If you can’t hold of buttermilk, you can use the same amount of milk with 1 tbsp lemon juice added (or cider vinegar), leave it for a few minutes until it goes lumpy then it’s ready to use!
Can you make the cake with plain/all purpose flour?
Self raising flour, which is very commonly used in the UK where I am based, already contains a raising agent and a little salt too. Therefore if you want to swap it for plain or all purpose flour, you will need to add some additional baking powder and also a little salt if you like. Some people like to add salt to cake recipes and some don't, so I'll leave that up to you as it won't affect the bake. The general advice is to add 2 teaspoons baking powder (a measuring teaspoon, not the kind you stir your coffee with) per every 200g plain or all purpose flour. So for this recipe you'd need to add 3 teaspoons baking powder. Please note, I have not tested this recipe using plain or all purpose flour.
How long does the Red Velvet Cake last for and can you freeze it?
The cake will keep in an airtight container for 3 days in the fridge. You can freeze the sponges either alone, or decorated. Once the sponges are fully cool, wrap them well with cling film or put them in an airtight container with some baking paper between them. You can freeze the frosting on it’s own in a tub, or you can decorate the cake and freeze it fully assembled. To do this and avoid damage to the decoration, freeze it either in an airtight container. Or let it freeze solid on a cake board or plate, then wrap in cling film. Remove the cling film when you take it out to defrost it, if you don’t it could damage the decoration as it defrosts and softens. You can also freeze slices of the cake, again well wrapped in cling film or in airtight containers.
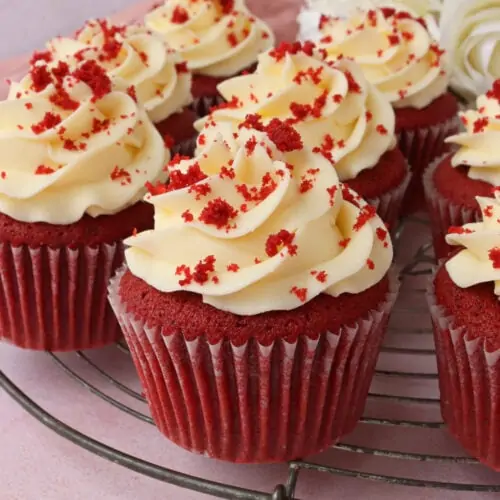
Can this recipe be made into cupcakes?
Yes! Please head over to my Red Velvet Cupcakes post for a recipe.
Can this cake be made in different size cake tins?
Yes! If you would like to make this cake in different size tins, please check my Conversion Guide to find out how to adjust the recipe.
Can this recipe be made gluten or dairy free?
Yes! For gluten free you can replace the self raising flour with a gluten free self raising flour blend. If you only have a gluten free plain flour blend, you will need to add additional baking powder. The general advice is to add 2 tsp baking powder per 200g flour, so for this recipe you'd need to add 3 teaspoons baking powder. You may also like to add ½ tsp xanthan gum for better texture. For a dairy free version, use a dairy free baking spread for the cake and buttercream. You can make dairy free buttermilk by adding 1 tbsp lemon juice (or cider vinegar) to dairy free milk. You will also need to use dairy free cream cheese for the buttercream. Please check the labels of everything you use if you are serving this cake to someone with an allergy or intolerance.
More tips for making the Red Velvet Cake:
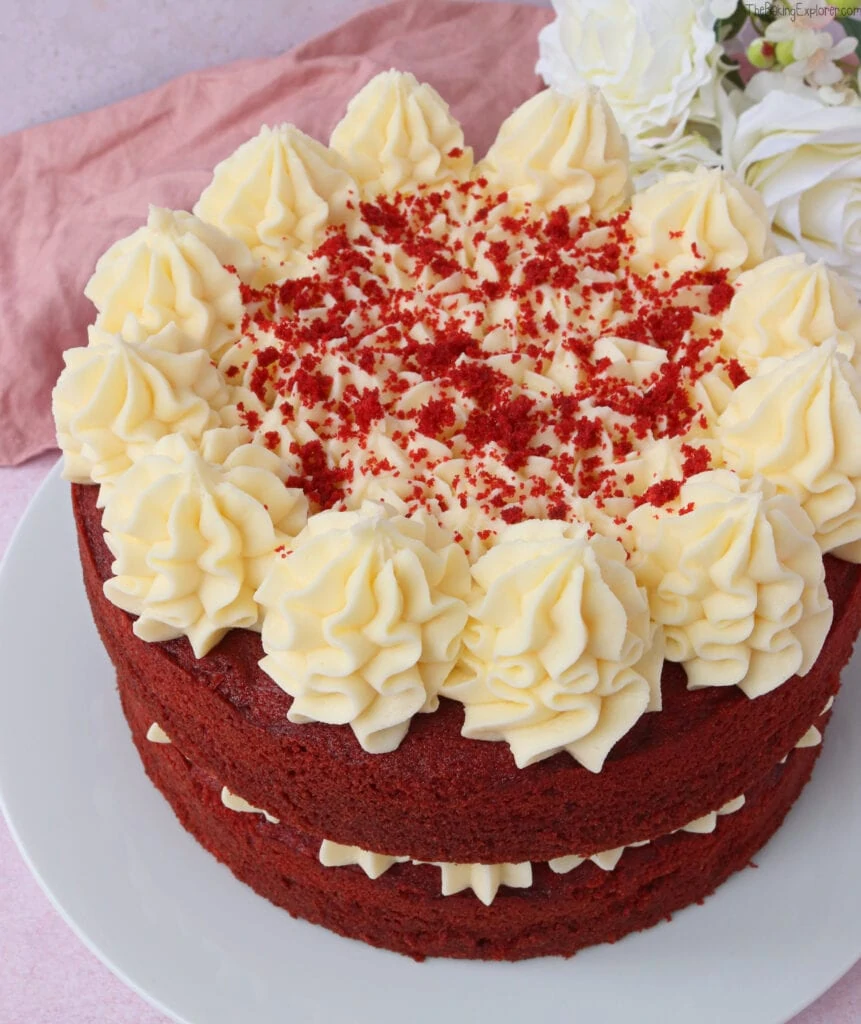
- I used a Ateco 828 piping nozzle to pipe on the frosting.
- I don’t recommend baking this cake in one deep tin, as it may not cook evenly. It is best to bake it in two sandwich tins (make sure the sides are at least 2" deep).
- Make sure to store the cake in the fridge once it's been frosted.
Troubleshooting
My number one tip for getting the best results is to read through this whole page of tips and recommendations before starting, and follow the recipe exactly. If you have any questions about this recipe, or if something went wrong and you need help, please use the comment form below and I will get back to you. You can also get in touch with me on my Twitter, Instagram or Facebook. I'd love to hear from you!
Recommended equipment & ingredients
- 8″ cake tins
- Mixing bowls
- Kitchen scales
- Electric hand mixer
- Cooling rack
- Piping bags
- Ateco 828 piping nozzle
- Red food colouring
I earn a small amount of money if you buy the products after clicking on the links. You will not be charged anything extra for this. Thank you for supporting The Baking Explorer!
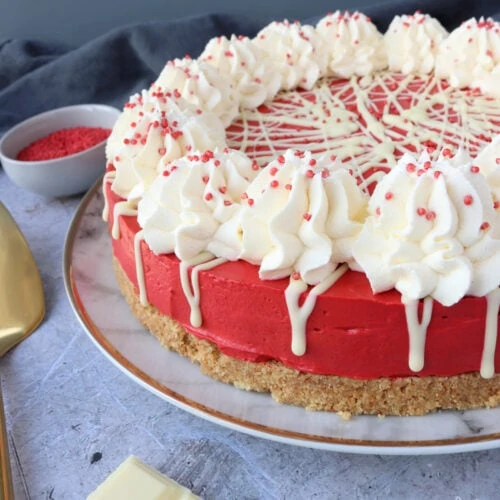
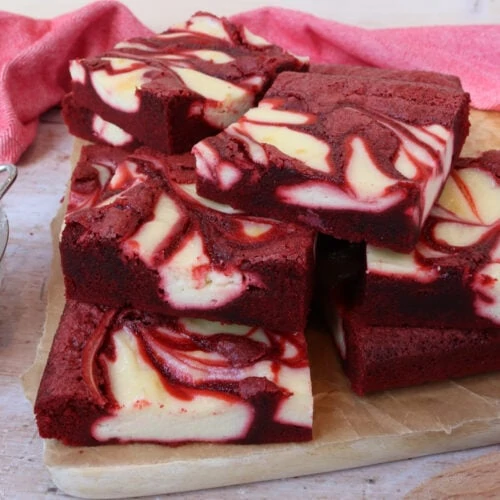
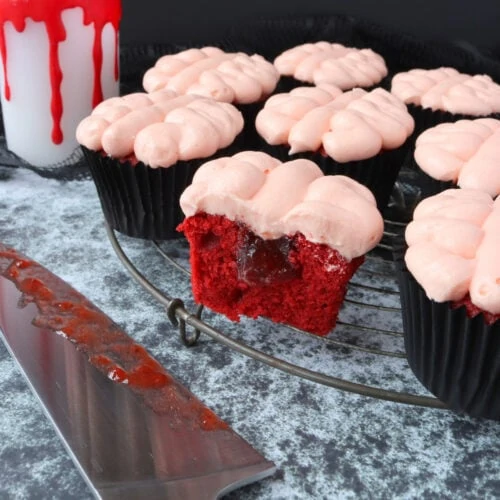
More red velvet recipes...

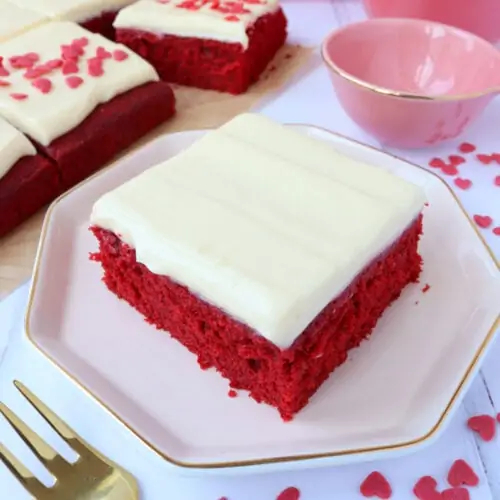
Red Velvet Cake
Ingredients
For the cake sponge
- 300 g Butter or baking spread unsalted, softened
- 300 g Caster sugar
- 4 Eggs large
- 2 tsp Vanilla extract
- 3 tbsp Cocoa powder
- 2 tsp Red food colouring
- 330 g Self raising flour
- 1 tsp Bicarbonate of soda
- 170 ml Buttermilk
For the cream cheese frosting
- 225 g Butter unsalted, softened
- 225 g Icing sugar
- 450 g Full fat cream cheese I use Philadelphia
- 1 tsp Vanilla extract
Instructions
- Pre-heat your oven to 160C Fan/180C/350F/Gas Mark 4, and grease and line two 8" cake tins (that are at least 2" deep)
- Mix the baking spread (or butter) and sugar together until fluffy, use an electric mixer for the best results
- Add the eggs and vanilla extract, and mix until fully incorporated
- Add the cocoa powder, bicarbonate of soda, red food colouring, buttermilk and self raising flour, and mix in gently until fully combined
- Divide the mixture between the tins, use scales for accuracy if you like
- Bake them for 40 minutes or until a thin skewer inserted in the middle comes out clean. Leave them to fully cool either in the tins or on cooling racks
- If the cakes have domed on top, level them off with a cake leveller or a sharp knife - you can use some of the crumbs from doing this for decoration
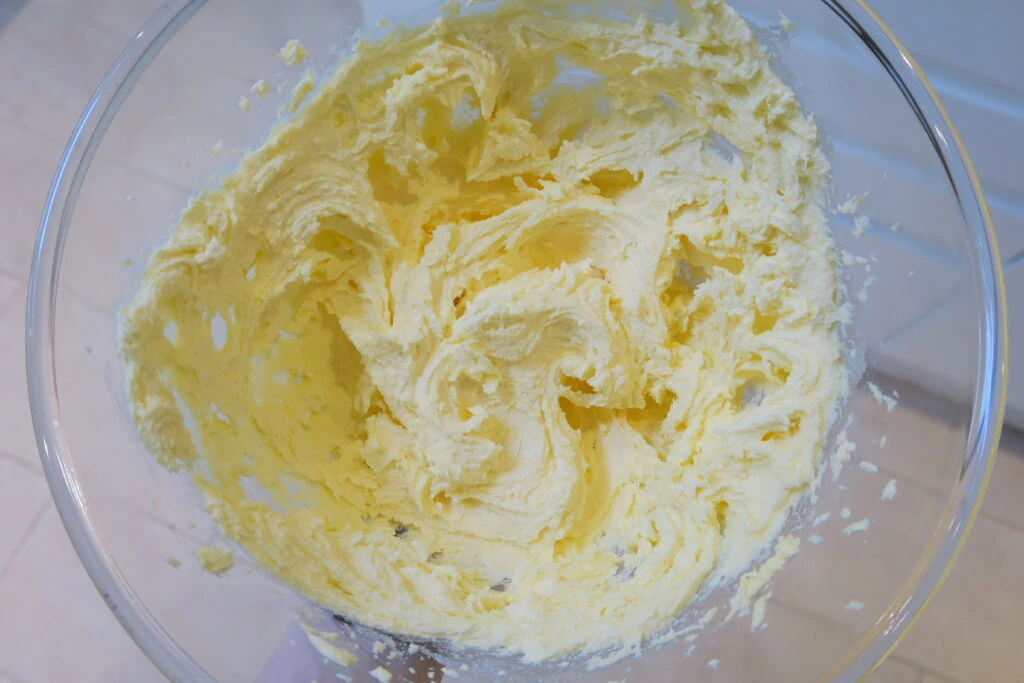
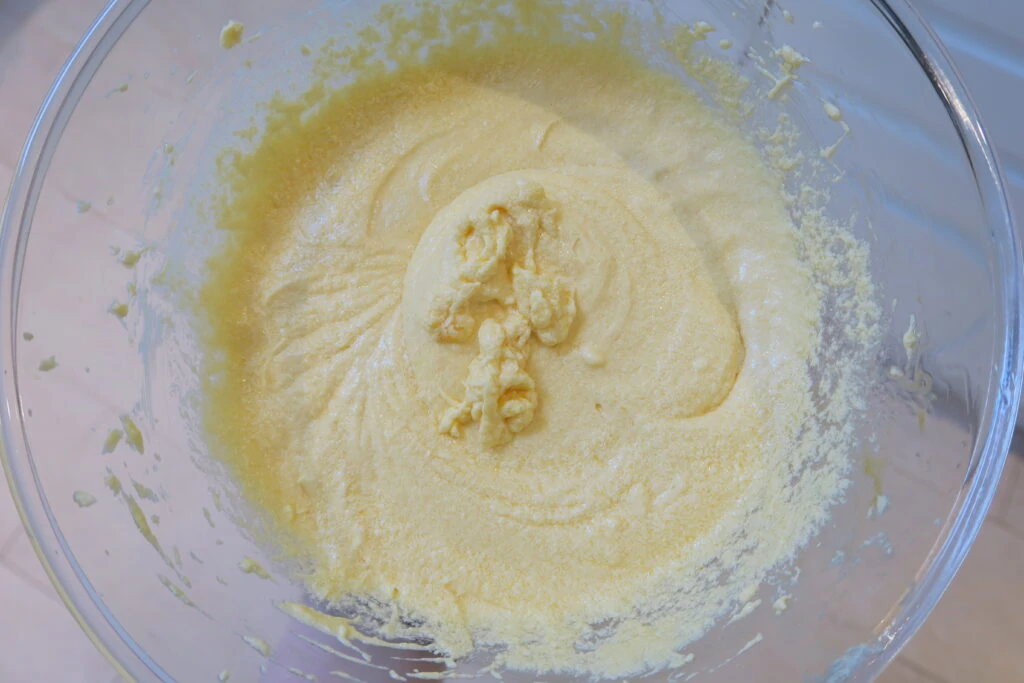
- To make the cream cheese frosting, use an electric mixer to beat the butter until smooth. Then mix in the icing sugar until the mixture is smooth
- Next, add the cream cheese and the vanilla extract and mix in until the frosting is thick and smooth. Be careful not to over mix as this can make the frosting sloppy, and you won't be able to get it thick again
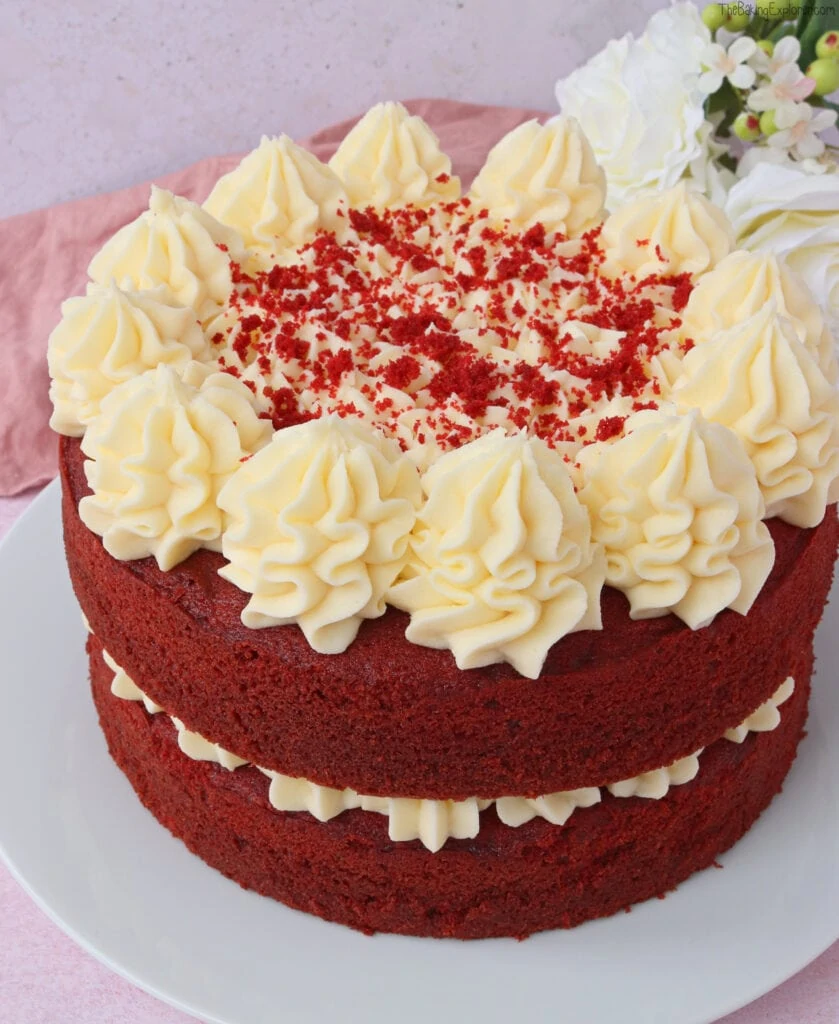
- Put one of the sponges on your plate or cake stand, and pipe or spread a layer of the frosting over it
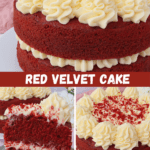
- And the second sponge on top, pipe larger rosettes of buttercream all around the edge and smaller ones in the centre
- Decorate with cake crumbs or sprinkles
- Serve immediately, store leftovers in an airtight container in the fridge and eat within 3 days
Video
Notes
- Make sure all your ingredients (particularly the butter, buttermilk and eggs) are at room temperature before you start baking.
- I used unsalted butter for the buttercream, for the cake I used a baking spread.
- You will need to use a professional grade food colouring to get the same shade of red that you can see in my photos. Brands I recommend are Pro Gel and Sugarflair. I have also heard good things about Colour Mill and Americolor.
- I prefer to use Philadelphia full fat cream cheese for the buttercream as it gives me the best results.
- Although I provide cup measurements, I highly recommend weighing your ingredients out using digital kitchen scales. It is the most accurate way to measure ingredients and will ensure the best results. Digital scales are very low cost and can be purchased for around £12 ($16.50).
- For teaspoon (tsp) and tablespoon (tbsp) measurements, please use measuring spoons and not the type of spoons you eat with. Again this will ensure accuracy and provide the best results.
Janice
A perfect cake for Valentines or any other celebration. Great recipe with really clear instructions.
Maureen
Can I use 2 x 9” tins instead and do I line the bottom or the whole tin?
thebakingexplorer
Hi Maureen, if you would like to make this cake in different size tins, please check my Conversion Guide to find out how to adjust the recipe: https://thebakingexplorer.com/ingredients-conversions/ I only line the bottom of my tins and grease the sides, but you know your tins best. I hope that helps!
Keri
Where can I buy buttermilk from and what brand please.
thebakingexplorer
Hi Keri, you should be able to get buttermilk in most major supermarkets. I usually get it from Tesco as that's my local shop, the brand is St Ivel.
Mia
You can get a small carton from Marks and Spencer's, its in the creams section usually!
Cat | Curly's Cooking
Such a wonderful deep red colour and cream cheese frosting is my favourite! Looks great.
Midge @ Peachicks' Bakery
What a gorgeous colour! Definite a flavour I need to have a go at making - it looks so pretty! #CookBlogShare
Rebecca
The COLOUR! I can never seem to get my cake to go this colour, think I'm too reserved on the food colouring. My son loves red velvet, its a treat they get a school sometime (cool school!) so am going to have a go at this recipe ... so I can be cool too!!!
Elajne
I made this today and it worked out brilliantly. Best red velvet cake I’ve had. I’d definitely recommend this recipe I’d you like red velvet cake.
thebakingexplorer
Thank you so much Elaine!
Suzie
Hello! Looks solo red! Do you think you could cook it in 3 tins instead of 2? Can't wait to try it xx
thebakingexplorer
Hi Suzie, yes I think you could do this, the thickness of the layers will be less and they will take less time to bake. I hope you enjoy the cake!
Gemma
I absolutely loved this recipe - the cake was so delicious and moist. Can I bake the same cake in a 2lb loaf tin? How should I adapt the quantities?
thebakingexplorer
Hi Gemma, I'm so happy you enjoyed it! I've been experimenting with a loaf cake version but I've not been happy with it yet, I will share it when I've perfected it! Feel free to try it yourself in the meantime 😀
Loveness
This is best recipe for red velvet cake. Very moist and delicious. You can eat the whole by your self. Thank you will try more recipes. Don't normally like cheese cream but this is epic.
Kat
Amazing recipe! So easy to follow and comes out so lovely and moist. Excellent cream cheese frosting... to die for!! Best red velvet cake I’ve had 🙂 Defo a must try!
Sheikh Islam
This recipe was super easy to follow! It tasted good too. I’ve always been a little afraid of baking red velvet cake because recipes always would be too complex and there would be too many components.
This was simple, easy to follow and luxurious!
Thank you for sharing!!
Sorry forgot my rating - definitely 5 STARS!
Instagram: @phat.bakes
thebakingexplorer
Thank you for this lovely feedback!
Hajra
Thank u so much.i tried the recipe and it came out perfect.I just modified it by adding a cake gel 1 and half tea spoon.and because i don like much sugar so i reduced the sugar by 10% so it was 270g.
Very good and easy recipe.
thebakingexplorer
Hi Hajra, I so pleased to hear you enjoyed the cake! And I'm glad it still worked well with the reduced sugar. Sugar contributes more than just sweetness to cake, it also helps them stay moist and soft.
Kayleigh
Hi there I need help I'm after making this cake a 10in tin what would you recommend for the recipe please? Thank you
thebakingexplorer
Hi Kayleigh, you can use my free cake converter to adjust the recipe for your tin size! It's available here: https://view.flodesk.com/pages/641e13c2674bc7e38a12bffc
sylvie
Hello and thank you for your lovely recipes! I tried to download the converter but nothing arrived vi email...🤷🏼♀️
thebakingexplorer
Hi Sylvie, have you checked your junk mail?
Lorraine Woodward
I made this cake for my neighbours 40th birthday. Such an easy cake to make and it was very moist everyone loved it. This will now be my go to recipe for Red Velvet Cake. Thank You
Patricia
Hi. I have made it today for a birthday tea party. It is just fantastic. Clear recipe and easy to follow
thebakingexplorer
Thank you so much for your lovely feedback Patricia!
C
Cakes didn't even turn out red, definitely brown. It's been 45 mins and the cakes haven't fully cooked yet. What a flop
thebakingexplorer
Hi C, if they didn't turn red then this is likely because you didn't use a good quality professional grade food colouring, I recommend several brands in the blog post. Or if you did, then you may need to use more of it next time. All ovens are different, I can only give the time they take in my oven, and then also the recommendation that they are done when a skewer inserted in the centre comes out clean. I hope this helps for next time!
Dannielle
Hello, I have tried this recipe and it is great.
I just wanted to know if it is study enough to be a tiered cake, as in it being the bottom tier, will it crumble if there is another cake on top because I tried a different recipe and it collapsed on me.
Would I need to replace the self raising flour and use plain flour?
How do I go about converting the recipe to fit two 10" tins?
Thanks Dannielle
thebakingexplorer
Hi Dannielle, I'm so happy you like the recipe! I have never used it as a tiered cake, so I don't know sorry. I only like to say yes if I've tested a scenario, but I haven't in this case. If you want to use plain flour instead of self raising, you will need to add 2 tsp baking powder to the recipe. If you would like to make this cake in different size tins, please check my Conversion Guide to find out how to adjust the recipe: https://thebakingexplorer.com/ingredients-conversions/ I hope that helps!
Jody
I have used the conversion for my two 9inch tins. Will I have to bake for longer seeing as the ingredients have been slightly increased? Also, once the sponges have cooled slightly, can I pop them in the fridge to cook quicker? Would it also be a good idea to put the frosting in the fridge for a while before using? As I am going to fully ice my cake in between the two layers and all over with the buttercream on a turntable. Thanks
thebakingexplorer
Hi Jody, yes the baking time will be slightly longer as the cakes are larger in size. I don't usually recommend cooling cakes in the fridge as it can dry them out. Yes do keep the frosting in the fridge if you are not using it straight away, especially if it is a warm day. It will need to come back to room temp to be soft enough to pipe/spread when you are ready. Let me know if you have any other questions!
Aisha Ilyas
This was the BEST red velvet cake recipe I've ever tried! Moist, and the cream cheese frosting was just perfect. It wasn't too sweet or too cheesy either like other cream cheese frosting recipes I've tried. I will definitely be making this cake again the whole family loved it!
Aisha Ilyas
This was the BEST red velvet cake recipe I've ever tried! The whole family loved it. The cream cheeae frosting was heaven 🤤 fluffy and stable. It wasn't too sweet or too cheesy either. Just perfect and I'll definitely be making this again. Thank you Kat for such a delicious recipe!
susan
MY family liked it. I was personally hoping for a lighter texture, maybe next time I will beat the egg whites and incorporate. I honestly think it could have done with another Tablespoon of cocoa which I may also try next time. I Also added mini chocolate chips, I thought that was good. What I like about the recipe is that it's a red velvet cake recipe that doesn't use oil
thebakingexplorer
Hi Susan, I'm so glad your family liked the recipe. Wishing you well with your future adaptions 🙂
Sharon Thompson
Hi, I wonder if you know how deep the layers come out with this recipe please?
thebakingexplorer
Hi Sharon, they are quite deep, I use a tin that is 2 inches deep to bake each layer. I hope that helps!
Sophy
Mine turned out quite dark colour, more like a chocolate cake. Did I use too much cocoa? Recipe didn't say level, so I went with heaped. Any advice?
thebakingexplorer
Hi Sophy, it does sound like you used too much cocoa powder. A tbsp measurement should always be levelled (unless otherwise stated), if you heap the spoon you are adding more than a tbsp. It is also best to use proper measuring spoons, and not the kind of tablespoon you eat soup with for example. It could also be related to the food colouring you used, I recommend using a professional grade colouring. Brands I use regularly are Pro Gel and Sugarflair. I hope that helps!
Katie
This turned our perfectly, moist, tender and the most gorgeous flavour!
thebakingexplorer
Thank you Katie! That is so lovely to hear 🙂
Julie Holloway
Made Red Velvet cake for my Great Neice Ruby's birthday ....had rave reviews from the family and the Birthday Girl! It was the most straightforward of 4 recipes I looked at so wod throughly recommend. I used a tablespoon of RedSquire paste ...cake mixture was bright red but was less so after baking. Thanks for sharing all your amazing recipes Kat.
thebakingexplorer
I'm so happy to hear it went down well! I've not heard of RedSquire, my favourite for red velvet cake is Sugarflair's Red Extra paste.
sian
This turned out beautiful both taste and texture, best recipe I've tried. I followed the recipe but need to make a 12" cake. I've used the converter and increased the mixture by 2.25. My tin is 12 x 4 round. I was planning to put all the mixture in 1 tin and increase cooking time will this be ok and any idea how much I should increase the cooking time and is the oven temperature the same? The cake is for a wedding.
thebakingexplorer
Hi Sian, I'm so happy you liked it! I wouldn't advise doing the whole cake in one tin, especially if you've increased the mixture so much. It will be very hard to get such a large and deep mixture to bake evenly. I would advise doing it in seperate batches or more than one tin. I hope that helps!
Sian
Thank you so much for coming back to me. If I mix half of the 12” mixture and put it in the 12x4” tin do you think that would work?
Natalie
If I don't have the nozzle or piping bags, would I be able to spread the frosting on the top and middle of the cake instead?
Sara
Just wanted to say this is THE BEST red velvet recipe. I get SOOO many compliments when I make it. Everyone loves it.
Kay
Hi, I am making the 10inch cake and not sure about the eggs if I multiply by the 1.56 like it says I get 6.24 eggs.
But looking at the egg conversion chart it says 10 so I have confused myself.
thebakingexplorer
Hi Kay, yes you're right it's 6 eggs to make a 10". I'll add a note to the conversion chart as the egg section only applies to my cakes that have 3 eggs per layer. Red velvet cake is a bit different and has less. Sorry about any confusion caused!
Patricia
The best and easiest Red Velver Cake. I have made it already 3 times for one of my daughte's friends and it's always a smash hit
Ella
Fab!! Can I freeze this cake?? If so for how long?
thebakingexplorer
Hi Ella, yes you can freeze it, check the post above there's a paragraph of details all about freezing it 🙂
Isha Mehrab
Wow what a crowd pleaser!!!! I don’t even like RVC and the only baking I’ve done is making fairy cakes!
The method was so easy to follow and all in all a great looking cake and great taste too.
I made it the night before and placed in the fridge for an office work party. It was all good.
The only red velvet cake I’ve had was gritty which is probably why I don’t like RV. But the feedback I got was that it was NOT gritty at all.
I was told the cake was not too sweet which everyone was so amazed about. Everyone loved it! Ppl even went for seconds.
This was my first time attempting a cake and that being a red velvet cake.
Thanks sooo much!!!
thebakingexplorer
Thank you so much for such lovely feedback! I'm so pleased it was enjoyed so much by everyone!
Jacqueline Ramjee
Very good moist and tasty cake. It had good height such that the two layers could have each been cut in two to give four layers if you wished. The cream cheese frosting wasn't too sweet and even worked well with plant based Philadelphia. I also replaced the buttermilk with soya milk plus a squeeze of lemon. It's great to find a recipe where everything worked.
thebakingexplorer
Thank you so much for your lovely feedback! I'm so pleased to know the frosting worked well with the plant based cream cheese.
Angela B
Hi, do you not need to add cider vinegar ?? most recipes I have looked at add vinegar to the bicarb and then add it to the cake .
thebakingexplorer
Hi Angela, the purpose of the vinegar in traditional red velvet cake was to make the cake turn red as it, along with the buttermilk, reacted with the cocoa powder to make the cake go red. However nowadays, as we use red food colouring to get a much brighter red shade, it is not necessary.
Caroline
Hi, my son would like a football cake for his birthday but it has to be red velvet. I have the sphere tins 6 inch (only used once and was vic sponge). Could I use the above recipe adapted for 6inch round (think sphere tins are 3inch deep). Or would it not work?
Many thanks
thebakingexplorer
Hi Caroline, yes provided you adjust the amounts to suit the tin sizes I cannot see a reason why it wouldn't work. Do let me know how it goes!
Margaret
Love this cake made it for my granddaughter’s 16th birthday. Would definitely recommend it. Thanks.
Charlotte Verrinder
Fantastic recipe, lovely and moist and a great red colour using Sugarflair red extra. I have been using this recipe for Red velvet cake for the last few years for my boys birthdays and will be again for ones 18th next week. It has become the birthday cake of choice and gets great compliments about it too.
A nice easy recipe with brilliant results thank you so much for sharing.
Amanda
Hi there,
Could you tell me how much Sugarflair Red Extra you use to get a nice bold red colour please?
Thank you
Amanda
Hi there,
I have some Sugarflair red extra colouring which is pretty good. Do you know how much I should use for this recipe please?
Thanks for your help.
thebakingexplorer
Hi Amanda, oh yes that is definitely the best colouring to use, I use it too. It's hard to measure it but I usually add around 2 tsp. You can always add more if needed. I hope you enjoy the cake!
Amanda
That’s great. Thank you. I will let you know how it goes 😊
Sally De Garis
HI
would this amount of butter cream be enough to cover the whole cake!
Angela Barnett
does it matter what brand of cocoa I use? when i have tried red velvet before it always comes out brown even though I use red extra. thanks
thebakingexplorer
Hi Angela, I just use regular cocoa powder from the supermarket. You might just need to use more of the food colouring, red is one of the hardest colours to get when baking so you do need to add quite a lot.
Louise
Turned out brilliant.
Will make this cake again, everyone loved it 😻
H
Hey, love your recipes and this one looks soo good!!! How can you turn this recipe into a pink velvet cake? Do you just use Pink food colouring instead? Or do you have to use less cocoa powder?
and also how would i change the frosting so that there is enough to spread between layers AND ontop AND the sides and have enough to maybe do a little piping for decorations?
thebakingexplorer
Hi, thank you! Yes for pink velvet I would remove the cocoa powder entirely and use pink food colouring. For the frosting I would increase it by 50% to cover the sides as well. The amount in the recipe is enough for the middle, top and decorations. Let me know if you have any other questions!